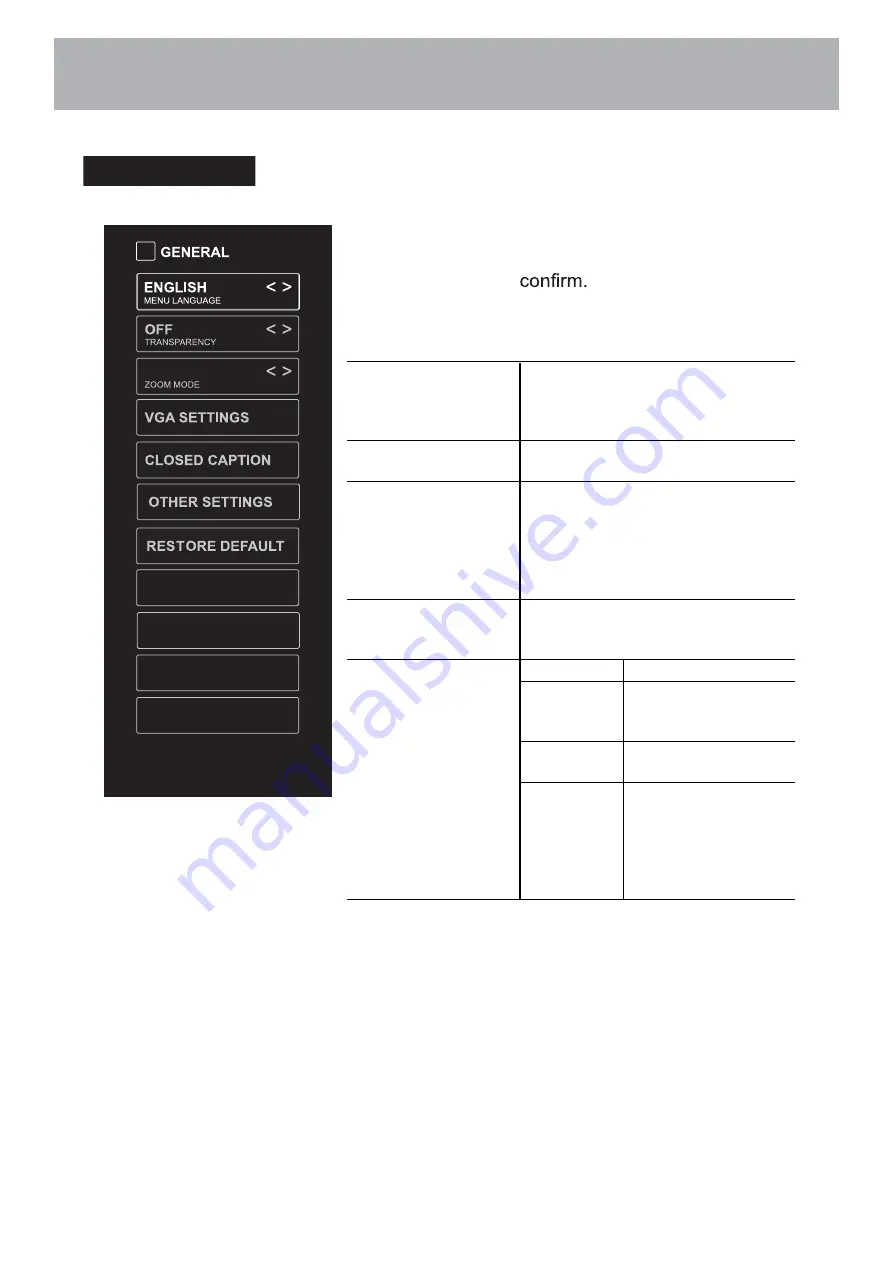
Bolva 58SVL19 User Manual Download Page 22

General

•  Press 

MENU

 to display the main interface, then 

use the

 Arrow 

buttons to highlight 

TV Settings


and press 

OK

 to 

 Use the

 Arrow 

buttons 

to  cycle  among  different  options  and  select 

General

 to enter and adjust each option setting.  

MENU LANGUAGE

Select the menu language among 

English, Français or Español. The 

default on-screen menu language is 

English.

TRANSPARENCY

Select to turn On/Off transparency 

function.

ZOOM MODE

Select zoom mode:

Wide/Wide Zoom/Zoom/Standard/

Just Scan(at HDMI mode)/Dot by 

Dot(at VGA mode).

Note: With a different input source,

the zoom mode options may differ.

VGA SETTINGS

Adjust advanced option’s setting: 

H-POS, V-POS, Clock, Phase or 

Auto. (only available in VGA mode)

CLOSED CAPTION

CC mode

On/Off/CC on Mute.

Basic 

Selection

CC1, CC2, CC3, 

CC4, TEXT1, TEXT2, 

TEXT3, TEXT4,OFF.

Advanced 

Selection

Service1/Service2.../

Service6/OFF.

Option

Mode, Font Style, 

Font Size, Font Edge 

Style, Font Edge 

Color, FG_ Color, 

BG_ Color, FG_

Opacity, BG_Opacity.

WIDE

Software Update(USB)

View End-User License

Software Update(Network)

Software Information

Customizing TV Settings

20

Summary of Contents for 58SVL19

Page 1: ...USER S MANUAL For technical assistance or troubleshooting please call 1 866 594 5445 or visit www bolvadigital com 58SVL19 58 4K ULTRA HD TELEVISION...

Page 2: ......

Page 3: ...g this apparatus during lightning storms or when unused for long periods of time damaged in any way such as power supply cord or plug is damaged liquid has been spilled or objects have fallen into the...

Page 4: ...f The type of power supply to your home consult your electronics retailer or local power company 6 Power Cord Polarization This TV is equipped with a three wire grounding type plug a plug with a third...

Page 5: ...e care should be taken to keep from touching such power lines or circuits as contact with them might be fatal 11 Overloading 12 Object and Liquid Entry Never push objects of any kind into this TV thro...

Page 6: ...r or an experienced radio TV technician for assistance authority to operate the equipment guarantee that interference will not occur in a particular installation If this television does cause interfer...

Page 7: ...structions 1 Table of Contents 5 Introduction 6 Installing the Base 7 Remote Control Battery Install 8 Overview 9 TV Overview Front Panel 10 Rear Panel 12 11 Connecting External Devices 13 Customizing...

Page 8: ...i w k o o b n o i t c u r t s n i s i h T s n o i t c n u f d n a s e r u t a e f t u o b a s n o i t s e u q e v a h u o y r e v e n e h w e d i u g s i h t o t r e f e r e s a e l P you up and runni...

Page 9: ...face down on a soft cloth or cushion Position base as shown Insert 4 screws provided through the holes in the bottom of the base into the post holes and tighten securely Do not over tighten Installing...

Page 10: ...or an extended period of time Do not mix batteries of different age and or type Always discard used batteries safely Do not expose the remote control to liquids direct sun light or sources of excessiv...

Page 11: ...wide zoom zoom Just Scan HDMI Dot by Dot VGA 14 VOL Adjust the volume 15 CH Select the channel 16 TV Into the TV channel 17 Start playback or pause 18 Reverse playback rapidly 19 Advance playback rap...

Page 12: ...ust the volume up or down Front Rear Panel 1 POWER Press the POWER button to turn the TV ON OFF power The screen image will appear within a few seconds and the LED will turn on 5 INPUT After connectin...

Page 13: ...8 EARPHONE Connect a stereo headphone for private listening 3 RJ45 RJ45 plug for connecting to external modem or network access equipment 5 VGA For PC display 6 PC AUDIO Connect it to the audio outpu...

Page 14: ...Connecting External Devices 2 1...

Page 15: ...the power cord to the power socket after you have completed all the physical connections At this stage the TV will enter Standby Mode and the red LED indicator will illuminate In Standby Mode press t...

Page 16: ...te control or TV keypad to select the network scan type SCANNING CHANNELS Connecting your TV to the Internet will let you use great services like Netflix stream TV shows and movies etc ARE YOU SURE Cu...

Page 17: ...to select the channel Press the 0 9 buttons on the remote control to select the channel directly Press 4 and then press OK button to select channel 4 Press 4 and 5 and then press OK button to select c...

Page 18: ...on to view Or press the hotkey on the remote control to enter the desired APP directly Customizing TV Settings 6 1 Facebook is an American online social media and social networking service company bas...

Page 19: ...OTOS option and press OK then it will jump to the inserted drive press OK to enter After entering PHOTOS use the Arrow buttons to select the picture and press OK to enter Press MENU button to display...

Page 20: ...he video use the Arrow buttons to select the desire video then press the to display When the video is playing the video function bar will be displayed Use the Arrow buttons to select the desired funct...

Page 21: ...on the remote control to display the main interface Then use the Arrow buttons to highlight TV Settings and press OK to enter Then use the Arrow buttons to cycle among the following options and select...

Page 22: ...mode Wide Wide Zoom Zoom Standard Just Scan at HDMI mode Dot by Dot at VGA mode Note With a different input source the zoom mode options may differ VGA SETTINGS Adjust advanced option s setting H POS...

Page 23: ...are Update In the case of a USB device VIEW END USER LICENSE Choose I have read the user agreement to select Accept or Decline SOFTWARE UPDATE NETWORK Software Update In the case of a NETWORK device S...

Page 24: ...n levels COLOR TEMPERATURE Cycle among color temperatures Normal Warm COOL ADVANCED OPTION Set the following options Noise Reduction Reduce the noise level of the connected device OFF WEAK MEDIUM STRO...

Page 25: ...nguage among English French Spanish Press MENU to display the main interface then use the Arrow buttons to highlight TV Settings and press OK to Use the Arrow buttons to cycle among different options...

Page 26: ...Hide the selected channel CHANNEL NUMBER Display the current channel number CHANNEL LABEL Display the current channel label Press MENU to display the main interface then use the Arrow buttons to high...

Page 27: ...a period of time after which the TV automatically switches to standby mode Off 5 10 180 240 min Alternative You may press the SLEEP button repeatedly to select the number of minutes directly OSD TIME...

Page 28: ...EM LOCK Select to turn On Off system lock The following options USA Canada RRT Setting and Reset RRT will only be accessible when you turn the system lock on USA TV TV RATING Press OK button to lock o...

Page 29: ...t each option setting APP Settings DEACTIVATE APP Deactivate and clear the account information DEACTIVATE APP Deactivate Vudu and clear the account information Terminate Netflix Quit Netflix ESN Elect...

Page 30: ...suitable for children over 7 may contain fantasy violence scenes TV G General Audience Considered suitable for all audience children may watch unattended TV PG Parental Guidance Suggested Suggested un...

Page 31: ...9 480p 720p 1080i 1080p 2160p 3840x2160 180 5000 1 178 178 16 7M 160 W 2 x 8W Composite Video Y Pb Pr HDMI 3 2 CABLE ANTENNA Optical Earphone RJ45 VGA PC AUDIO USB Weight may vary 10 _ 29 51 5 W x 30...

Page 32: ...efault settings See page 20 Cannot use certain functions If the item chosen in a menu is shown in gray text that item cannot be selected in the current input No sound Check that connected audio cables...

Page 33: ...hase For technical support visit our website www bolvadigital com or call the BOLVA Technical Support Center for technical assistance or troubleshooting at 1 866 594 5445 Monday to Saturday 10 00AM to...

Page 34: ......

Page 35: ......

Page 36: ......

Reviews: