background image

7

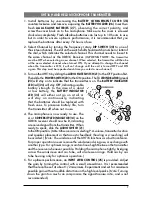
1. Install  batteries  by  unscrewing  the 

BATTERY. COMPARTMENT. COVER. (28).

....

counterclockwise and remove, exposing the 

BATTERY.HOLDER.(26)

. Insert two 

    fresh 

AA. ALKALINE. BATTERIES. (27)

,  observing  the  correct  polarity,  and   

    screw the cover back on to the microphone. Make sure the cover is screwed 

    clockwise completely. Fresh alkaline batteries can last up to 10 hours in use, 

    but in order to ensure optimum performance, it is recommended that you 

    replace the batteries after every 7-8 hours of use.
2. Select Channel by turning the frequency rotary 

DIP.SWITCH.(20)

 to one of 

       the sixteen channels. The slot on the switch shaft should match a number or letter of 

    the dial, which indicates the selected channel. This channel needs to be set to   

     the  same  channel  as  the  UDR16  Receiver. 

(IMPORTANT  NOTE:  The  transmitter 

     must be OFF when selecting a new channel. When selected, the transmitter will then be 

    at the new selected channel when turned ON. If you attempt to change the channel 

      when the transmitter is ON, it will not change until the unit is turned OFF and ON 

      again. This step must be repeated each time you select a new channel.)

3. Turn on the UHT16 by sliding the 

AUDIO.MUTE.SWITCH.(21)

 to the OFF position first. 

    Then slide the 

POWER.SWITCH.(22)

 to the ON position. The TX 

LED.INDICATOR.

(green) 

....(23)

 will stay on to indicate that the transmitter is on. The 

BATTERY.INDICATOR.

.......LED.

(red)

.(24)

 will stay OFF, indicating usable 

     battery  strength.  In  the  case  of  a  dead 

   or  low  battery,  the 

BATTERY. INDICATOR.

. . . LED. (24)

  will  either  not  go  on  at  all  or 

    will  stay  on  continuously,  indicating 

      that the batteries should be replaced with 

     fresh ones. To preserve battery life, turn

    the transmitter off when not in use.
4. The microphone is now ready to use. The 

      A or B 

DIVERSITY.LED.INDICATOR.(14)

 on the  

      UDR16 receiver should now be lit, indicating 

      a received signal from the transmitter. When  

     ready to speak, slide the 

AUDIO.SWITCH.(21).

..........

to the ON position. 

(Note: Observe care in selecting P.A. volume, transmitter location 

     and speaker placement so that acoustic feedback (howling or screeching) will  

      be avoided.) (Note:  The windscreen of the UHT16 functions as a built-in antenna. 

      For proper operation, never remove the windscreen during use, or exchange with 

      another type. For optimum range, maintain line-of-sight between the transmitter 

     and the receiver whenever possible. Holding the microphone tightly, bridging 

    across the windscreen and mic tube, will also lessen range. Hold mic by mic 

    tube housing only for optimum operation.)

5. For optimum performance, an 

INPUT.LEVEL.CONTROL.(25)

 is provided. Adjust 

   the gain by turning the control with a small screwdriver. It is recommended 

    that the level be set at about 1/2 maximum. Experiment and set for maximum 

     possible gain without audible distortion on the high level peaks. 

(Note: Turning 

   down the gain too much can compromise the signal-to-noise ratio, and is not   

    recommended.)


UHT16.HANDHELD.MICROPHONE.TRANSMITTER

24 23

21

22

20

28

25

26

27

Summary of Contents for UDMS16BP

Page 1: ...INSTRUCTION MANUAL ...

Page 2: ...tures and is the best performance and price value available in UHF PLL Synthesized wireless systems INTRODUCTION This manual lists the features of the UDMS16BP HH Wireless System and takes you step by step through operation of the system After reading the receiver instructions turn to the section of the booklet that covers the type of transmitter used with your new system Each section will give yo...

Page 3: ... MIC TRANSMITTER Sleek metal housing with internal antenna for optimum aesthetics and durable long life Uni directional neodymium dynamic cartridge for optimum true sound maximum feedback rejection and minimal handling noise Frequency rotary DIP switch with 16 user selectable channels Audio mute switch allows convenient audio muting with the transmitter ON Easily accessible level adjustment for op...

Page 4: ...always best to maintain a line of sight no obstructions between the receiver antennas and the transmitter at all times whenever possible 4 Mute Squelch Adjustment In normal operation the SQUELCH CONTROL 6 should be set fully clockwise to the factory preset RF level Max Sens However in areas of high RF activity the squelch or mute may need to be adjusted to compensate for the adverse conditions in ...

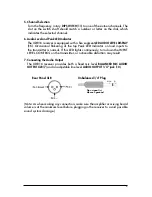
Page 5: ...r on loud inputs to the transmitter is normal If this LED lights continuously turn down the INPUT LEVEL CONTROL on the transmitter or noticeable distortion may result 7 Connecting the Audio Output The UDR16 receiver provides both a fixed mic level BALANCED MIC AUDIO OUTPUT XLR 7 and an adjustable line level AUDIO OUTPUT 1 4 jack 10 Tip signal Sleeve ground Rear Panel XLR Unbalanced 1 4 Plug Note A...

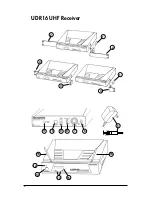
Page 6: ...6 1 2 3 5 6 7 8 9 10 11 12 13 14 15 2 1 4 4 16 16 UDR16 UHF Receiver ...

Page 7: ...ed 24 will stay OFF indicating usable battery strength In the case of a dead or low battery the battery indicator LED 24 will either not go on at all or will stay on continuously indicating that the batteries should be replaced with fresh ones To preserve battery life turn the transmitter off when not in use 4 The microphone is now ready to use The A or B DIVERSITY LED INDICATOR 14 on the UDR16 re...

Page 8: ...ttempt to change the channel when the transmitter is ON it will not change until the unit is turned OFF and ON again This step must be repeated each time you select a new channel 4 Turn on the UBP16 by sliding the AUDIO MUTE SWITCH 34 to the OFF position first then slide the POWER SWITCH 36 to the ON position The bi color LED indicator 35 will stay ON green indicating usable battery strength and t...

Page 9: ...ctly in front of the mic Also mics that are farther from the sound source such as lavalieres require more acoustic gain and thus are more prone to feedback than close source mics such as handheld models that are used close to the mouth For optimum performance an INPUT LEVEL CONTROL 38 is provided Adjust the gain by turning the control with a small screwdriver For lavaliere mic use it is recommende...

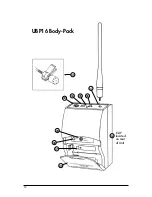
Page 10: ...10 40 32 31 38 30 33 34 35 36 37 39 CLIP located on rear of Unit UBP16 Body Pack ...

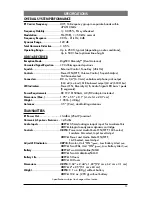
Page 11: ...ments Power Requirements DC 19V 500mA AC DC adapter included Dimensions Max 1 75 x 5 5 x 8 1 4 4 x 14 x 20 7 cm Weight 1 05 lb 48 kg Antennas 3 5 9 cm dual folding antennas TRANSMITTERS RF Power Out 14dBm 25mW nominal Harmonic Spurious Emissions 45 dBc Audio Inputs UBP16 3 5mm locking mini jack input for Lavaliere Mic UHT16 Integral neodymium dynamic cartridge Controls UBP16 Power and Audio Mute O...

Page 12: ... S SOLE AND EXCLUSIVE REMEDY BOGEN MAKES NO OTHER WARRANTIES OF ANY KIND EITHER EXPRESS OR IMPLIED AND ALL IMPLIED WARRANTIES OF MERCHANT ABILITY OR FITNESS FOR A PARTICULAR PURPOSE ARE HEREBY DISCLAIMED AND EXCLUDED TO THE MAXIMUM EXTENT ALLOWABLE BY LAW Bogen s liability arising out of the manufacture sale or supplying of products or their use or disposition whether based upon warranty contract ...

Reviews: