background image

BST800

Page  14

Safety and Maintenance

•  Make sure all nuts, bolts, and screws are tightened prior to use.

•  Be sure that all adjustment locking devices and safety devices are properly engaged prior to use!

•  Never over-tighten the above-mentioned devices and parts to avoid damage to the unit.

•  Check for loose parts and components and make proper adjustments prior to use.

•  Check to see if there are any tears or bends in the welding or metal prior to use. If tears or bends are found,  

DO NOT use the unit and contact our CUSTOMER SUPPORT.

• 

Extreme care must be taken to not allow your feet, fingers, hair, clothing, and/or any loose items to be snagged into 

any portion of the bike when the unit is in motion. Failure to follow these instructions could result in serious injury, 

including the loss of fingers.

•  Always wait for the pedals and other moving parts (which can gain great momentum during riding) to come to a  

complete stop before dismounting the unit to avoid serious injury.

•  Please review all safety instructions and warnings in this entire Owner’s Manual, as well as any safety/warning labels 

affixed to the product before use.

• 

To avoid rust or corrosion to the flywheel caused by moisture and sweat, we advise wiping and drying the flywheel 

and surrounding parts with a dry absorbent towel after each workout session.

•  Do not use solvent cleaners. If you are in any doubt, do not use your cleansing product and contact CUSTOMER 

SUPPORT.

•  For any replacement warning labels, please contact our CUSTOMER SUPPORT at 


1 (888) 266-6789

 or 

1 (909) 598-9876

,  or mail in a written request to: 


Body Flex Sports, Inc. 

21717 Ferrero Parkway 

Walnut, CA 91789 


More detailed information about how to reach our CUSTOMER SUPPORT may be found on Page 2 of the  

Owner’s Manual under the “CUSTOMER SUPPORT” section.

Safety & Warning

Maintenance & Care

Summary of Contents for Body Power BST800 StepTrac

Page 1: ...BST800 STEPTRAC ELLIPTICAL STEPPER WORKOUT TRAINER WITH CURVE CRANK TECHNOLOGY OWNER S MANUAL This product is intended for indoor home use only and is not to be used in a commercial setting ...

Page 2: ...This page is left blank intentionally ...

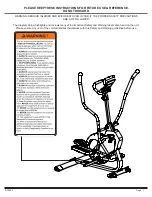
Page 3: ...NJURIES AND EVEN DEATH CAN OCCUR IF THE PROPER SAFETY PRECAUTIONS ARE NOT FOLLOWED The diagram below highlights and reviews many of the important Safety and Warning labels also found on the unit Please ensure any user of the unit familiarizes themselves with this Safety and Warning guidelines before use ...

Page 4: ...he proper operation of the equipment and to warn them of the potential hazards If at any time during exercise you feel faint dizzy or experience pain stop and consult your physician Your product is intended for use in clean dry conditions You should avoid storage in excessively cold or damp places as this may lead to corrosion and other related problems If you have any questions concerning the ass...

Page 5: ...ectly and to make sure all parts are attached correctly and firmly tightened when the assembly process is complete 6 Parts that are not tightened correctly will seem loose and can cause irritating noises and will cause damage to the equipment Tools Required For Assembly WARNING PLEASE NOTE Many of the parts and hardwares listed on the parts list are already pre assembled or installed on the unit T...

Page 6: ... 46 Crank Cover 47 Monitor 48 Sensor 49 Magnet 51 Tension Controller 52 Magnet 53 Fly Wheel Axle 54 Handle Bar Axle 55 Left Pedal Hinge Bolt 56 Right Pedal Hinge Bolt 57 Crank Axle Description 58 Left Crank 59 Right Crank 60 Fly Wheel 61 Bearing 6004zz 62 Bearing 6000zz 63 Bearing 6200z 64 Bolt M6x55 mm 65 Spring 66 Tool S13 17 19 67 Tool S5 68 Tool S6 69 Tool S8 70 Pop Pin M8x50 mm 71 Tool S13 14...

Page 7: ...the parts and hardware that will be used during the assembly process Not all of the parts and hardware you see here will be used while you are assembling the machine because some of these items are already pre installed Please use this page only as a reference guide for parts and hardware PLEASE NOTE ...

Page 8: ... S8 1 pc 67 Tool S5 2 pcs 71 Tool S13 14 15 1 pc 2 pcs 88 Arc Washer M8 12 pcs 97 Spring Washer M8 11 pcs 105 Bolt M8x25 mm 2 pcs 106 Bolt M8x42 mm 4 pcs 112 Bolt M8x45 mm 8 pcs 111 Screw ST4 2x15 mm 2 pcs 77 Screw M5x8 mm 4 pcs pre assembled 72 Nylon Nut M8 12 pcs 24 Wheel 2 pcs 70 Pop pin M8x50 mm 1 pc 79 Bolt φ10x11xM8x12 mm 2 pcs 100 Bolt φ10x30xM8x12 mm 2 pcs 80 Bolt φ10x11xM8x15 mm 2 pcs 81 ...

Page 9: ...106 two Arc Washers 88 two Nylon Nuts 72 from the front And two Bolts 112 two Repeat the above the process on the right side of the machine Arc Washers 88 two Nylon Nuts 72 from the rear NOTE BEFORE STARTING THE ASSEMBLY PROCESS To avoid misalignment due to over tightening please do not use a wrench and use only hand tightening for now to ensure easy assembly Wrench tightening should be performed ...

Page 10: ...rning CLOCKWISE Then secure with a Spring Washer 96 and a Left Nylon Nut 94 Align and attach the Left Pedal Tube 05 to the Left Crank 58 Insert the Left Pedal Hinge Bolt 55 through a Wave Washer 102 Left Pedal Tube 05 and Left Crank 58 Attach Left Pedal 21 to the Left Pedal Tube 05 secure with two Hex Bolts 81 and two Nylon Nuts 72 Repeat the above process on the right side of the machine Attach t...

Page 11: ...bricant Attach two Wavy Washers 102 Left Coupler Bar 03 and Right Coupler Bar 04 to the Main Frame 01 via the Handlebar Axle 54 Again use WD40 or Vaseline to reduce friction if needed Once the Left Coupler Bar 03 and Right Coupler Bar 04 are correctly situated fasten the end of the Handlebar Axle 54 with a D Shape Washer 101 a Washer 103 a Spring Washer 97 and a Bolt 78 on each side Attach Connect...

Page 12: ...Carriage Bolts 84 two Arc Washers 88 and two Nuts 85 Repeat the above process on the right side of the machine Attach the Front Handle Bar 11 to the Front Post 02 secure with two Bolts 105 Hardware Required 88 Arc Washer M8 4 pcs 105 Bolt M8x25 mm 2 pcs 84 Carriage Bolt M8x40 mm 4 pcs 85 Nut M8 4 pcs ...

Page 13: ...m 1 pc Remove the four Screws 77 that are pre assembled on the back of the Monitor 47 set them aside nearby After using please insert the Pop Pin 70 to the holes on the left Connection Joint 14 and Left Slide Rail 07 THE ASSEMBLY PROCESS IS NOW COMPLETE However for your own safety please make sure to read this entire Owner s Manual which includes safety instructions and warnings as well as any saf...

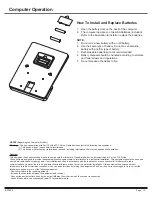
Page 14: ...PEED Displays current speed DISTANCE Displays the distance traveled CALORIES Displays the amount of calories burned ODOMETER Displays total accumulated distance PULSE Hold the pulse sensor 6 7seconds and read your heart rate per minute 1 If the display is faint or shows no figures please replace the batteries 2 The monitor will automatically shut off if there is no signal received after 4 minutes ...

Page 15: ...articular installation If this equipment does cause harmful interference to radio or television reception which can be determined by turning the equipment off and on the user is encouraged to try to correct the interference by one or more of the following measures Reorient or relocate the receiving antenna Increase the separation between the equipment and receiver Connect the equipment into an out...

Page 16: ...ait for the pedals and other moving parts which can gain great momentum during riding to come to a complete stop before dismounting the unit to avoid serious injury Please review all safety instructions and warnings in this entire Owner s Manual as well as any safety warning labels affixed to the product before use To avoid rust or corrosion to the flywheel caused by moisture and sweat we advise w...

Page 17: ... toward your body as you tuck your chin and arch your back upward 2 Return to the starting position slowly 1 Sit with your leg extended and bend your right knee as you cross your right leg over your left leg Your right foot of your extended leg foot should be flat on the floor alongside your left knee 2 Place your left arm on the outside of your right leg and pull against that leg while twisting y...

Page 18: ...a support with your left hand 2 Flex your right leg behind you grasp your ankle or foot with your right hand and pull your foot toward your buttocks Keep your back straight and right knee pointed down Repeat on the other leg 1 Place both hands against a wall to aid your balance Press the ball of your left foot against the wall and keep the heel of the same foot rested on the floor make sure your l...

Page 19: ...This page is left blank intentionally ...

Page 20: ...elow and keep this manual along with your sales receipt as proof of purchase Serial Number Date of Purchase Retailer Body Flex Sports Inc 21717 Ferrero Parkway Walnut CA 91789 Phone 1 888 266 6789 Fax 1 909 598 6707 Email info bodyflexsports com Ver 07 30 2019 Printed in China ...

Reviews: