Page 24
SECTION IV: INSTALLATION (cont.)
VENT & COMBUSTION AIR INTAKE (cont.)
Note:
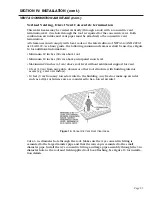
Do not allow insulation or other materials to
accumulate inside pipe assembly when installing
through the roof.
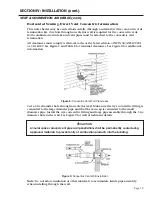
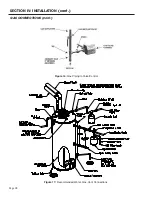
Install the rain cap and small pipe assembly into
the wye concentric fitting and large pipe assembly.
Ensure small diameter pipe is bottomed and
cemented in wye concentric fitting. Complete
indoor piping runs and connect piping to the
water heater. See Figure 11, 3" pipe systems, for
connection details. Piping must be sufficiently
supported. At minimum, it is recommended that
a support is placed along the vent or air intake
piping every 4 feet. For additional information,
see installation instructions supplied with
concentric vent kit. For vertical venting, the
condensate drain kit must be installed to the
exhaust adapter.
Assembling Vent and Air Intake Joints
WARNING
Cements and primers are highly flammable. Assemble joints in an adequately
ventilated area away from heat sources or open flames. Do not smoke.
Read cautions and warnings on material containers.
CAUTION
DO NOT use cement that is lumpy or thick. DO NOT thin cement.
Connections (i.e. joints) between plastic pipe and fittings must be properly sealed. This
requires that an appropriate primer (cleaner) and cement (solvent) are used for the type of
material (PVC, CPVC, ABS) that is used in the venting system. For PVC use ASTM D2564
grade cement, for CPVC use ASTM F493 grade cement, and for ABS use ASTM D2235 grade
cement. The following steps should be taken when connecting plastic pipe and fittings:
• Cut pipe square with hand saw and remove burrs from inside and outside edges.
• Clean fitting socket and pipe joint area of all dirt, grease, or moisture.
• Check dry fit. Pipe should easily go 1/3 of the way into the fitting socket.
• Liberally apply primer to inside of fitting socket and pipe joint area.
䊱
!
䊱
!
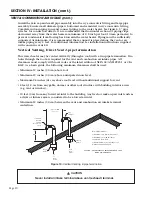
Figure 15:
Concentric Vent Roof Installation


