background image


19 


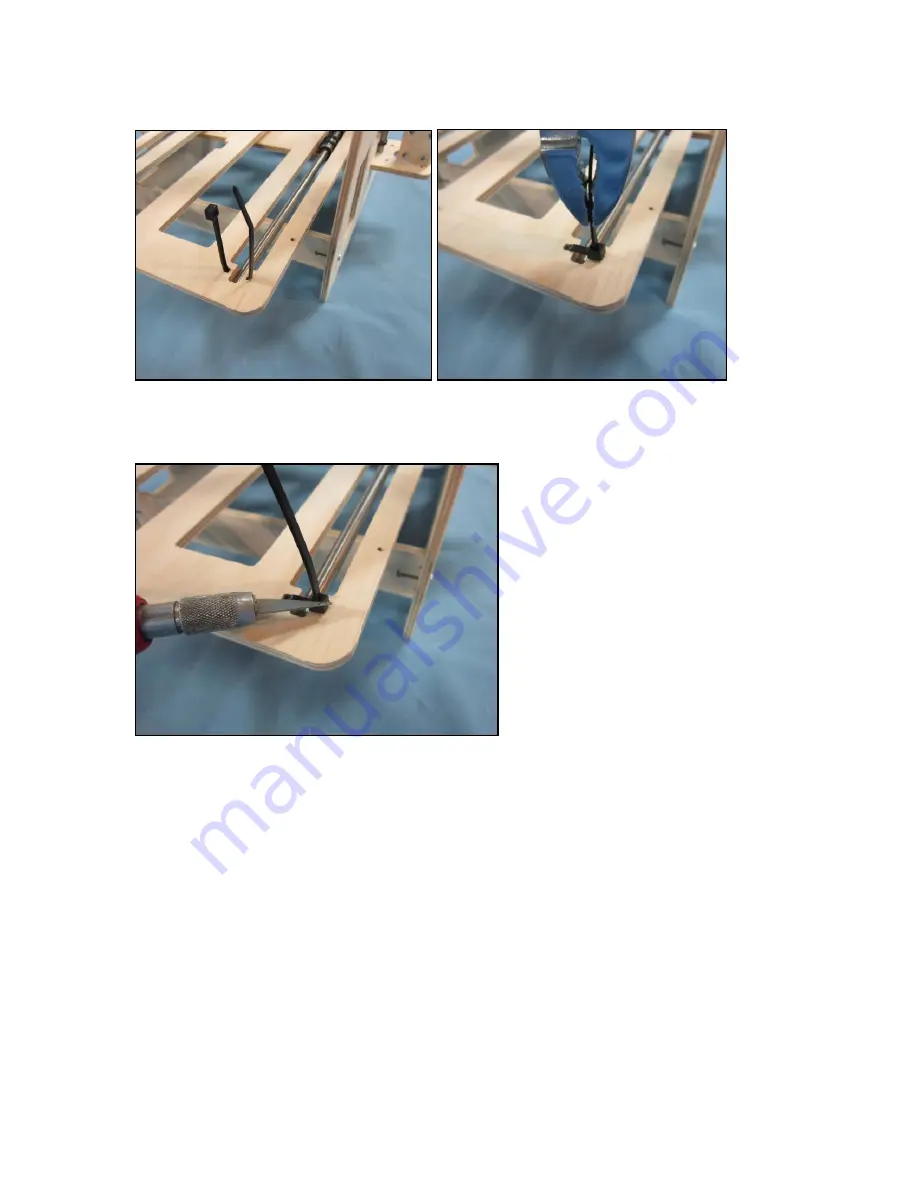
5. Wrap the bottom of the rods by inserting large nylon ties through the side opposite of 
the rod into the slotted holes of the extruder mount. 
6. Pull the rods snug against the frame (use pliers if needed). 


7. Cut off the excess of the nylon ties. 


Summary of Contents for RP8

Page 1: ...RP9 Assembly Instructions ...

Page 2: ...on Stepper motors 23 Limit Switches 25 Adding The String Drive 26 Tying the knots Uni knot 27 X string Drive 27 Y String Drive 29 Adding the Extruder 31 Build Platform Assembly 33 Connecting the Controller 34 Ramps1 4 Connections 34 _Toc403068513 Filament Spool Holder 36 Initial Controller Setup 37 Arduino 2560 Firmware settings 37 Power supply 38 First print quick guide 39 Appendix 42 Warranty an...

Page 3: ...esponsibility Always use the proper protective equipment and safety sense when building or operating a 3D printer Printers have high voltage power supply and extruder operating temperatures can be over 200 degrees Celsius The operator should understand the hazards before operating a printer Required tools Please browse through the instructions and get familiar with the steps before you begin To pu...

Page 4: ...s to measure motion distance and extrusion width calibration block STP file Building the Printer We recommend a large working surface for assembling the printer The plywood may require some minor sanding and can be painted stained or finished for a different look Extruder Assembly Parts for the extruder mount assembly include A 1 Extruder mount B 1 Extruder lock C 1 Extruder spacer D 3 M3 x 20 mac...

Page 5: ...ng large nylon ties through the side opposite of the bearing into the slotted holes of the extruder mount 3 Pull the bearing snug against the extruder mount use pliers if needed 4 Cut off the excess of the nylon tie For a clean look and string clearance insert the nylon straps first in the inboard holes ...

Page 6: ... wire slot 6 Pull the wires through and re coil them to keep them out of the way and undamaged 7 Insert a M3 x 20 screw from the extruder side into the middle mounting hole 8 Place the extruder through the extruder plywood mount 9 Install the extruder spacer with the cut groove facing down M3 x20 ...

Page 7: ... into the holes 12 Install the 3 nuts and tighten Y Sub assembly Parts for the Y sub assembly include A 1 Left mount B 2 Bearing holders C 1 Extruder assembly D 1 M3 x 16 machine screw E 1 Right mount F 4 M3 x 20 machine screws G 6 M3 nuts H V groove bearing 623VV I 2 LM8UU bearings J 12 Large nylon ties K 2 8mm rods A B B E H ...

Page 8: ... bearing holders 2 Wrap the bearings by inserting large nylon ties through the side opposite of the bearing into the slotted holes of the bearing holders 3 Pull the bearing snug against the bearing holders use pliers if needed 4 Cut off the excess of the nylon tie ...

Page 9: ...M3 x 16 machine screw 6 Tighten the nut 7 Install the screw and bearing through the top of the right mount through the bearing mounting hole 8 Install and tighten the nut The bearing should rotate freely once installed Bearing mounting hole TOP TOP ...

Page 10: ...s on the bearing holders 10 Assemble the left and right mounts to the bearing holders with 2 M3 x20 machine screw 11 tighten the screws Note orientation is important The bearing center should line up with the hole on the left and right mounts ...

Page 11: ...n Note that the nylon tie under the Y limit switch slots will be installed differently 14 For 7 of the nylon ties wrap the rods by inserting large nylon ties through the side opposite of the rods into the slotted holes of the left and right mounts 15 Pull the rods snug against the left and right mounts use pliers if needed 16 Cut off the excess of the nylon tie ...

Page 12: ...on tie through the same side as the rod into the remaining slotted holes of the left mount 18 Pull the rod snug against the left mount use pliers if needed 19 Cut off the excess of the nylon tie The extruder assembly should slide on the 8mm rods freely ...

Page 13: ...s 1 Place the bearings in the u shaped slots of the cross member 2 Wrap the bearings by inserting large nylon ties through the side opposite of the bearing into the slotted holes of the bearing holders 3 Pull the bearing snug against the extruder mount use pliers if needed 4 Cut off the excess of the nylon tie ...

Page 14: ...n of three parts is important Indicator marks on the frame should be at the back facing inward The middle stepper mount should be closer to the left frame 1 Properly orient and insert x sub assembly into the left and right frame 2 Press with pliers or tap the 8 M3 nuts into the slots the handle of the screw drive works well 3 Insert the top and bottom plywood braces into the slots 4 Install and ti...

Page 15: ...s travel 1 Place the Y assembly into the frame 2 Insert the rods through the Y assembly and position them into the holes of the cross member at the bottom and u shaped slots at the top of the frame 2 Wrap the top of the rods by inserting large nylon ties through same side as the rod into the slotted holes of the extruder mount 3 Pull the rods snug against the frame use pliers if needed 4 Cut off t...

Page 16: ...st the frame use pliers if needed 7 Cut off the excess of the nylon ties The Y assembly should slide on the 8mm rods freely Z Rod Assembly Parts for the Z rod assembly include 1 Frame assembly 2 1 4 20 threaded rods 4 Coupler halves 8 M3 x 20 machine screws 8 M3 nuts The orientation of the coupler is important The larger slots are paired and connected to the threaded rod ...

Page 17: ...s into the larger coupler slots 2 Connect the coupler halves with 4 M3 x20 screws and nuts 3 Only snug up the screws they will be tightened in a later step 6 Insert both of the coupler assemblies into the threaded inserts on the Y assembly ...

Page 18: ... M3 nuts Note orientation The string holder is mounted on bottom on the front and it is mounted on top in the rear The cut groove in the string holder mates with the bed mount 1 Install the string stops into the bed mount using 2 M3 x 16 machine screws 2 Install the M3 nuts and tighten 2 Insert the rods into the bearings on the cross member and install the bed B A A ...

Page 19: ...of the rods by inserting large nylon ties through the side opposite of the rod into the slotted holes of the extruder mount 6 Pull the rods snug against the frame use pliers if needed 7 Cut off the excess of the nylon ties ...

Page 20: ...e tube J 1 Filament guide tube nut K 1 Large washer L 2 M3 x16 machine screws M 1 Small washer N 1 M3 nut O 2 M3 x 20 machine screws P 2 O rings 1 Insert the M3 x 16 through the extruder arm 2 Install the small washer on the screw 3 Install the bearing on the screw 4 Install the nut on the screw and tighten 5 Press the nylon washer into the extruder arm 6 Insert the big washer onto the M3 x 16 mac...

Page 21: ...extruder drive wheel and adjust the height so that the bearing is centered on the knurled part of the wheel Tighten the extruder drive wheel with the Allen wrench 10 Thread the filament guide nut onto the filament guide tube so that 10 to 12 mm is through 11 Insert the tube and nut into the front plate groove 12 Stack the mid plate on the backing plate and insert the M3 x16 ...

Page 22: ...ide tube so that it is close to the drive wheel without touching it Adding the Electronics Controller Assembly Parts for the Ramps A 1 Frame assembly B 1 Controller assembly 1 Arduino 1 Ramps1 4 4 Stepper drivers C 4 Small nylon ties Snug up board against the frame until if is firm Do not over tighten the ties as this will damage the control board ...

Page 23: ...control board up against the frame 5 Cut off the excess of the nylon tie Motion Stepper motors The minimum lengths of wire for the stepper motors are X Stepper 125 mm Y Stepper 584 mm ZRight Stepper 305 mm ZLeft Stepper 330 mm E Stepper 520 mm Parts for the motion stepper motors A 1 Frame assembly B 4 Stepper motors C 2 threaded couplers x y stepper motors D 1 X stepper spacer E 4 M3 x 15 x steppe...

Page 24: ...so that the Allen key is flat against the top of the Y assembly 6 Set the height of the X threaded coupler so that it is approximately 1 mm less than the round spacer thickness This will give the build platform clearance 4 Install and tighten both of the Z stepper motors 4 M3 x10 mm machine screws 5 Tighten the 8 coupler machine screws so that the gap is even and parallel on both sides If the Z st...

Page 25: ...ne screws E 4 M2 5 nuts F 1 small nylon tie 1 Insert the small nylon tie through the Y limit switch long wires hole loop around the rod and back up through the second limit switch hole 2 Tighten the nylon tie and cut off the excess 3 Place the Z Limit switch long wires on the left frame near the top with 2 M2 5 x16 screws and nuts 5 Tighten the nuts ...

Page 26: ...crews and nuts 5 Tighten the nuts Adding The String Drive Parts for the string drive assembly include A 1 X drive string assembly shorter B 1 Y drive string assembly longer C 4 large nylon ties The kit includes 2 sets of tied string The instruction for tying the knot has been added for reference ...

Page 27: ... tag end and tighten the knot The tied length of the string from one nylon tie to the other is X string L 330 350 mm Y string L 690 710 mm X string Drive 1 Place a large nylon tie into behind the string holder then thread the large tie connected to the string through the string holder into the loose nylon tie 2 Push the bed to the rear stop making the coupler closer to the nylon tie 3 Push the nyl...

Page 28: ...older and the loose nylon tie 6 Snug up the string and slide the bed back and forth to ensure that the sting rides in the threads of the coupler with full travel threads will move up as the bed moves rearward 7 If needed adjust the string moving it up or down the threaded coupler 8 Tighten the sting by pushing the nylon tie into the string holder 9 Cut off the excess of the nylon ties ...

Page 29: ...ge nylon tie with the string attached into the bottom slot on the left side of the extruder 3 Move the extruder to the left stop and push the nylon tie connected to the string into the string holder until the nylon tie is no longer touching the threaded coupler 4 Wrap the string around the threaded coupler 3 to 4 times close to the bottom of the threaded coupler ...

Page 30: ... top slot on the right side of the extruder 7 Snug up the string and slide the extruder back and forth to ensure that the sting rides in the threads of the coupler with full travel with nylon tie clearance 8 If needed adjust the string moving it up or down the threaded coupler 9 Tighten the string by pushing the nylon tie into the extruder slots 10 Cut off the excess of the nylon ties ...

Page 31: ...rts Adding the Extruder Parts for adding the extruder include D 1 Frame assembly E 1 Extruder assembly F 1 SMC connector G 2 M3 X 16 machine screws H 2 M3 Nuts The SMC fitting will release the tube if the blue ring is push into the fitting as the tube is gently pulled This allows for quick filament changes ...

Page 32: ...32 1 Press the 2 M3 nuts into the right mounts 2 Insert and tighten 2 M3 X16 machine screws 3 Insert the SMC into the top of the extruder 4 Insert the tube into the SMC ...

Page 33: ...nd Spacers C 4 M3 X 20 machine screws D 4 M3 Nuts The Build platform has counter bored holes These holes should be facing up 1 Place the 4 spacers over the holes in the bed mount 2 Insert 4 M3 X 20 machine screws through the build platform spacers then bed mount 3 Install and tighten the 4 M3 Nuts ...

Page 34: ...nently damage the board If you are unsure about the connection the internet is a good resource and has a great deal of information on the Ramps1 4 The connections are A Main Power supply F Z max limit switch B Extruder power G Extruder sensor C Extruder stepper motor H X stepper motor D X min limit switch I Y stepper motor E Y min limit switch J Z stepper motors ...

Page 35: ...on ties included in the kit to secure the wires Several sets of wires will need clearance to move with the Y assembly They included the Extruder and Y stepper motor wires Y and Z limit switch wires The Extruder heater and sensor wires The 2 extruder sensor wire routes to the front Below are pictures of typical wire routing ...

Page 36: ...Spool leg C 1 Spool support The reel holder is designed to quickly change spools of filament The groove in the top of the spool support should be oriented to the outside for to ensure spool clearance with the frame 1 Insert the spool support into the right frame and spool leg rectangular slots ...

Page 37: ...oard using the Arduino software that can be downloaded at http arduino cc en main software There are several good choices in firmware Repetier is a good choice and can be located at http www repetier com It includes the software and firmware for a complete package The firmware will need to be configured Good starting values are X Velocity 100 mm s Y Velocity 100 mm s Z Velocity 4 5 mm s E Velocity...

Page 38: ... 4096 Temperature Sensor 7 Power supply The Power supply will need to be connected correctly to avoid possible damage to the controller board Check polarity with a multimeter and follow the controllers recommendations The power supply should be rated at 6 to 8 Amps at 12VDC 1 Correctly connect the 4 terminals to the Ramps 1 4 Connector terminal ...

Page 39: ...ppers make sure the move in the correct direction The diagram has arrows showing the positive axis directions If the motors move in the incorrect direction it can be changed with a firmware setting or turning the stepper motor connectors 180 degrees The power must be removed before stepper motor connectors can be removed to avoid damage to the controller board Loading the 1 75 mm filament 1 Insert...

Page 40: ...imit switches do not function troubleshoot the switches using the M119 code 2 Set the firmware for Z max length to 210 mm 3 Use the G0 Z20 command to move the printer close to the bed 4 Slowly move the Z axis close to the bed Use a gage or business card to get the right side of the bed the set distance to the nozzle business card is around 0 35 mm thick 5 Once you get the set height for the left s...

Page 41: ...rmware for the Z max length 9 Home the Z axis and use the G0 Z0 35 command to verify 10 Download a file and print a part Tips and tricks Isopropyl alcohol to clean blue painters tape to ensure first layer sticking First layer is key Experiment to learn what is the best layer height Different colors will have different printing characteristics The string drive may loosen as the knots pull tight Sim...

Page 42: ... of the printing parameters and therefore results may vary The assembly calibration and understanding of these parameters requires technical and mechanical proficiency Please review the instruction manual and this return policy prior to purchase as there can be no refund for a kit that has been attempted to be assembled or assembled fully Return Shipping Damage Bobs CNC will not be liable for any ...

Page 43: ...3 X16 Machine Screws 21 1 4 2 4 2 M3 X20 Machine Screws 21 3 4 8 8 2 4 M3 Nuts 36 3 6 8 8 4 1 2 4 1 4 20 Inserts 2 2 1 4 20 Threaded Rods 2 2 LM8UU Bearings 8 2 2 4 V groove Bearing 1 1 Drive Bearing 1 1 Large Nylon Ties 55 4 1 2 8 4 4 8 1 5 Small Nylon Ties 25 4 1 2 0 8 mm Drill Rod 6 2 2 2 Extruder Guide Tube 1 1 Nylon Bushing 1 1 O rings 4 2 2 Large Washer 1 1 Small Washer 1 1 Extruder Tube Nut...

Page 44: ...epper motors can be found in many online stores The extruder stepper should rated holding torque of 5 5Kg cm 76 oz in Other stepper motors can be less but could reduce performance Search for printer stepper motors The feedstock drive wheel needs to fit a 5 mm shaft and knurling bottom diameter of 6 mm Search online for feedstock drive wheel The Arduino Ramps1 4 and A4988 stepper drives with heat s...

Reviews: