


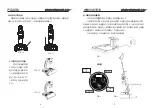


Fig.1
Fig.2
INSTALLATION FOR THE BODY AND THE CLEAN WATER TANK
Turn the lid of clean water tank counterclockwise as shown in Fig.3, and then fill the clean
water tank with pure water as shown in Fig.4. The water level must not exceed the
maximum water level marked on the clean water tank. And then turn the lid of clean water
tank clockwise as shown in Fig.5 to tighten it. After finish filling water, make the tank lid
downwards and then insert the clean water tank into the corresponding position of the
body as shown in Fig.6. There is a fastener inside the body, and the clean water tank is
installed well in position after you hearing a sound of "click" (see Fig.7) .
Fig.3
Fig.4
Fig.5
Fig.6
Fig.7
INSTALLATION FOR THE BODY AND THE DIRTY WATER TANK
Insert the dirty water tank into the corresponding position of the body as shown in Fig.8.
There is a fastener at the dirty water tank, and the dirty water tank is installed well in
position after you hearing a sound of "click" (see Fig.9) .
Fig.8
Fig.9
INSTALLATION FOR THE ROLLER BRUSH
Insert the roller brush into the corresponding position at the floor brush as shown in Fig.10.
There is a fastener at the floor brush, and the roller brush is installed well in position after
you hearing a sound of "click" (see Fig.11) .
Fig.10
Fig.11
7
8
INSTALI ATION OF THE APPLIANCE
INSTALLATION FOR THE ROLLER BRUSH