background image


3. 

Installation menu


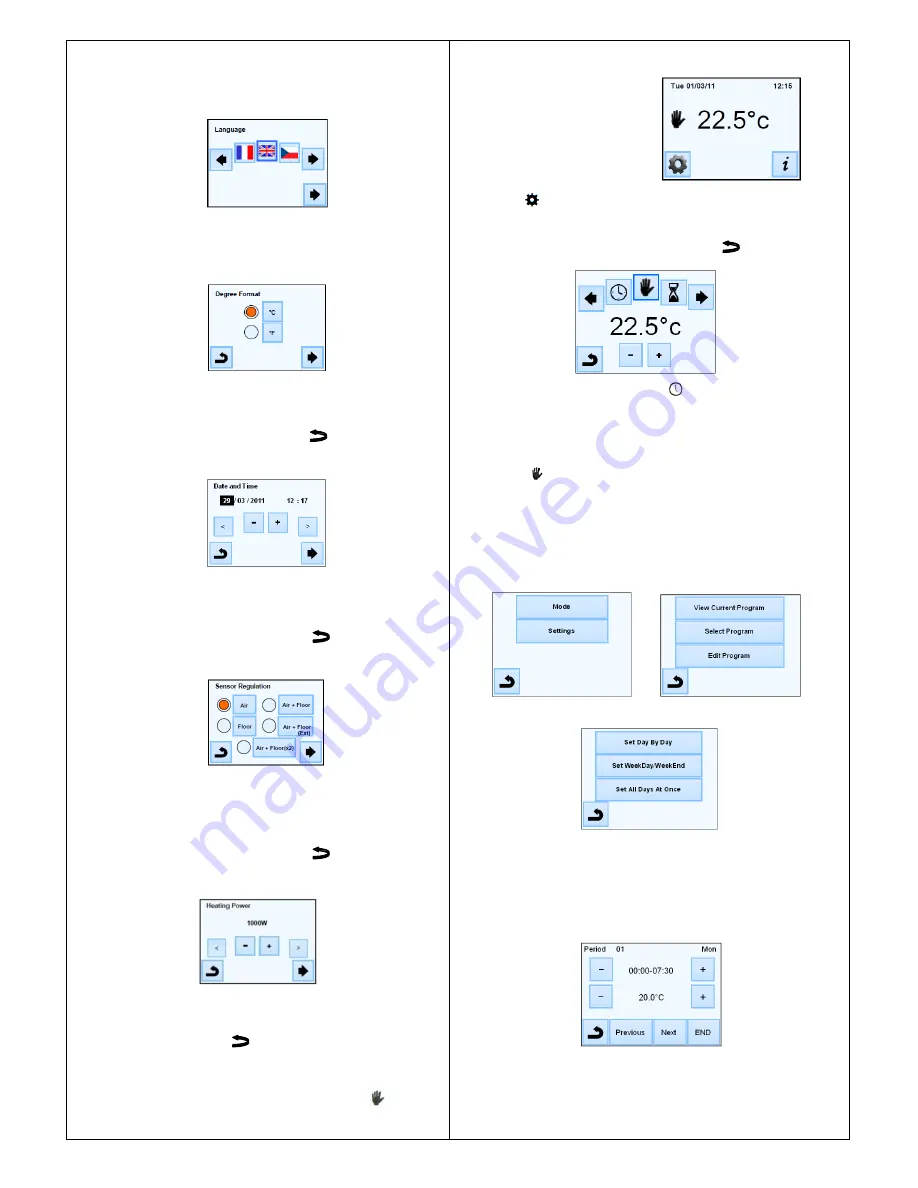
This section will guide you through setting up your thermostat for the first time. 

3.1.  Language


Press the 

(◄) 

or 

(►) 

keys near the flags to select the chosen 

language.  The active language is framed. 
Press the 

key in the bottom right corner to continue the settings of the installation. 

3.2.  Degree format


Select the degree format chosen by pressing on the touch button near the 
degrees.  The active option is coloured red 
Press the 

key in the bottom right corner to continue to the next part of the 

installation 

You can return to the previous menu by pressing the  

  key. 

3.3.  Date and Time


Select the time format 12H or 24H using the same method as above. 
Press the 

(◄) 

or 

(►) 

keys to activate the value to be modified. 

Each time a value is highlighted, it can be modified by pressing the (

+

) or (

-

) keys. 

Press the 

key in the bottom right corner to continue to the next part of the 

installation 
You can return to the previous menu by pressing the   

  key. 

3.4.  Sensor Regulation


Select the chosen sensor regulation by pressing on the touch button near the 
sensor  regulation possibilities 
The active touch is 
coloured red 
Press the 

key in the bottom right corner to continue to the next part of the 

installation 

You can return to the previous menu by pressing the   

 key. 

3.5. 

Heating power


Press the 

(◄) 

or 

(►) 

keys to select a unit, press the (+) or (-) keys to modify the 

heating power. 

This value is used to estimate the running cost of the system. You can return to 

the previous menu by pressing the  

 key. 

Press the 

key in the bottom right corner to continue. 


The main screen is displayed. 

The default working mode will automatically be set to manual mode. 


4.     Mode of operation


Main screen                             


How to change the current mode? 

Press  on  the 


key on  the  main  screen  and  then  press  on  the 

“Mode” button  to 

access to the operating modes. 

You can now press the 

(◄) or (►) keys to scroll and select a mode. 

The selected mode is framed, to select a mode press the   

  key to return to the 

main screen. 


4.1    Programmable mode  


In  this  mode  the  thermostat  will  follow  the  chosen  program  (Built-in  or  customized) 
according to the actual time 


You  can  temporarily  override  the  selected  program,  by  pressing  the  temperature 
displayed on the main screen. 

The small hand 


logo will be displayed when the override function is active.  To exit 

override mode, switch to manual then back to automatic mode 


You will have the choice between 4 built-in programs that 

can’t be modified and 3 user 

programs that you can customize. 


1-      How to customize  a user program 


Press  on  the 

“Mode”  button  then  on  “Edit  Program”  button  and  choose  a  user 

program. 


Then you will have to choose between 3 configurations: 


a-      Set day by day 


You will set a new program for each day.   
Automatically, the first day you will program is Monday. 
The minimum program step is 15 minutes. 
You will have to configure several periods. 
The first period begins at 00:00. Then, choose the end time period with the (+) and (-) 
keys and the temperature to be followed during this period. 


Press 

“Next” button to continue the program. The next period will start at the end of 

the last period. 
For all periods you will define, you have to choose the end period and the 
temperature. The last period stops at 24:00. Then press on the Next button.


Summary of Contents for T16C Series

Page 1: ... performance INSTALLATION INSTRUCTIONS INSTRUCTIONS FOR PROGRAMMABLE THERMOSTAT T16C Series PLEASE READ ALLTHESE INSTRUCTIONS NOTE THE SAFE OPERATIONAL REQUIREMENTS WARNINGS AND CAUTIONS USE THIS PRODUCT CORRECTLY AND WITH CARE FOR THE PURPOSE FOR WHICH IT IS INTENDED FAILURE TO DO SO MAY CAUSE DAMAGE AND OR PERSONAL INJURY AND WILL INVALIDATE THE WARRANTY See next page for wiring diagrams ...

Page 2: ...e thermostat against hot air currents coming up the conduit and into the thermostat Failure of the thermostat is not covered by the guarantee if it over heats At least one floor sensor must be used when using this thermostat with underfloor heating supplied and all floor sensors MUST be mounted alone in a separate conduit to avoid electrical interference Again seal this conduit to avoid hot therma...

Page 3: ...he sensors and the 230V connections under any circumstances Interchanging these connections may result in life endangering electrical hazards or the destruction of the appliance and the connected sensors and other appliances FIRST INSTALLATION Batteries inside the thermostat must be charged for at least 6 hours to reach maximum capacity to back up time 1 Product overview Touch screen programmable ...

Page 4: ...bottom right corner to continue The main screen is displayed The default working mode will automatically be set to manual mode 4 Mode of operation Main screen How to change the current mode Press on the key on the main screen and then press on the Mode button to access to the operating modes You can now press the or keys to scroll and select a mode The selected mode is framed to select a mode pres...

Page 5: ...play Screen Lock The logo will be displayed on the screen press on the key and then press 7 seconds on the logo 5 2 First heating This function should be used after installation to prevent your floor from getting damaged by its first heating cycles The first heating function works as follows Concrete 2 hours of operation during first 24 hours and 1 extra hour is added for the 21 subsequent days Du...

Page 6: ... Heating In new installations the heating must be progressive there are two first heating programs available depending on the finished floor covering In Installation Menu Regulation SmartStart Function that can be activated deactivated In program mode the positive steps will be anticipated according to the current temperature and the next set point 7 Technical characteristics Measured temperature ...

Page 7: ...et point It then works out how quickly the room is cooling down and turns the heating on before the set point is reached so trying to stop the room cooling down too much If you would rather the heating being turned on and off at the exact set point follow this guide which explains how to turn PID off 1 Viewing the main screen 2 Press settings icon 3 From new screen press Settings 4 From new screen...

Reviews: