background image

T.O. BMS1F-16CM-1 


 BMS 4.34 Change 2.00


BMS 4.34 Dash 1 
© Red Dog 2012-2019 


Page: 81 

1.4 MULTI FUNCTION DISPLAYS 


The MFDs are the two displays situated on the front dash featuring 20 pushbuttons and four rocker 
switches on each. Both displays are independent. MFDs are powered by the MFD switch on the 
AVIONICS POWER panel on the right side console.  
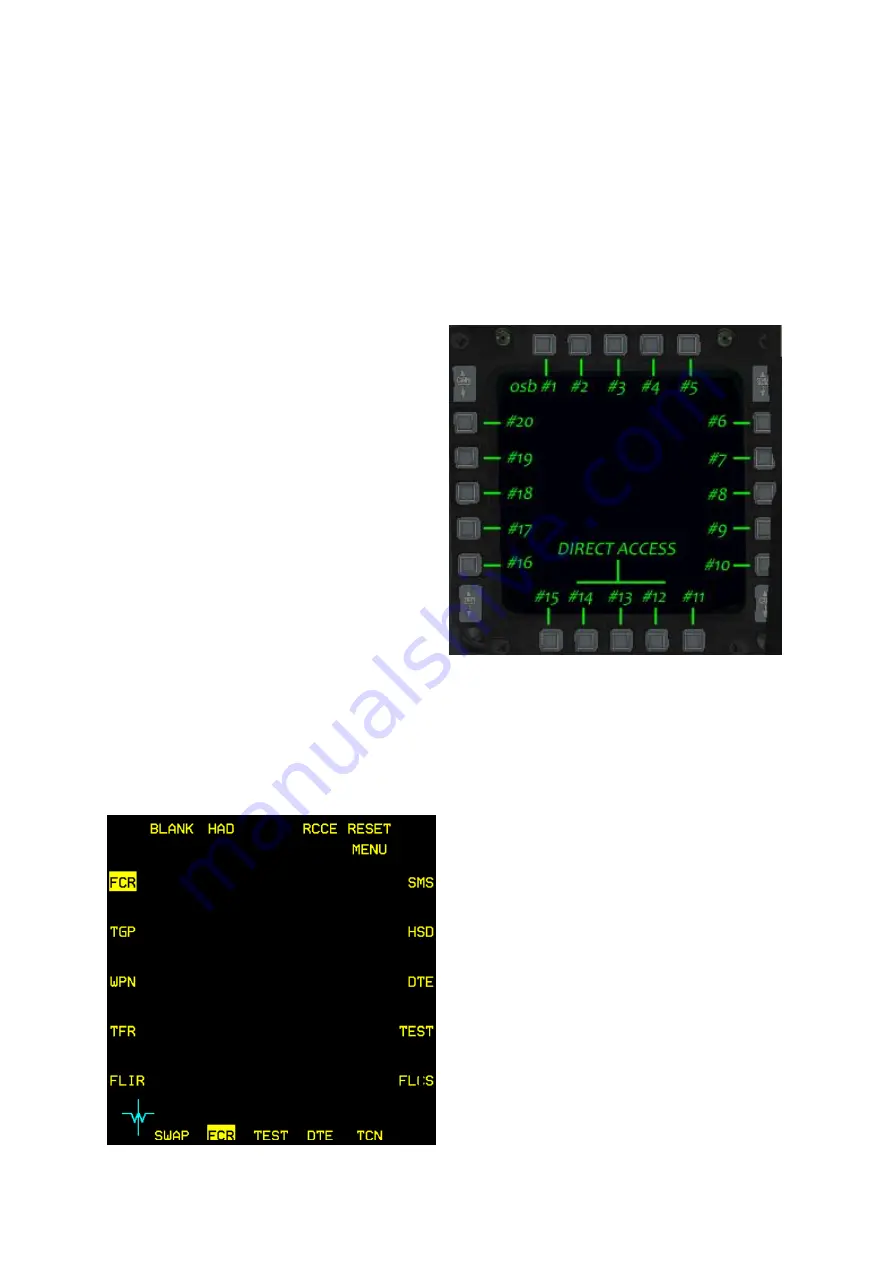
The push buttons are called Option Selection Buttons (OSB) and are numbered from 1 to 20, starting 
at the left button of the top row and moving clockwise to the top button of the left row.  
The function of the button changes according to the displayed page and the button’s legend is 
displayed next to the button.  
The top, left and right rows of buttons are 
typically assigned customized functions 
depending on the page being displayed. By 
contrast, the bottom row (OSB 11 to 15) operates 
more or less the same way regardless of page 
format:   


OSB #15 is always a SWAP button that 
will swap over the left and right displays. 
OSB #11 is usually a declutter option. 
The only page where OSB #11 is not 
used for declutter is the SMS page where 
OSB #11 selects the S-J (Selective 
Jettison) master mode.  


The three centre OSBs (#12, #13, #14) 
are Direct Access (DA) buttons and 
provide direct access to the DTC saved 
MFDs displays according to master 
mode. Up to three pages for each MFD 
may be assigned to the DA buttons for 
each master mode. The displayed page 
format has its DA mnemonic highlighted. These are easily toggled by pressing the 
corresponding direct access OSB button or they can be cycled even faster with the HOTAS 
buttons: DMS right for the right MFD and DMS left for the left MFD. Please note you cannot 
have the same page displayed on both MFDs at the same time, so if you try to display the 
FCR on the right MFD while it is already being displayed on the left MFD the FCR will simply 
be taken from the left MFD leaving an empty DA slot where it was originally assigned. 

1.4.1. Menu page 

Although it is advised to set the three most 
required MFD pages for each master mode in the 
DTC it is also possible to set them in the cockpit 
by modifying the direct access button setting, 
while the desired master mode is engaged.  
To do so, first set the desired master mode, then 
display the page you want to change (its 
mnemonic is highlighted). Press the DA button 
that is highlighted and the MFD displays the 
MENU page. From there simply select the new 
page you want to have accessible and the new 
page mnemonic appears on the direct access row, 
replacing the previous one. You can now easily 
toggle it with the DMS HOTAS button. 
As you can see from the left image, the default 
MFD colours changed on some aircraft in 4.34 
(though you can customise them with the Avionics 
Configurator). Note also the new entry: the backup 
TACAN page (see § 1.4.17 TACAN page). 

Summary of Contents for F-16C/D 4.34

Page 1: ...T O BMS1F 16CM 1 BMS 4 34 Change 2 00 BMS 4 34 Dash 1 Red Dog 2012 2019 Page 1 T O BMS1F 16CM 1 FLIGHT MANUAL Combatsimchecklist series F 16C D BMS 4 34 Block 50 and 52 23 March 2019 CHANGE 2 00 ...

Page 2: ...date 1 Added MFL analysis V1 05 published Sept 5th 2015 Added ILS section from BMS 4 32 Manual with relevant changes Added section IV Flight Characteristics V1 04 published August 9th 2015 Merged AAR section from BMS Manual V1 03 published July 13th 2015 Proof read and 4 33RC changes Updated pictures to reflect latest changes V1 02 published March 31st 2015 Proof read and 4 33RC changes V1 01 publ...

Page 3: ...lished by Benchmark Sims for use with licensed copies of Falcon 4 0 Unauthorized rental sales arcade use charging for use or any commercial use of this mod or part thereof is prohibited This mod is for non commercial use only This mod was created by Benchmark Sims with the permission of Billion Soft Hong Kong Limited This mod and all included content are in no way affiliated with Billion Soft Hong...

Page 4: ...RATION 11 1 1 THE AIRCRAFT 12 1 2 COCKPIT ARRANGEMENT 13 1 2 1 LEFT CONSOLE 15 1 2 1 1 TEST panel 16 1 2 1 2 FLT CONTROL Panel FLCP 17 1 2 1 3 MANUAL TRIM panel 18 1 2 1 4 FUEL panel 18 1 2 1 5 IFF panel 19 1 2 1 6 EXT LIGHTING panel 21 1 2 1 7 AVTR panel 22 1 2 1 8 ECM panel 22 1 2 1 9 ELEC panel 23 1 2 1 10 EPU panel 24 1 2 1 11 AUDIO 2 panel 25 1 2 1 12 AUDIO 1 panel 25 1 2 1 13 ENG JET START p...

Page 5: ...R SSC 55 1 2 5 3 HUD panel 57 1 2 5 4 NUCLEAR panel 58 1 2 5 5 ZEROIZE panel 58 1 2 5 6 VMS panel 58 1 2 5 7 Internal LIGHTING panel 59 1 2 5 8 AIR COND panel 59 1 2 5 9 KY 58 panel 60 1 2 5 10 ANTI ICE panel 60 1 2 5 11 AVIONICS POWER panel 60 1 2 5 12 OXYGEN REGULATOR panel 61 1 2 5 13 DTU panel 61 1 2 6 MISCELLANEOUS 62 1 2 6 1 NVG 62 1 2 6 2 HELMET VISOR 63 1 2 6 3 PILOT MODEL 63 1 3 UP FRONT ...

Page 6: ...Secondary SEC engine control 117 1 6 2 Exhaust nozzle 117 1 6 3 Engine Oil system 117 1 6 4 Engine Anti Ice system 117 1 6 5 Jet Fuel Starter JFS 117 1 6 6 Engine Warning Caution lights 118 1 6 7 Engine instruments 118 1 6 8 Throttle 118 1 6 9 Ground operations 119 1 7 FUEL SYSTEM 120 1 7 1 Fuel SHUTOFF valve 122 1 7 2 Fuel pumps 122 1 7 3 Fuel pressurisation 123 1 7 4 Fuel quantity indicating sys...

Page 7: ...INSTRUMENT LANDING SYSTEM 145 1 16 IDENTIFICATION FRIEND OR FOE IFF 150 1 16 1 IFF modes 150 1 16 2 Cockpit controls 151 1 16 3 IFF DTC Brief 151 1 16 4 How to use the IFF in flight 153 1 16 5 IFF use in backup mode 158 1 16 6 IFF in emergency 159 SECTION II NORMAL PROCEDURES 161 2 1 RAMP START IN 3 SWEEPS 162 1st Sweep Before starting the engine 162 2nd Sweep Starting engine systems 166 3rd Sweep...

Page 8: ...RGENCIES 210 3 6 1 ABORT REJECTED TAKEOFF 210 3 6 2 LG FAILS TO RETRACT 210 3 6 3 BLOWN TYRE ON TAKEOFF 211 3 7 IN FLIGHT EMERGENCIES 212 3 7 1 COCKPIT PRESSURE MALFUNCTIONS 212 3 7 2 EQUIP HOT CAUTION LIGHT 212 3 7 3 EJECTION 212 3 7 4 ELECTRICAL SYSTEM FAILURE 212 3 7 5 ENGINE MALFUNCTIONS 212 3 7 6 JETTISON 218 3 7 7 EGI In Flight Alignment IFI 219 3 7 8 Controllability Check 219 3 7 9 Out of C...

Page 9: ...T O BMS1F 16CM 1 BMS 4 34 Change 2 00 BMS 4 34 Dash 1 Red Dog 2012 2019 Page 9 4 4 5 Deep Stalls Recovery 229 4 5 OPERATING LIMITS RESTRICTIONS 231 5 BIBLIOGRAPHY 233 6 ACKNOWLEDGMENT 234 ...

Page 10: ...T O BMS1F 16CM 1 BMS 4 34 Change 2 00 BMS 4 34 Dash 1 Red Dog 2012 2019 Page 10 INTENTIONALLY LEFT BLANK ...

Page 11: ...T O BMS1F 16CM 1 BMS 4 34 Change 2 00 BMS 4 34 Dash 1 Red Dog 2012 2019 Page 11 SECTION I DESCRIPTION OPERATION ...

Page 12: ...lage A 2810 lbs And two reserve tanks fwd reservoir and aft reservoir each holding 480 lbs The two reserve fuselage tanks F A supply fuel directly to the engine The D model has a smaller front fuselage F fuel capacity because of the second cockpit 1890 vs 3250 lbs Fuselage fuel is therefore 4800 lbs and full internal fuel is 5900 lbs The F 16 can carry 3 external fuel tanks 2 wing tanks of 370 Gal...

Page 13: ...T O BMS1F 16CM 1 BMS 4 34 Change 2 00 BMS 4 34 Dash 1 Red Dog 2012 2019 Page 13 1 2 COCKPIT ARRANGEMENT ...

Page 14: ...e 3D button hotspot in the 3D cockpit and the mouse buttons Hotspots are displayed in the 3D cockpit with a change of cursor colour When your mouse cursor reaches a hotspot it turns green signalling the hotspot presence for the switch Usually moving the switch up is accomplished by depressing the left mouse button and moving it down is done with the right mouse button The same is true for push but...

Page 15: ...T O BMS1F 16CM 1 BMS 4 34 Change 2 00 BMS 4 34 Dash 1 Red Dog 2012 2019 Page 15 1 2 1 LEFT CONSOLE ...

Page 16: ...e total temperature probe heaters are on anytime the aircraft is airborne regardless of the TEST panel switch position The PROBEHEAT position allows the probes to be heated on the ground OFF de energizes all systems on the ground TEST on the ground and in flight performs a functional test of the PROBEHEAT monitoring system The PROBEHEAT caution light flashes for a successful test Failure of the PR...

Page 17: ... the FLCS standby gains activated on any FLCS fault see FLCS section Not all faults can be reset The MANUAL TF FLYUP switch is a two position toggle switch It allows you to disable or enable FLYUP protection in MANUAL TF Terrain Following mode Only aircraft fitted with the AN AAQ 13 navigation pod NVP part of the LANTIRN Low Altitude Navigation and Targeting Infrared for Night system will have Ter...

Page 18: ...n BMS when rudder trim is implemented and as a consequence you have no reference for the YAW TRIM position BMS Key Callbacks for the MAN TRIM panel SimTrimAPDisc toggle SimTrimAPDISC DISC switch position SimTrimAPNORM NORM switch position SimTrimNoseUp SimTrimNoseDown SimTrimRollLeft SimTrimRollRight SimTrimYawLeft SimTrimYawRight 1 2 1 4 FUEL panel The FUEL MASTER switch is guarded in MASTER posi...

Page 19: ...and set with the Mode 4 reply switch in backup mode In ZERO both code A and code B are erased from memory when the position is held for 2 seconds keys are also erased automatically upon shutdown In HOLD power off zeroing is temporarily disabled and the Mode 4 codes are saved The CNI knob allows the pilot to toggle between the BACKUP system and the UFC Up Front Controller The heart of the F 16 cock...

Page 20: ... distance between aircraft operating 63 TACAN channels apart The KC 10 also provides bearing information BMS Key Callbacks for the AUX COMMS panel SimIFFMasterOff SimIFFMasterStby SimIFFMasterLow SimIFFMasterNorm SimIFFMasterEmerg SimIFFMasterInc SimIFFMasterDec SimIFFCodeSwitchZero SimIFFCodeSwitchHold SimIFFEnableOff SimIFFEnableM1M3 SimIFFEnableM3MS SimIFFEnableInc SimIFFEnableDec SimIFFEnableC...

Page 21: ... FLASH STEADY switch is a two position toggle switch as well and is relevant only to the position lights wingtips and fuselage in BMS In FLASH the wingtip and fuselage lights flash at a set frequency In STEADY the lights remain on constantly In BMS the fuselage intake wingtips and tail position lights are considered a single entity and as such one switch drives them all In the cockpit both the WIN...

Page 22: ...doesn t move the switch as logic would dictate to ON but straight to EVENT MARK To move to record you still must left click with the switch on EVENT MARK to move the switch down to RECORD Normally a move down should be a right click So basically to record an ACMI with the mouse click twice with the left mouse button And to place it back to OFF click twice with the right mouse button Note that an o...

Page 23: ...or the FLCS has failed When the MAIN GEN indicator comes on it means that the main generator is not connected to the non essential AC buses In all likelihood the main generator has failed Likewise when the STBY GEN indicator light up it means that standby generator power is not available When the EPU GEN indicator light comes on it means the EPU has been commanded ON but the EPU generator is not p...

Page 24: ... the same time In other words the guard has no effect in BMS The EPU RUN green light comes on whenever the EPU turbine runs within the proper range and the EPU hydraulic pressure is above 2000 psi The top indicator is telling the pilot if the EPU runs on engine bleed air and or hydrazine When the yellow AIR indicator lights up bottom light the EPU is running on bleed air which is sufficient to mai...

Page 25: ...increases volume for the COMM1 radio UHF This control can be set through an analogue potentiometer via the advanced setup or with regular keystrokes The COMM1 mode knob has three position OFF SQL and GD In OFF squelch mode is disabled though squelch is not implemented in BMS In SQL the squelch mode is activated helping reduce background noise in normal operations In GD the main receiver and transm...

Page 26: ...osition to IDLE which starts the main engine as it does in the real jet In BMS this can also be done with the throttle detent key callback The JFS brake accumulator starts to recharge past 12 engine RPM with HYD B pressure and takes between 40 and 60 seconds to regain a full operating pressure charge The JFS automatically shuts down when the engine RPM passes 55 The switch then snaps back to OFF S...

Page 27: ... digit display In GRD the main receiver and transmitter are automatically tuned to the UHF guard frequency The channel knob selects one of the 19 presets available In BMS those presets are automatically set with the Falcon BMS cfg config line set g_bInitBUPfromDTC 1 By default the panel selects channel 6 but this is also configurable in the your callsign ini file COMMS section The tiny volume knob...

Page 28: ...sition this is also now visible in multiplayer BMS Key Callbacks for the MPO panel SimMPO SimMPOToggle 1 2 1 16 Throttle grip and left side wall The left sidewall has two important hotspots Hotspots are areas where the mouse turns into a selective zone where a switch can be clicked The first one is the canopy area Normally the canopy switch is hidden inside the left sidewall and protected with the...

Page 29: ...elease wrongly called idle detent in BMS 2 Comms switch L R IDM Up Down radio 3 MAN RNG knob 4 ANTENNA knob 5 DOGFIGHT MRM mode switch 6 SPEEDBRAKE switch 7 Cursors 8 HOBO switch not implemented in F4 Flying a simulator you can choose how you program your HOTAS We do advise you to use a program as close as possible to the real F 16 HOTAS The two following images illustrate the relationship between...

Page 30: ...T O BMS1F 16CM 1 BMS 4 34 Change 2 00 BMS 4 34 Dash 1 Red Dog 2012 2019 Page 30 ...

Page 31: ...T O BMS1F 16CM 1 BMS 4 34 Change 2 00 BMS 4 34 Dash 1 Red Dog 2012 2019 Page 31 1 2 2 LEFT AUXILIARY CONSOLE ...

Page 32: ...adar by default they are not With SEARCH enabled a SAM radar in search mode will display as an S well before you would expect to see its acquisition symbol if SEARCH was not enabled giving you an early warning in most cases With the SEARCH option not active the green S indicator on the TWA will blink at 4 Hz whenever the EWS detects a search radar painting the aircraft In that configuration S symb...

Page 33: ...STBY the release parameters and programming can be manually changed using the UFC It is the only mode allowing reprogramming The CMDS cannot release countermeasures in this mode MAN only programs 1 to 5 can be released manually by the pilot by using the CMS on the sidestick CMS forward releases whatever program is selected 1 to 4 through the PRGM knob Program 5 can also be released with the slap s...

Page 34: ...ggle SimEWSFlareOn SimEWSFlareOff SimEWSFlarePower toggle SimEWSO1On SimEWSO1Off SimEWSO1Power toggle SimEWSO2On SimEWSO2Off SimEWSO2Power toggle SimEWSModeOff SimEWSModeStby SimEWSModeMan SimEWSModeSemi SimEWSModeAuto SimEWSModeByp SimEWSPGMInc SimEWSPGMDec SimEWSProgOne SimEWSProgTwo SimEWSProgThree SimEWSProgFour SimEWSProgDec SimEWSProgInc SimEwsJett toggle SimEwsJettOff SimEwsJettOn 1 2 2 5 S...

Page 35: ...ly be considered procedural only When the hook is down the HOOK caution light located on the caution panel right aux is illuminated The LIGHTS LANDING TAXI light also has a specific shaped cap and operates the landing taxi lights The real jet has a three position switch because of the distinction made between the landing light and the taxi light In BMS we have no such distinction and the switch is...

Page 36: ...akes disengage automatically that s why it is a magnetic switch above 80 RPM There is no parking brake status indicator aside from the position of the switch The EMER STORES JETTISON when depressed for more than 1 second jettisons all A G stores and external fuel tanks A A weapons and any HTS TGP and ECM pods remain on board While the emergency jettison is depressed the MFD displays the SMS Jettis...

Page 37: ...T O BMS1F 16CM 1 BMS 4 34 Change 2 00 BMS 4 34 Dash 1 Red Dog 2012 2019 Page 37 1 2 3 CENTRE CONSOLE ...

Page 38: ...lling door closed No FLCS fault present AOA must be less than 15 DBU not engaged MPO switch not in OVRD ALT FLAPS not in EXTEND TRIM AP DISC switch not in DISC Stall Horn is silent When the autopilot is engaged and any of the above conditions are no longer met the autopilot disconnects automatically The PITCH switch then snaps back to the A P OFF position and a WARN message is displayed in the HUD...

Page 39: ...SafeMasterArm SimSimMasterArm SimMasterArmDown SimMasterArmUp SimPickle SimRFSwitch SimRFSwitchUp SimRFSwitchDown SimRFNorm SimRFQuiet SimRFSilent 1 2 3 2 Left EYEBROW The left eyebrow is made of a stack of pushbuttons and a stack of lights Only one pushbutton is implemented F ACK Depressing F ACK acknowledges or recalls faults on the PFL display on the right AUX console see RIGHT AUX section belo...

Page 40: ... is thus made up of OSB 1 to OSB 5 The displays have many different pages and subpages which are explained later in the MFD chapter As such the function of each button changes according to the active page and is always displayed just next to the button BMS Key Callbacks for the LEFT RIGHT MFDs SimCBEOSB_1L SimCBEOSB_1R SimCBEOSB_2L SimCBEOSB_2R SimCBEOSB_3L SimCBEOSB_3R SimCBEOSB_4L SimCBEOSB_4R S...

Page 41: ...les some declutter of the RWR display by displaying only the 5 most important symbols instead of the usual 12 symbols 16 when UNKNOWN mode is selected When the priority MODE button is depressed the RWR enters PRIORITY mode the top light comes on and the bottom light OPEN goes off as both lights are mutually exclusive When PRIORITY mode is enabled the top PRIORITY light will flash if the EWS detect...

Page 42: ...her information refer to the TO BMS1F 16CM 34 1 1 BMS Key Callbacks for the RWR SimRWRBrightnessUp SimRWRBrightnessDown 1 2 3 6 Left INDEXER The left indexer is made of three lights relevant to the Angle of Attack and is located to the left of the HUD It is a repeater of the AOA instrument on the centre console and the HUD AOA tape The AOA is sensed by two conical sensors on each side of the nose ...

Page 43: ...DSEQ SimDriftCO SimDriftCOOn SimDriftCOOff SimWarnReset SimSetWX SimFlirLevelUp SimFlirLevelDown SimBrtWheelUp SimBrtWheelDn SimSymWheelUp SimSymWheelDn SimHUDPower SimHUDOn SimHUDPOff SimRetUp SimRetDown 1 2 3 9 MACHMETER The Mach meter is a primary flight instrument giving indicated airspeed in both knots nautical miles per hour and Mach number The indicated airspeed is given by the outer needle...

Page 44: ... a vertically moving tape display indicating an operating range of 32 to approximately 32 The tape is colour coded from 9 to 17 to coincide with the colour coded symbols on the AOA indexer The instrument is flagged OFF when there is no power available 1 2 3 12 ADI The ADI Attitude Direction Indicator is the main attitude flight instrument and gives ownship attitude along pitch roll and yaw axis su...

Page 45: ...not displayed All HSI indicators point to the TACAN station The TO FROM indicator is displayed NAV the HSI displays course deviation and distance from the steerpoint of interest active UFC Steerpoint and not the TACAN The TO FROM indicator is displayed ILS NAV ILS symbology is displayed as in the other ILS mode in the HUD ADI and HSI The course deviation indicator on the HSI gives the localiser de...

Page 46: ...he total fuel on board The NORM position is the only position that enables the automatic forward fuel transfer system trapped fuel warning and BINGO fuel computation based on fuselage fuel RSVR AL and FR needles point to fuel quantity left in the aft and forward reservoir tanks The Totalizer displays the total fuel on board INT WING AL needle points to the fuel quantity remaining in the left inter...

Page 47: ...r e g Kunsan the beacons are not installed 1 2 3 18 FUEL FLOW indicator Located above the RIGHT MFD this gauge displays the current fuel flow being consumed by the engine including in Afterburner in pounds per hour pph The gauge has a range from 0 to 80000 pph and is powered by the emergency bus 1 2 3 19 Backup ADI The backup ADI is located above the RIGHT MFD and is the primary attitude backup in...

Page 48: ...000 psi During engine start the warning light usually goes off before reaching idle rpm however acceptable operation is indicated if the warning light goes off before exceeding 70 percent rpm and remains off when the throttle is retarded to idle FLCS DBU ON The middle light is also a split face indicator and refers to the FLCS and the Digital Backup DBU The FLCS warning light illuminates to indica...

Page 49: ... with the HYD OIL warning light lit you will need to shut down and restart the engine Pay attention to this dial during ramp start The NOZ POS indicator is a display of actual nozzle position ranging from 0 closed to 100 full open The indicator is powered by emergency buses The RPM indicator has a pointer display expressed in percent rpm from 0 110 on Ge129 engine or 0 100 for PW229 engine The ind...

Page 50: ...T O BMS1F 16CM 1 BMS 4 34 Change 2 00 BMS 4 34 Dash 1 Red Dog 2012 2019 Page 50 1 2 4 RIGHT AUXILIARY CONSOLE ...

Page 51: ...ay The Pilot Fault List Display PFLD is the same type of screen as the DED and provides a list of faults detected in aircraft systems mainly related to the FLCS engine and avionics The display is blank until a fault is detected The PFLD needs UFC power to work The fault list is acknowledged page by page by the pilot via the F ACK fault acknowledge button on the left glareshield The F ACK button al...

Page 52: ...plied by engine bleed air the caution light OXY LOW is replaced by the OBOGS caution light 1 2 4 7 EPU FUEL gauge The EPU gauge indicates the quantity of EPU fuel hydrazine remaining Hydrazine is used if insufficient engine bleed air is available for running the EPU The gauge displays the percentage of EPU fuel remaining and depletes fast when hydrazine is used In normal operations you have an EPU...

Page 53: ...T O BMS1F 16CM 1 BMS 4 34 Change 2 00 BMS 4 34 Dash 1 Red Dog 2012 2019 Page 53 1 2 5 RIGHT CONSOLE ...

Page 54: ...er the radar power is switched to OFF for more than 4 seconds and then back on A shorter Manual BIT lasting about 30 seconds can also be performed through the MFD TEST page OSB 19 FCR or by switching the FCR switch to OFF for less than 4 seconds and then back on The RDR ALT switch is a three position switch used to operate the radar altimeter With the switch in OFF the radar altimeter is inoperati...

Page 55: ...lightly clockwise Refer to the diagrams on the two following pages for the function of each button BMS Key Callbacks for the Sidestick SimTMSUp SimTMSDown SimTMSLeft SimTMSRight SimDMSUp SimDMSDown SimDMSLeft SimDMSRight SimCMSLeft SimCMSUp SimCMSDown SimCMSRight SimPinkySwitch SimHotasPinkyShift DX callback SimAPOverride SimTriggerFirstDetent SimTriggerSecondDetent SimMissileStep SimPickle AFAile...

Page 56: ...T O BMS1F 16CM 1 BMS 4 34 Change 2 00 BMS 4 34 Dash 1 Red Dog 2012 2019 Page 56 ...

Page 57: ...by bombing mode The CAS TAS GND SPD switch controls display of the speed scale on the left of the HUD When CAS is selected the speed tape shows the Calibrated Airspeed CAS is Indicated airspeed IAS corrected for position instrument error When TAS is selected the speed tape shows the True Airspeed TAS is CAS corrected for pressure altitude so it is the airspeed in the air mass at this altitude When...

Page 58: ...calesVVVAH SimScalesVAH SimScalesOff SimHUDScales SimHUDScalesDown SimHUDScalesUp SimHUDDEDDED SimHUDDEDPFL SimHUDDEDOff SimHUDDED SimHUDDEDDown SimHUDDEDUp 1 2 5 4 NUCLEAR panel Currently not implemented 1 2 5 5 ZEROIZE panel Currently not implemented 1 2 5 6 VMS panel The Voice Messaging System VMS panel includes a single toggle switch When placed in the INHIBIT position VMS will be inhibited Bi...

Page 59: ...onditioning cooling and pressurizing functions shut off meaning no cockpit pressurisation system cooling or external fuel tank pressurisation preventing fuel transfer from external tanks NORM the air conditioning system sets for automatic temperature and pressure regulation Cockpit and fuel tanks are pressurized and avionics are cooled DUMP cabin pressurisation is terminated and the cockpit is ven...

Page 60: ...seconds when it has heading information At that point the AUX yellow flag on the ADI disappears and a steady RDY is displayed in the HUD and DED Those are your visual cues for performing a short ramp procedure Full alignment takes approximately 4 minutes rather than the old 8 minutes with the INS At that point RDY flashes in the HUD and on the DED to indicate full alignment Once the EGI is ready s...

Page 61: ... SimMFDOn SimMFDOff SimUFCPower SimUFCOn SimUFCOff SimGPSPower SimGPSOn SimGPSOff SimDLPower SimDLOn SimDLOff SimMAPPower SimMAPOn SimMAPOff 1 2 5 12 OXYGEN REGULATOR panel The Oxygen panel is not implemented in BMS but the green lever can be used to toggle on or off the sounds of the pilot breathing through the oxygen mask BMS Key Callbacks for the Oxygen panel SimOxySupplyToggle SimOxySupplyOn S...

Page 62: ...em You will have to activate them with the relevant callback associated to a keystroke n by default it s a toggle so it can be easily activated or deactivated NVGs in BMS are restricting the pilot field of view and try to simulate tunnel vision The resolution of your main screen might impact the NVG as the DDS masks by default is made for 1920x1080 resolution If you use other screen resolution it ...

Page 63: ...re have to use the relevant new callback associated to a keystroke default ALT v which can be mapped to a spare HOTAS button to allow convenient access in flight BMS Key Callbacks for Visor SimVisorToggle 1 2 6 3 PILOT MODEL Before 4 34 the F 16 cockpit was empty Harpoon s popular pilot model has been added by default into the cockpit with two kneeboards where relevant dynamic flight information c...

Page 64: ...ated Control Panel ICP Both work together to provide the pilot with an easy way to interface with the avionics system of the aircraft Every press on an ICP button opens a page or changes information on the DED The DED needs UFC power to work Please note it will not turn on immediately at UFC power up during ramp start but requires a few seconds for the display to come online Fig1 The ICP Fig 2 The...

Page 65: ...1 ICP button 2 COM2 ICP button 3 IFF ICP button 4 LIST ICP button 5 F ACK left glareshield pushbutton Override modes provide direct access to the functions of the corresponding button You can revert back to the initial page by pressing the override mode button again In addition to the 5 override modes there is a special override mode that returns the UFC to CNI Communication Navigation Identificat...

Page 66: ...rea is displayed in the DED between two asterisks The scratchpad area on the left picture is around the Laser Start Time which is initially set to 20 seconds before weapon impact Any press on the ICP buttons will change the numerical value For instance if we press 1 then 6 the laser time will change to 16 seconds when the ENTR key is pressed and the scratchpad is moved automatically to the next ar...

Page 67: ... it with the M SEL 0 ICP pushbutton The CMD STRG line in the DED is highlighted when command steering is active To change the ILS course place the scratchpad on the CRS field using DCS up down and enter the correct runway heading for the active ILS Press ENTR to input the data into the system 1 3 6 A LOW page 2 The Altitude LOW page lets the pilot set different values for the altitude advisory sys...

Page 68: ... are supposed to overfly the steerpoint according to your INS flight plan This is different from the real jet that has the ground spot height for steerpoint in this field it is quite relevant to TGP mechanisation and finding the target The fifth line is the TOS Time Over Steerpoint which gives you the local time the steerpoint will be reached if you are following the route of flight as planned 1 3...

Page 69: ... descent Further information displayed on this page indicates home point can be changed to any INS steerpoint e g alternate onboard fuel quantity remaining when reaching active steerpoint optimum altitude for the HOME profile wind direction and speed The last subpage of the CRUS page is the Endurance mode EDR When EDR mode is mode selected a speed caret is placed on the HUD tape to give a referenc...

Page 70: ...e is NAV or A G mode and the TGP is SOI and ground stabilised entering the MARK page will default to TGP MARK As with FCR TMS up will create the markpoint If master mode is NAV or A G mode and the FCR or TGP are not SOI designating or ground stabilised entering the MARK page will default to HUD MARK A markpoint must be created manually by moving the HUD mark cue HMC a small slewable circle appeari...

Page 71: ... COM1 page Pressing the COM1 ICP button brings up the UHF radio page The first line gives the status in this case it s set to BOTH Preset Guard and the frequency is 292 650 MHz The scratchpad is ready to receive a new frequency or the new preset Presets are set in the UI Another way to change the UHF radio is to use the ICP NEXT PREV ICP button to directly change the preset note the double arrows ...

Page 72: ...dback can be set with 7 ENTR in the scratchpad It will toggle between OUT no feedback when Mode4 interrogated by another aircraft LIT the 4 will be highlighted on the CNI DED page and enlarged if repeated on the HUD when interrogated by another aircraft and AUD includes LIT plus in addition an audio tone is played in the pilot s headset if a Mode4 interrogation not matching the set key is received...

Page 73: ...ime criteria are activated only when the TIM subpage is mode selected Move the scratchpad to TIM with DCS up and hit 0 M SEL TIM will then highlight Pilot can set 12 different time criteria use the up and down arrow on the ICP to toggle between the different criteria pages The top right number will be updated accordingly For instance you could set time criteria for each hour during the next 12 hou...

Page 74: ...S steerpoint Since BMS 4 33 you can change from FT to KM or NM on the RNG line DCS up until you see FT scratchpad asterisks around FT then press any number key to rotate through FT to KM to NM More information about offset aimpoints can be found in the TO BMS1F 16CM 34 1 1 manual 1 3 16 2 BNGO page 2 The BINGO page is where you input your briefed Joker Bingo settings It is made up of two lines the...

Page 75: ...ude and the last line your true heading and groundspeed This last bit of information is very useful when taxiing as it is the only way to see information about your taxi speed 1 3 16 7 EWS page 7 The Electronic Warfare System page is where you setup your EWS Normally all these settings are in your DTC but you can also reprogram them on the fly through this page Programming is only possible when th...

Page 76: ...hat the active key is valid as a transponder will not respond to an invalid key query Modes can be enabled or disabled in the same way as the STAT page as well 1 toggles M1 2 M2 IJAM is not implemented and is relevant to IFF jamming Entering 9 ENTR in the scratchpad couples or decouples the SCAN LOS interrogator code to from the transponder codes When coupled all changes made manually or through t...

Page 77: ...d be used to correct INS navigation errors should they happen in BMS At the moment this is done automatically by the code 1 3 16 12 3 OFP page Operational Flight Program page is not implemented 1 3 16 12 4 INSM page Inertial Navigation System Memory page is not implemented 1 3 16 12 5 LASER page This page is used to set up the Laser system It is made of 4 lines The first sets the TGP code which mu...

Page 78: ...will have no bearing and range indication to Bullseye in the HUD In the MFDs FCR and HSD pages bearing and range information of the cursor position is shown relative to the Bullseye position when BULLSEYE is mode selected and relative to the active steerpoint when BULLSEYE is not mode selected This may vary according to block with newer blocks always displaying the flight director symbol even with...

Page 79: ... control the HMCS on supported aircraft The first line enables HUD blanking when mode selected The HMCS will not be displayed when looking at the HUD The second line enables blanking the HMCS when the pilot looks inside the cockpit The third line allows a selection of three levels of de clutter for the HMCS displays Highlight that line with DCS down and hit any ICP secondary button to change from ...

Page 80: ...ually so you can compensate automatically On the other hand it may be an annoyance at high altitude with strong winds which may throw the FPM off the edges of the HUD and the upper position labelled DRIFT C O maintains the FPM in the centre of the HUD regardless of winds The switch should be placed to NORM before landing The lower momentary position is labelled WARN RESET and is used to reset the ...

Page 81: ...ges for each MFD may be assigned to the DA buttons for each master mode The displayed page format has its DA mnemonic highlighted These are easily toggled by pressing the corresponding direct access OSB button or they can be cycled even faster with the HOTAS buttons DMS right for the right MFD and DMS left for the left MFD Please note you cannot have the same page displayed on both MFDs at the sam...

Page 82: ... one MFD to the other The visual cue for MFD SOI is the big square box drawn outside the OSB labels If a MFD is not SOI the text NOT SOI is displayed in the centre reminding the pilot that this display is not the Sensor of Interest Above the FCR on the left MFD is the SOI and displays the large square SOI cue around the edge of the display The TGP on the right MFD does not display the SOI cue and ...

Page 83: ...your direction from the HSD itself They are also very helpful with bullseye situation awareness By joining the North and South pointer you draw a reference line that can be used to quickly identify bearing from the bullseye calls In the right example ownship position is 158 from bullseye 16Nm and the radar cursor position is 271 7Nm from Bullseye OSB 1 is labelled DEP Depressed and when pressed to...

Page 84: ...F IFF response symbols now implemented LINE1 DTC line 1 steerpoints 31 to 36 LINE2 DTC line 2 steerpoints 37 to 42 LINE3 DTC line 4 steerpoints 43 to 48 LINE4 DTC line 4 steerpoints 49 to 54 RINGS concentric range rings from ownship ADLINK Air to Air datalink information GDLINK Air to Ground datalink information NAV1 2 3 INS flight plan but only NAV1 is implemented in BMS for the whole INS flight ...

Page 85: ... the cursor gets close the range will automatically change up or down accordingly This is done mainly on the FCR because most of the time the FCR is SOI but it also works on the HSD when it is SOI If the HSD is in CPL mode the first hit on any top or bottom edge will switch the HSD to DCPL mode and subsequent hits will change the range Bullseye symbols There are many different bullseye symbols on ...

Page 86: ...layed on the TEST page during Ramp Start Those faults will clear as the systems come online In the event of a real problem it may be necessary to clear the MFL with OSB 3 to launch a fault survey After having cleared the MFL if a system is still malfunctioning the fault will display again on the MFL allowing the pilot to take appropriate action to solve it PAGE 1 OSB 1 BIT1 Indicates BIT1 tests Pr...

Page 87: ...B 6 shows current active weapon type and quantity aboard When depressed the next different A G weapon type is selected in sequence Please note the MSL STEP button on the sidestick does not perform the same function it switches to the next pylon loaded with the same type of A G ordinance This allows the pilots to pre program two missiles differently if needed such as in the case of HARM missiles fo...

Page 88: ...ly for double fused CBUs On this page AD1 AD2 and BA can be set LADD stands for Low Altitude Drogue Delivery and although OSB 6 has a profile for it it is currently not implemented in BMS OSB 10 is the setting for the planned release angle This value is required by the computer to calculate the correct symbology for DTOS deliveries Most of the time C1 and C2 are used if you deploy GP LGBs or CBUs ...

Page 89: ... PRF range and toggles between unknown large medium and small targets Large is used for bombers medium is used for fighters and small is used to intercept missiles not implemented For IR missiles it toggles from BP Bypass to TD Threshold Detection When set to TD the missile will automatically uncage When set to BP the missile needs to be uncaged manually OSB 19 toggles SLAVE or BORE Radar missiles...

Page 90: ...ons and racks unarmed or unguided from selected aircraft stations Only jettisonable stores will be displayed for selection The pilot presses the OSB adjacent to the station displayed on the S J page The selected station s bottom most store is highlighted on the S J page indicating that it is selected If a jettisonable rack is also loaded it may also be selected with a second press of the OSB A thi...

Page 91: ... like the autopilot by depressing the paddle switch on the stick While the paddle is depressed the STBY bottom part of the ADV light on the MISC panel is illuminated Blended TF the autopilot is engaged to hold a specific barometric altitude or attitude If the LANTIRN pod detects the aircraft violating the selected minimum AGL the system will automatically maneuver the aircraft to maintain the mini...

Page 92: ...S Technical Manual 1 4 8 FLCS page The FLCS page is accessed from the menu page by depressing OSB 10 The FLCS page provides an overview of anything related to the FLCS The page provides a backup display for the FLCS faults by showing up to 5 FLCS faults or warnings As with the PFL the warnings are displayed within When more than 5 faults are present they can be reviewed by pressing OSB 20 labelled...

Page 93: ... ground the FLIR camera is boresighted on top of the HUD It may induce parallax errors The boresight is used to better match the image in the HUD with the image from the FLIR camera at a certain range Depress OSB 10 and the BSGT mnemonic highlights The HUD FLIR image can then be slewed with the cursors Do not boresight on close objects It is advised to boresight in flight on large objects such as ...

Page 94: ...nd any dome covers removed See weapon specific documentation for Maverick deployment OSB 1 reports status OSB 2 toggles PRE VIS BORE modes OSB 3 sets the Field of View OSB 5 accesses the Control page OSB 6 displays the type of weapon currently selected OSB 7 toggle polarity Bottom row has the usual DCLT Direct Access and SWAP buttons OSB 20 selects the SLAVE options For further information on spec...

Page 95: ...d on Rmax of the AGM 88 and will increase or decrease in size according to your speed and altitude If the HARM WEZ is greater than the selected display range the lines will be dashed Detected emitters are coloured as follows Green emitter not active Yellow emitter active Red emitter tracking Flashing Red emitter launching 1 4 13 BLANK page It is possible to turn off one MFD by selecting the BLANK ...

Page 96: ...radar and its submodes or A G radar depending on Master Mode 1 4 16 1 FCR in A A modes The FCR is switched on by the FCR switch on the SNSR panel and once powered enters a BIT Built In Test that may last a few minutes If the FCR is switched off in flight for longer than 4 seconds the BIT will be reinitialised Once the BIT is complete the FCR becomes available and usually defaults to A A CRM Combin...

Page 97: ...Slew Bore 60 Vertical OSB 3 is FOV and is not available in all modes It is displayed only when available and will toggle between NORM and EXP This can also be done with the pinky switch S3 on your stick When toggled to EXP the area around the cursor is expanded and illustrated by the blue square drawn on the MFD The EXP label also flashes OSB 4 places the FCR in standby mode All symbology is delet...

Page 98: ...s the bar scan and can be toggled from 1 bar to 4 bar The FCR scans the horizon by physically moving the antenna The beam that the antenna normally emits is not able to scan more than 4 9 in the vertical So with this set to 1 the radar will scan just the single 4 9 slice of airspace Set to 2 the radar will scan 2 bars of airspace set to four it will scan four bars It takes 2 5 seconds to scan one ...

Page 99: ...2 2019 Page 99 OSB 19 20 are used to set the FCR range when the mode allows it Depressing OSB 19 decreases range and OSB 20 increases range Another way to set the range is by cursor bumping if the FCR is SOI whenever the cursors hit the top or bottom edge of the FCR ...

Page 100: ...ng and range from the current steerpoint is displayed near OSB 17 according to Bullseye being mode selected or not In this case bearing and range is displayed 189 00 as bullseye is not mode selected Ownship bullseye position will be displayed in the bottom left corner of the MFD if Bullseye is mode selected in the DED LIST 0 8 BULL page In the picture on the right Bullseye is not mode selected and...

Page 101: ...d To resume radar operation the OVRD button has to be pressed again OSB 5 enters the Control page Please Note the FCR CNTL page is the same for A G and A A FCR modes The display remains and keeps being updated but the OSBs change to CNTL options Currently none of these Control options are enabled in BMS for the A G FCR The options can be toggled but the consequences are nil in the code In the real...

Page 102: ...ed system deltas and so will return all STPTs to their original position and will naturally return SPI position to the current STPT position The CZ mnemonic will be highlighted in aircraft with the Nav EGI upgrade if a system delta exists i e SPI slew Pilots should use the following routine to revert the system solution back to the original navigation solution TMS down Cursor Zero Wide Field of Vi...

Page 103: ...TACAN operations are managed with OSB 6 to 10 OSB 6 toggles AA T R and T R OSB 7 increases by 1 the channel displayed next to OSB 8 OSB 8 opens an MFD page where the TACAN channel may be entered manually to avoid scrolling all the way to the relevant channel OSB 9 decreases by 1 the channel displayed next to OSB 8 OSB 10 toggles X and Y band If increasing or decreasing the channels require too man...

Page 104: ...o it for each TE through the DTC Common DTC settings are saved in the callsign ini file TE specific DTC settings are saved in the TEname ini file Making your own MFD configuration Open any TE and select the DTC button Select the MODES tab to set your MFDs The first menu is used to select Master Mode The second menu is used to select the MFD MFD1 is left MFD MFD2 is right MFD MFD3 MFD4 used to be i...

Page 105: ...ee to use your own configuration or use this as a base to build your own A A Left MFD 1 FCR blank blank current primary for FCR Right MFD 2 HSD SMS blank current primary for HSD You don t risk losing the FCR on the left MFD with an inadvertent press of DMS left thanks to the two empty pages A G Left MFD 1 FCR TGP blank current primary for FCR Right MFD 2 HSD SMS blank current primary for HSD NAV L...

Page 106: ...advanced controller menu 1 5 1 HUD SETTINGS In all Master Modes Velocity or airspeed is always displayed on the left Altitude on the right and Heading on the top or the bottom VAH Some HUD features can be set using the HUD panel on the right console see cockpit arrangement section 5 3 HUD panel Airspeed can be displayed as CAS Calibrated TAS True or GND SPD Groundspeed The FPM and pitch scale line...

Page 107: ...ines pointing to horizon and down dashed lines pointing to the horizon When the horizon line is outside the HUD Field of View it is replaced by a dashed ghost horizon line The pitch bars are also bent incrementally when the aircraft is in a dive The bend varies between 8 and 45 There are two specific symbols at 90 zenith and at 90 nadir pitch as seen on the pictures below ...

Page 108: ...h of the HUD CNTL panel to VV VAH displays the Vertical Velocity Velocity Altitude and Heading on the HUD The vertical velocity is placed inboard of the altitude tape The VV scale features 500 feet interval marks and a moveable triangular caret displaying the actual vertical velocity the same as the VVI When the vertical velocity is displayed the roll indicator usually found on the bottom of the H...

Page 109: ...low it is set at 900 feet Note the AL line has switched to the bottom of the HUD right under the AR window When climbing the radar scale remains displayed up until 1500 feet AGL when it is replaced by the barometric scale Airspeed scales On the ground the airspeed tape cannot display airspeeds CAS at speeds lower than 60 knots The displayed airspeed may change according to the position of this HUD...

Page 110: ...tion can be displayed according to the way various subsystems are set up If the HSI is switched to NAV ILS or TCN ILS the HUD will display the ILS localizer and glide slope and the CMD STRG cue if activated in the UFC T ILS page The ETA to STPT can be replaced by ETE Estimated Time Enroute according to the UFC CRUS TOS page settings Different carets can be displayed around the tapes to give visual...

Page 111: ...ket as pictured above thus maintaining an AOA around 13 corresponding to the green doughnut on the AOA indexer A dashed pitch line is also displayed between the horizon line and the 5 pitch line It is the 2 5 pitch line that represents the glideslope for landing When the gear is down the displayed airspeed is always CAS even if the Speed switch on the HUD panel is set to TAS or GND SPD The ground ...

Page 112: ...e The HUD will display different information depending on the active weapon in A A mode A A weapon parameters are displayed in the HUD repeating the cues on the MFDs usually A A FCR In the image above the A A gun has been selected in EEGS mode Note the inverted attitude and the radar altimeter which is blank ...

Page 113: ...S1F 16CM 34 1 1 for weapon employment specifics 1 5 6 HUD as SENSOR OF INTEREST SOI As with the left or right MFD the HUD can be selected as Sensor of Interest SOI This is done with DMS up on the sidestick When the HUD is SOI an asterisk is displayed in the top left corner of the HUD The HUD is used as SOI for creating HUD mark points and A G missile employment in VIS mode When the HUD is SOI a sl...

Page 114: ...aircraft altitude above ground level AGL Radar altitude is displayed on the HUD below the altitude tape in a box preceded by the letter R The CARA is controlled by the radar altimeter switch on the SNSR PWR panel located on the right console When the switch is placed in RDR ALT the CARA is functional Radar Altitude advisory is provided by the A LOW page of the UFC that is used to set the CARA A LO...

Page 115: ...in use to old WWII aiming devices The Primary reticle does not change actual HUD symbology except for the bombing mode symbols and consists of a centre pipper with a dashed inner circle 50mil surrounded by a solid outer circle 100mil The reticle can be moved UP and DOWN in the HUD by using the DEPR RET ICP wheel top right wheel The depression is displayed on the left of the HUD in milliradians The...

Page 116: ... and post designate In pre designate mode the HMC pipper is placed on the FPM The HUD is automatically made SOI and the HMC pipper can be moved within the HUD field of view A first TMS up will ground stabilize the pipper which can then be moved into position The coordinates in the MARK UFC page will remain blank as the markpoint is not saved yet TMS down at this point will cancel ground stabilisat...

Page 117: ...il system Lubrication of the engine is done with a self contained oil system In BMS 4 34 oil issues may arise as during ramp start or as a result of battle damage Pilots should ensure that oil pressure is always within operating limits A loss of oil pressure will lead to engine seizure See SECTION III ABNORMAL EMERGENCY PROCEDURES for further information 1 6 4 Engine Anti Ice system No component o...

Page 118: ...over temperature or a flameout has occurred It could also light in the case of RPM and or FTIT indicator failure The warning light illuminates when the RPM decreases below 55 or approximately 2 seconds after FTIT exceeds 1100 C 1 6 7 Engine instruments The RPM indicator expresses RPM in percent and is powered by the battery bus The NOZ POS indicator gives the position of the exhaust nozzle in perc...

Page 119: ...ty so beware while performing your ramp start checklists Always back up the chocks with toe brakes when performing checks needing higher power settings EPU SEC etc Parking brakes are usually automatically deactivated around 83 85 RPM as well The real value is when the throttle goes further than one inch past the IDLE point but that is not easily quantifiable in the simulator Do not exceed 80 RPM f...

Page 120: ... In this scenario the maximum load of external fuel is 7072 lbs The maximum fuel load is thus 7162 7072 14134 lbs The internal fuel system is made of 6 tanks Left wing tank with a capacity of 550 100 lbs Aft fuselage tank Aft reservoir fuselage tank with a capacity of 2810 100 lbs Forward fuselage tank Forward reservoir fuselage tank with a capacity of 3250 100 lbs Forward fuselage tank 1 forward ...

Page 121: ...T O BMS1F 16CM 1 BMS 4 34 Change 2 00 BMS 4 34 Dash 1 Red Dog 2012 2019 Page 121 ...

Page 122: ... the image above allows the engine to be starved of fuel That valve is driven by the MASTER FUEL switch located on the FUEL panel on the left side console The switch has two positions MASTER and OFF and is guarded in the MASTER position In some air forces it is even securely wired and cannot be moved by the pilot unless in an emergency In BMS that switch is in MASTER at all times as well especiall...

Page 123: ...mented in BMS For fuel to transfer from the external tanks they have to be pressurized This is done with the AIR SOURCE knob on the AIR COND panel on the right console This knob controls the ECS system and thus pressurisation of the cockpit and the fuel tanks Fuel tanks are pressurized only in NORM and DUMP position In NORM both the cockpit and fuel tanks are pressurized in DUMP only the fuel tank...

Page 124: ...s TEST 6000 20 20 NORM Total lbs Fuel onboard Total Lbs fuel AFT FUSELAGE max 28 Total lbs fuel FWD FUSELAGE max 32 RSVR Total lbs Fuel onboard Total lbs fuel AFT RSVR max 4 8 Total lbs fuel FWD RSVR max 4 8 INT WING Total lbs Fuel onboard Total lbs fuel LEFT internal wing max 5 5 Total lbs fuel RIGHT internal wing max 5 5 EXT WING Total lbs Fuel onboard Total lbs fuel LEFT external wing max 25 fo...

Page 125: ...t Lead to check it for you Check it as often as possible and not only the fuel gauge but also the fuel remaining at different steerpoints on your route particularly at home plate There are three types of check your lead can request from you 1 Fuel state 2 Ops check 3 FOS Fuel Onboard at Station Fuel state is simply the total fuel remaining on board You find that one on the fuel quantity gauge at t...

Page 126: ...zed with the aileron trim in the exact same way an asymmetrical loadout is compensated That roll will be noticed before the external wing tanks are empty and if you succeed in overcoming the temptation to check the possibility of joystick drift you will probably realise something is wrong with your load Since your weapons haven t been dropped yet you should think about a potential fuel imbalance p...

Page 127: ...ency DC bus n 1 and are independent from the fuel totalizer Usually when these two come on you re in trouble because you only have a few seconds of engine power left and you should land right away Consider also that fuel gauges are notoriously imprecise You ve also busted the minimum fuel needed on board when landing which is 1200 lbs Effective fuel management includes setting a Joker and a Bingo ...

Page 128: ...long it may be possible that the fuel left inside cannot reach the internal wing tank In that case a TRP FUEL condition may develop AIR SOURCE to OFF or RAM The same is true if the AIR SOURCE knob is placed in any other position than NORM or DUMP Both these positions besides activating the ECS pressurise the fuel tanks If they are not pressurised the fuel may not transfer correctly That being said...

Page 129: ... 2 a If VMC Visual Meteorological Conditions 1 pattern 400 lbs so add 400 lbs just in case you screw up the overhead and need to go around 2 b If IMC Instrument Meteorological Conditions 1 STAR 800 lbs so add 800 lbs just in case you have to go missed approach and re do the STAR 3 Compute fuel needed to go the alternate If alternate is say 70Nm from home multiply by 10 700 lbs to get there 4 Final...

Page 130: ...NORM the bingo computation is based on the lesser of fuselage fuel weight or total fuel weight In other words with the FUEL QTY SEL knob in NORM a Bingo fuel warning will be triggered as soon as either fuselage fuel or total fuel decreases below the entered BINGO fuel value With the FUEL QTY SEL knob out of NORM the warning will only be triggered when total fuel decreases below the entered BINGO v...

Page 131: ... knob In BMS we basically use two positions OFF both air conditioning and pressurisation systems shut off and NORM both systems working automatically The TEMP knob is used for cockpit air conditioning and is not implemented The same is true of the defog lever outside the left console towards the rear of the cockpit and obviously the Anti G system 1 8 1 ECS PFL Caution Warning lights Two caution li...

Page 132: ...to engine start the MAIN PWR switch is placed to BATT to permit a check of the aircraft battery The ELEC SYS MAIN GEN STBY GEN and FLCS RLY lights come on The FLCS RLY light illuminates because the FLCS relays are open and the FLCC is not connected to the aircraft battery The FLCS PMG light is not illuminated since it requires FLCS power The ACFT BATT TO FLCS light does not illuminate since the FL...

Page 133: ...s an aircraft battery failure or failure to charge ACFT BATT TO FLCS light indicates that the battery is powering the FLCS ACFT BATT FLCS RLY indicates that the battery is not connected to the FLCS ELEC SYS caution light CAUTION panel comes on with any of the lights above FLCS PWR light TEST panel ABDC a single light in BMS as the 4 FLCS branches are considered a unique branch illuminates to indic...

Page 134: ...T O BMS1F 16CM 1 BMS 4 34 Change 2 00 BMS 4 34 Dash 1 Red Dog 2012 2019 Page 134 ...

Page 135: ... is done through the ATC menu Ground page Failure to remove the pin would prevent proper EPU testing and proper EPU operation if need in an inflight emergency The EPU can also be operated manually by placing the EPU switch to ON When the EPU is operating power is supplied to the emergency bus the non essential and essential buses are unpowered Hydraulic system A is also supplemented by EPU hydraul...

Page 136: ...ition and airspeed less than 400 knots The Standby gains are coded in BMS but are relatively transparent to the user They kick in automatically when the FLCC detects a FLCS failure indicated by the FLCS FAULT caution light 1 12 1 CRUISE GAINS 1 12 1 1 Pitch FLCS The purpose of the Pitch FLCS is to limit requested G to control the natural pitch instability of the F 16 It is important to understand ...

Page 137: ...ed around 14 AOA and reaches zero deflection possible at 26 AOA In CAT III the maximum deflection starts to be limited at 3 AOA and reaches zero deflection at 15 AOA The ARI provides automatic coordinated turns by moving the rudder along with the ailerons to compensate for aileron induced yaw effect Nevertheless in a crosswind take off landing situation the pilot may need to put the rudder and ail...

Page 138: ...he warning light going off Action of FLCS limiters in three FLCS axis Cruise and LG gains 1 12 4 Gun compensation The FLCS automatically compensates for the off centre gun firing and the gun gas emissions during gun firing by moving the rudder and flaperons Gun compensation is optimised for 0 7 0 9 Mach Firing outside of those speeds may create adverse effects Furthermore if the FLCS is damaged fi...

Page 139: ... is not coded in BMS The DBU light and DBU switch on the FLCP are eye candy but will nevertheless disengage autopilot if engaged 1 12 7 Asymmetrical loading The FLCS does not provide automatic roll trim function to compensate for asymmetric loading of the wings fuel or weapons As a consequence the pilot will need to constantly adjust the roll trim of the F 16 when loaded asymmetrically or when fue...

Page 140: ...LCS BIT switch snapping back to the OFF position The FLCS bit progress can also be followed on the MFD FLCS page The BIT in progress and BIT status messages are displayed 1 12 9 FLCS warning caution lights There are many caution and warning lights about the FLCS scattered on the TEST FLCP panels warning panel ELEC panel etc The FLCS warning light located on the right glareshield illuminates to ind...

Page 141: ...s extended but the NWS should be manually disengaged above 70 knots to avoid uncontrolled nose wheel rotation on the take off and landing roll Failure of the NWS is indicated by the NWS FAIL caution light 1 13 2 Wheel brakes BMS features two types of wheel brakes for users with or without rudder equipped toe brakes Users without toe brakes or using no rudder at all have a wheel brake implemented b...

Page 142: ...ocks are on by default at ramp start and they need to be removed prior to taxi Normally this is done with the crew chief but we don t have them in BMS so the request is done through the ATC Tower menu Bear in mind that you need to have a correct tower frequency set on your radio Likewise at shut down chocks can be requested to be placed through the same ATC Tower menu Although the chocks will prev...

Page 143: ...above 2000 ft min or below 2000 ft min may prevent the correct altitude capture The FLCS limits the pitch command from 0 5 to 2 0G when PITCH ALT HOLD is engaged The AOA also plays an important role in altitude capture It remains accurate only below 5 AOA Stick steering Autopilot override If the pilot moves the stick while the A P is engaged the aircraft will respond to pilot input although the st...

Page 144: ...e Angles above or below 60 in roll will not be captured Stick steering and paddle override remains available with the known restriction of each mode 1 14 5 Steering Select ROLL Placing the left ROLL switch to STRG SEL commands the aircraft to fly to the current steerpoint of interest As in Heading Select mode the bank angle will be limited to 45 If AUTO steerpoint is selected in the UFC the A P wi...

Page 145: ... Command steering CMD STRG behaves like a flight director and is automatically mode selected on FCC MMC power up but may be deselected selected by positioning the asterisks around CMD STRG and pressing the M SEL 0 button The pilot tunes the ILS by entering the desired four or five digit ILS frequency in the scratchpad and pressing ENTR The system recognises that an ILS frequency has been entered a...

Page 146: ...erpoint or the selected TACAN neither of which may be at the same location as the ILS antenna ILS approaches in BMS are therefore all ILS DME approaches It is important to note that ILS localizer raw data is displayed on the HUD the ADI and on the HSI but the glideslope is displayed only on the HUD and the ADI Command steering cueing when selected is only displayed on the HUD The command steering ...

Page 147: ...T O BMS1F 16CM 1 BMS 4 34 Change 2 00 BMS 4 34 Dash 1 Red Dog 2012 2019 Page 147 The following picture shows a typical sight picture the pilot sees when flying an ILS approach ...

Page 148: ...and the CMD STRG cue will start to swing you onto the approach course As you continue inbound you ll get to within 2 3 degrees of the glide slope When you do the GS deviation bar will start to descend Depending on exactly where you are in the approach course around this time or shortly thereafter you will be close enough to the GS centreline to get pitch steering The CMD STRG cue will unglue from ...

Page 149: ...or cycling the gear if you don t proactively toggle the declutter off again yourself The picture below illustrates the decluttered HUD on the right The last thing you ll recognise which isn t directly related to ILS but is with landing is how various symbology in the HUD now move in coordination with the FPM This movement was noticed during review of many HUD videos The heading speed and altitude ...

Page 150: ... aircraft in BMS are mode 4 or mode C capable Mode 1 military mode non crypto Response is a code in a range of 32 codes between 00 and 73 The reason it is only 32 codes is that the first digit is never above 7 the second never above 3 Example 41 and 22 are valid Mode 1 codes 44 and 81 are not Mode 2 military mode non crypto Response is a code in a range of 4096 between 0000 and 7777 Similarly the ...

Page 151: ... and LOS pages right DED image It is important to understand the difference between the IFF Transponder and the IFF Interrogator parts of the IFF system All aircraft have transponders but not all have interrogator capabilities Backup control of the IFF is only done on the IFF panel when the C I switch is in the BACKUP position 1 16 3 IFF DTC Brief Each mission TE or campaign displays an extensive ...

Page 152: ...errogates Panther with its default M2 interrogator setting Panther will not reply positively and will be categorised as bogey M3 is specific to each aircraft as well but unlike M2 rotates every hour Panther2 has M3 code 7354 and Mudhen1 has M2 code 4610 until 1000 FT when the codes will switch to 1004 2634 respectively M4 is always assigned per team and the encryption key rotates every 24 hours TI...

Page 153: ...t flight or by opening up the ATO finding the fragged tanker flight in the support flights and opening his briefing to note down the aircraft specific IFF codes If you do that make sure you record your own squadron package number and flight callsign because you will have to find your flight in the ATO after having joined the tanker flight to read its brief 1 16 4 How to use the IFF in flight Once ...

Page 154: ...es for that specific purpose On the IFF STAT page you can see the OUT 7 in the centre of the bottom line Pressing ICP 7 then ENTR will toggle the IFF Mode 4 feedback between available options which are OUT no feedback at all the default option LIT visual feedback when interrogated with the 4 symbol highlighted on the UFC CNI page whenever your jet is interrogated in Mode 4 AUD an audio tone will b...

Page 155: ...that are active in the SCAN INTG UFC page in this case M1 M2 and M4 Mode 4 takes a bit longer than Mode 2 and Mode 1 The system first interrogates in Mode 4 and then works its way down to Mode 1 A green circle with the mode inside is a correct answer and therefore categorised as friendly A yellow square with the mode inside is an incomplete answer and therefore categorised as unknown bogey During ...

Page 156: ...the LOS INTG page which may be different to the interrogation settings on the SCAN INTG page Response symbols and scan mechanisation are the same as in SCAN mode Notice OSB 16 highlighting LOS mode while interrogating Mode 4 As you can see above the jamming contacts are not interrogated this time because they are outside the interrogation cone roughly 15 either side of the ACQ cursor On the other ...

Page 157: ...transponder That state can be changed to CPL coupled mode by pressing ICP key 9 then ENTR Available options are DCPL decoupled ALL all are coupled and SOME some modes are coupled Entering ICP key 9 and ENTR sets the relevant interrogator mode SCAN or LOS to ALL by coupling all interrogation modes to the transponder modes All codes will then be highlighted and will display the same code as the tran...

Page 158: ...ded by the MODE 4 REPLY Switch toggling between OUT no Mode 4 reply A reply with A key and B reply with B key Please note it is up to you to know which key is supposed to be active according to the briefed switch time The MODE 4 MONITOR Switch defines the audio cue which sounds when the IFF is unable to answer a Mode 4 request Please note for the audio cue to sound this switch must be placed in AU...

Page 159: ...mergency status 1 16 7 IFF CAUTION Lights The caution panel IFF light illuminates whenever there is a condition preventing IFF Mode 4 operation This includes IFF in STBY Mode 4 disabled in UFC or on the BACKUP panel depending on C I switch position Mode 4 keys zeroed RF switch in SILENT or QUIET Additionally if a Mode 4 interrogation was received on a different key than what the transponder is set...

Page 160: ...T O BMS1F 16CM 1 BMS 4 34 Change 2 00 BMS 4 34 Dash 1 Red Dog 2012 2019 Page 160 INTENTIONALLY LEFT BLANK ...

Page 161: ...T O BMS1F 16CM 1 BMS 4 34 Change 2 00 BMS 4 34 Dash 1 Red Dog 2012 2019 Page 161 SECTION II NORMAL PROCEDURES ...

Page 162: ...lowing page into three main sections Left console left auxiliary left console Centre console Right console right auxiliary right console Mouse vs Keystrokes You can move cockpit switches with the relevant keystroke or with the mouse For keystrokes you will have to find the corresponding key for each switch state with the mouse you will have to use left or right click to move switches up or down an...

Page 163: ...T O BMS1F 16CM 1 BMS 4 34 Change 2 00 BMS 4 34 Dash 1 Red Dog 2012 2019 Page 163 F 16 b50 52 cockpit layout and panels ...

Page 164: ...ton depressed on the hotspot It simulates holding the switch or button in position While doing that the FLCS PMG and the ACFT BATT TO FLCS lights illuminate and the FLCS RLY light goes out ELEC panel On the TEST panel the four FLCS PWR lights ADBC come on indicating good power output to the FLCC The MAIN GEN and STBY GEN lights ELEC panel remain illuminated during the test You can now release the ...

Page 165: ...ct the COM1 page of the UFC it will display the following page When the UFC will be powered the DED will tell you that the UHF is ON in Backup mode and 273 52 is selected in the MNL window and the active preset is channel 6 6 Since there is nothing to set on the front panel during this sweep we move straight to the right console If you need internal lighting you can set up the LIGHTING panel accor...

Page 166: ...lick the idle detent and monitor lights and engine gauges SEC caution light goes off around 20 RPM before moving the throttle HYD OIL PRESS light right eyebrow goes off between 30 and 35 RPM If the light stays on and your oil pressure remains below 15 psi you have an oil pressure fault shut down the engine immediately and refer to abnormal operations chapter 3 5 4 later in this manual During engin...

Page 167: ...set it without knowing why it came on in the first place Clear also the MFL Maintenance Fault List on the MFD TEST page via OSB 3 7 Move to the left console and rotate the C I switch on the IFF panel from BACKUP to UFC so you can start using the primary on board systems Place the IFF MASTER knob to STBY Your lead will soon initiate radio contact on a pre briefed frequency and you had better be rea...

Page 168: ...hydraulic fluid and removing air from the system Check that all switches are down prior to flip the FLCS BIT switch It s a magnetic switch that stays in place for the duration of the bit test The green RUN light comes on and the flight controls are tested in sequence progress can be monitored by looking out of the cockpit at the flight controls Members of your flight are also able to see your flig...

Page 169: ...PU from actually starting during your normal engine start sequence the status message in the top right corner of your screen will disappear Once the EPU pin is removed move to the EPU panel and cycle the EPU to OFF and back to NORM With the mouse make sure you use a left click to move it from NORM to OFF a right click would engage the EPU which should be avoided on the ground The real reason is of...

Page 170: ...e left auxiliary console Depress the lower right POWER button and the SYSTEM POWER green light illuminates You can then move to the CMDS panel and power up the RWR and JMR pod with both toggle switches to ON The CMDS has four countermeasure banks but only the CH chaff and FL flares are used in the Korean squadron F 16 Bank 01 and 02 are not implemented in the F 16 in Korea and as such these two sw...

Page 171: ...auxiliary console indicate 2000 lbs The totalizer should read 6000 lbs and both FWD and AFT FUEL LOW lights should be illuminated on the caution panel In NORM A L 2675 2810 lbs F R 3100 3250 lbs In RSVR both needles should read 460 480 lbs In INT WING both needles should read 525 550 lbs In EXT WING both needles should read 2300 2420 lbs when carrying 370 gal wing tanks In EXT CTR A L 0 lbs F R 18...

Page 172: ... radio comms he might be busy communicating relevant information or requests considerably shortening your ramp start routine Don t stay idle waiting for the EGI to align perform as many items while you can because there are many other checks Lead may call for from his flight such as IDM checks swing checks etc ...

Page 173: ...Airtac beacon provides only range to an airborne station Mitac beacon provides bearing and range to an airborne station The Ground TACAN is self explanatory Airtac is used by fighters and the KC 135 and Mitac is only used by the KC 10 As a consequence only the KC 10 will provide bearing information All other airborne stations will provide distance only and the bearing pointer on the HSI will spin ...

Page 174: ...ctor lights at this stage You just need to hold position a few feet behind the boom When the boom operator is happy with your stabilised position he will call call sign cleared to contact position At that point the red director lights F Forward and U Up will switch on to give further positional guidance Start to move slowly towards the boom and it will move to left or right to let you get into con...

Page 175: ...ns of Falcon you remember the boom snapping you in the correct position no matter what this is no longer the case with BMS You keep flying the aircraft The boom will remain connected as long as you stay within its manoeuvring envelope When the boom connects the blue RDY light on the right indexer shuts off and the green AR NWS light comes on signalling fuel transfer If you enabled the BINGO DED pa...

Page 176: ...T O BMS1F 16CM 1 BMS 4 34 Change 2 00 BMS 4 34 Dash 1 Red Dog 2012 2019 Page 176 ...

Page 177: ...T O BMS1F 16CM 1 BMS 4 34 Change 2 00 BMS 4 34 Dash 1 Red Dog 2012 2019 Page 177 KC 10 Diagrams ...

Page 178: ...r refuelling operations Quick Flow allows receivers to minimise refuelling time with maximum fuel transfer The receiver flight will join on the left of the tanker with the flight lead moving to the pre contact position Remaining aircraft will proceed to the left observation position Once the flight lead commences refuelling the second aircraft in the air refuelling sequence should move to the On D...

Page 179: ...ct position as directed by the tanker if the On Deck formation was being flown correctly he would be cleared straight to contact The third receiver if present then moves to On Deck and waits for the second to call done refuelling to follow the tanker direction to refuel The left to right flow continues until all fighters have refuelled Additional receivers arriving prior to the first flight comple...

Page 180: ... Dash 1 Red Dog 2012 2019 Page 180 3 Leader done refuelling and moves to the right tanker wing 2 contacts 3 closes up to echelon on 2 4 is waiting in position 4 2 done refuelling and rejoins the leader on the right wing 3 Contact with 4 closing up ...

Page 181: ... The tanker needs to be told you have done refuelling y 3 for the next flight member to be cleared for refuel The AR door can then be closed For departure from the tanker the aircraft at right observation will descend 1000 and take up a loose echelon right formation with each jet stepped down 100 progressively to allow the outside jets to maintain sight The aim point for this clearing manoeuvre is...

Page 182: ...n be done visually as well Altitude should be 2000 feet and airspeed less than 300 knots for safe extension of the landing gear Due to the low drag nature of the F 16 speedbrakes may need to be opened to reduce speed From this point on we will no longer refer to airspeed but instead to angle of attack AOA The optimal approach airspeed depends on your gross weight and the best way to be on speed is...

Page 183: ...ve left to do is to understand angle of attack and how to control it with the throttle AOA is the angle between the aircraft wing chord line equivalent here to the airframe longitudinal axis and the relative vector of motion of the aircraft Basically it s the angular difference between where the aircraft is pointing and where it is going The optimal touch down AOA for the F 16 is 13 AOA correspond...

Page 184: ...FPM is below the bracket AOA 15 you need to increase power to decrease AOA and bring the FPM up inside the AOA bracket You are too slow The approach is made around 11 AOA FPM at the top of the HUD AOA bracket on a 2 5 glideslope to the runway with speedbrakes opened and landing gear obviously deployed The FPM should be just on the runway threshold and the PAPI should indicate two red and two white...

Page 185: ...e middle of the AOA bracket and the green doughnut illuminated in the left indexer Since you are rolling and not flying anymore that is done by pulling gently on the stick Beware that pulling too much will scrape the tail and damage the aircraft You can maintain directional control with the rudders during the landing roll rudder efficiency is greater at higher speed and will decrease as your speed...

Page 186: ...T O BMS1F 16CM 1 BMS 4 34 Change 2 00 BMS 4 34 Dash 1 Red Dog 2012 2019 Page 186 SECTION III ABNORMAL EMERGENCY PROCEDURES ...

Page 187: ...action to correct them There are three basic rules to apply to all emergencies Maintain aircraft control Analyse the situation and take corrective action Land as soon as the situation dictates The warning caution system is made of different subsystems Warning lights amber lights on the eyebrows MASTER CAUTION press to reset amber light on the left eyebrow Caution lights yellow lights on the right ...

Page 188: ...is reset the MASTER CAUTION light will remain illuminated as long as the individual caution light is illuminated 3 1 2 Caution lights The caution light panel is located on the right auxiliary console It is a placeholder for 32 indicators of which 20 are fully supported in BMS The ELEC SYS caution light cannot be reset with the MASTER CAUTION light The only way to reset it is to use the ELEC CAUTIO...

Page 189: ...t Fault List which reports only faults of interest to the pilot The MFL also reports faults of interest for maintenance personnel Nevertheless the MFL can be used by the pilot to get more information about a particular component of a failed system See chapter 3 5 for MFL analysis 3 1 6 Voice Message System VMS The VMS provides an audible warning to back up warning and caution visual cues VMS can b...

Page 190: ...nsent is required COUNTER advises that a dispense command should be initiated active in CMDS SEMI mode LOCK LOCK advises the pilot that the FCR has locked on a target PULLUP PULLUP advises that the ground proximity warning has been activated and a 4G pull is immediately required to avoid terrain CHAFF FLARE advises that CMDS has initiated a dispense program release active only if FDBK is turned on...

Page 191: ...s not correctly configured for landing The light comes on when the following conditions occur 1 Below 10000 feet 2 Airspeed less than 190 knots 3 250 fpm descent or more The VMS warning horn will sound To address the problem stop your rate of descent and accelerate or lower the landing gear handle if you intend to land In the air with the landing handle down the light indicates a malfunction in th...

Page 192: ...e system B gauge is under 1000 psi check the EPU If the EPU RUN light is off there is a single system B hydraulic failure refer to System B Hydraulic failure in the EP checklists If the EPU run light is on check the ELEC SYS caution light If ELEC SYS light is on the problem is PTO shaft failure If ELEC SYS light is off both hydraulic system A B have failed refer to Dual Hydraulic failure in the EP...

Page 193: ...e red light in the gear handle lollipop is also considered a warning light It refers to the landing gear or landing gear doors not being in the position commanded by the handle unless the gear is in transit Normal operation of this light is to be illuminated while the gears are in transit If the light remains on after moving the handle a failure has occurred If the light remains on after placing t...

Page 194: ...luminates except IFF Check for the specific caution light and take relevant action Please note if a caution light remains on for more than 7 seconds VMS will issue a CAUTION CAUTION message The MASTER CAUTION light can be reset by pressing the light face It cannot be reset when the ELEC SYS caution light is illuminated the ELEC CAUTION RESET pushbutton needs to be pressed in this situation 3 3 2 C...

Page 195: ...to an Automatic Terrain Following failure It has no consequence in BMS It does come on during the MAL IND LTS test The FWD FUEL LOW caution light comes on whenever the forward reservoir contains less than 400 pounds of fuel C model or 250 pounds of fuel D model The AFT FUEL LOW caution light comes on whenever the aft reservoir contains less than 400 pounds of fuel C model or 250 pounds of fuel D m...

Page 196: ...h is irrelevant in BMS This caution light is advisory and has no consequence in BMS This caution light illuminates whenever the ejection seat lever is up system safe If desired simply arm the seat and the caution light will clear The Nose Wheel System NWS has failed and steering with the nose gear is not possible Steering can be done with the rudder but will become less effective at low speed Diff...

Page 197: ... be used for reviewing the faults that occurred during a flight to help determine if pilot actions were appropriate 3 4 1 Maintenance Fault List MFL The Maintenance Fault List is accessed from the MFD TEST page See 1 4 4 MFL displays a maximum of 17 faults with the following format FAULTY subsystem TEST number Number of occurrences up to 9 Time of first occurrence MC04 326 1 1 37 The first column ...

Page 198: ... set MSL Missile slaving loop NVP Navigation Pod RALT Radar altimeter RWR Radar warning receiver SMS Stores management set TCDS Threat Adaptive Countermeasures Dispensing Set TCN TACAN TGP Targeting Pod UFC Upfront control set TOF Pseudo fault recording the take off time LAND Pseudo fault recording landing time When a fault occurs the PFL is displayed on the TEST page and the corresponding test nu...

Page 199: ...he mission time at MFL clearing If the flight happens without any malfunctions the next pseudo fault that will be generated will be the landing fault LAND that will record the landing time when the airspeed falls below 80 kts with the gear down 3 4 1 2 DTC fault recording All MFL faults can be reviewed after the flight by analysing the DTC_last_flight_faults file located in the User Logs folder Th...

Page 200: ...splayed in the centre of the status line Avionics faults AV mnemonic displayed on the right side of the status line If the PFLD is blank that is a normal situation and there is no reported fault When the system reports faults the PFLD will display the category of fault and the type of malfunction When the malfunction has been acknowledged with the F ACK button but the fault is still present the PF...

Page 201: ...e following lines Pressing the F ACK button will acknowledge each page in sequence The button needs to be depressed as many times as they are pages present 4 After the F ACK press the second page is displayed Bottom arrows are still displayed so a third page is present and needs to be reviewed with the F ACK button 5 The third and final page is acknowledged A subsequent F ACK press will clear the ...

Page 202: ... F ACK button will show the pilot that the MMC is still degraded Shutting down the MMC power may or may not clear the fault The active cooling may or may not provide enough bleed air to cool down the MMC and make it operational again depending on how long the system was overheated 3 4 2 2 Special considerations The PFLD is powered by the UFC and will obviously blank if no power is available to the...

Page 203: ...ION FLCS ADC FAIL 13 Air data input signal failure Second ADC fail triggers STBY GAINS and latches ADC fail against FLCS RESET attempt FLCS RESET Land ASAP ISA RUD FAIL 34 Rudder servo actuators malfunction Rudder problems FLCS RESET Land ASAP ISA ALL FAIL 36 Controls servo actuators malfunction Flight control problems FLCS RESET Land ASAP FLCS HOT TEMP 48 Excess temperature in FLCS branches None ...

Page 204: ...heat of the UFC system Possible damage if not shut off Shut off FCC check AIR SOURCE knob position AMUX BUS FAIL 3 AMUX BUS failure FCC is forced to NAV Discontinue offensive operations BMUX BUS FAIL 3 BMUX BUS failure FCC is forced to NAV Discontinue offensive operations DMUX BUS FAIL 3 DMUX BUS failure HUD HMS MFDs non operational Pilot discretion CADC BUS FAIL 3 Loss of CADC parameters to avion...

Page 205: ...implemented NVP COMM FAIL 14 INS invalid data Terrain following FAIL and AUTO fly up Check INS EGI GPS NVP COMM FAIL 15 Invalid RALT Terrain following FAIL and AUTO fly up Check RALT switch position RALT BIT not running NVP FLIR ALIGN 12 FLIR alignment failure FLIR video misaligned Reset FLIR discontinue FLIR operations NVP FLIR FAIL 9 FLIR failure FLIR inoperative Discontinue TFR FLIR operations ...

Page 206: ...Remote interface degraded Command not executed correctly Pilot discretion SMS STA8 FAIL 94 Station 8 Remote interface failed Station operation inhibited Pilot discretion SMS STA9 DEGR 111 Station 9 Remote interface degraded Command not executed correctly Right wingtip pylon malfunction pilot discretion SMS STA9 FAIL 95 Station 9 Remote interface failed Station operation inhibited Right wingtip pyl...

Page 207: ...hot start is occurring and the engine must be immediately shut down Failure to interrupt the engine start will damage the engine leading to engine fire with FTIT rising to well over 1000 C After moving the throttle back to the CUTOFF position click idle detent if necessary keep the JFS running as it helps to cool down the engine Allow FTIT to fall to 200 C before advancing the throttle to IDLE to ...

Page 208: ...riod that failures due to a hot brake condition may occur depending on how much energy was built up Brake energy is also continually monitored and built up during taxiing whenever the brakes are applied Build up from taxiing is at its greatest with low gross weights and long taxis because the brakes must be used more often to control taxi speed Taxiing with a gross weight of 20000 lbs at 10 knots ...

Page 209: ...te braking failure likely 3 5 7 NWS FAILURE NWS failure is indicated by the NWS FAIL caution light in which case do not engage NWS a malfunction may cause abrupt turns tyre skidding or blowouts and departure from the paved surface Use rudder and brakes as required to steer the aircraft on the ground Beware of increased hot brakes risk when using differential brakes to steer the aircraft Remember N...

Page 210: ...mmediately to below 300 knots and replace the gear handle in the down position If landing gear comes down normally land as soon as possible Do not try to retract the gear as it may cause further damage and prevent further gear extension If the landing gear does not indicate down reduce speed further to below 190 knots and use the alternate gear extension handle Bear in mind that NWS is not availab...

Page 211: ...pecially if speed is already high If takeoff is continued do not retract the landing gear reduce the gross weight and plan to land as soon as practical refer to landing emergencies chapter 3 8 1 Landing With A Blown Tyre later in this section If aborting the takeoff try to maintain directional control with rudder differential braking if available and NWS when at control speed Stop straight ahead a...

Page 212: ...S caution light Refer to Chapter 1 9 Electrical System for troubleshooting The ELEC SYS caution light cannot be reset with the MASTER CAUTION light The CAUTION RESET pushbutton on the ELEC panel is used to reset any ELEC SYS caution light 3 7 5 ENGINE MALFUNCTIONS 4 34 introduced more possibilities to have engine trouble in flight Nearby explosions AAA or SAM may cause your engine to flameout fuel...

Page 213: ...ss rate the pilot demonstrated in simulated flameout SFO exercises That being said failing does not bear any consequence and the BMS ejection envelope is rather large To perform a flameout landing turn immediately towards the nearest runway jettison stores to decrease drag and establish best range airspeed Sounds simple but you first need to be able to know where you are and where the closest runw...

Page 214: ...final at 3000 5000 feet BASE KEY midpoint of the turn from downwind to final no lower than 2000 AGL The whole approach is flown at best range airspeed 210 knots gear up Optimum bank angles are 50 for gear up and 55 gear down Anything above optimum bank angle induces a significant loss of altitude per degree of turn The gear is only lowered when it becomes certain that BASE key altitude can be reac...

Page 215: ... best range airspeed towards Base Key Base Key is the mid point of the turn and should be reached no lower than 2000 feet AGL At that point the gear should be down Speedbrakes can be used carefully to bleed off excess altitude or just move the touchdown point past the runway threshold Maintain 11 13 AOA during final approach flaring and using speed brakes as required On touch down maintain aero br...

Page 216: ... runway aligned with an altitude of 7000 feet AGL POINT B 4 Nm from the runway aligned with an altitude of 4000 6000 feet AGL AREA C between 0 and 4 Nm from the runway threshold Judging when the aim point is 11 17 below the horizon to start your final descent is not easy A good visual cue is when the aim point runway touch down point is at the bottom of the HUD If the altitude of 7000 feet was mai...

Page 217: ...ck and forth or enter a flameout overhead pattern Once at 2000 feet AGL with the aim point at the bottom of the HUD lower the landing gear alternate gear extension and control your final descent which will be steeper with speed brakes When starting a straight in approach take the weather and the EPU fuel remaining when reaching POINT A into consideration IMC penetration can be performed but ideall...

Page 218: ...he L117s are the Maverick racks and the L88s are the AGM 88 racks The pilot can preselect a selective jettison configuration while in S J Master Mode which will be remembered during master mode transitions The stores are jettisoned using the pickle button when the MASTER ARM switch is in ARM After the stores are released the highlighted stations are removed from the S J page and the associated wea...

Page 219: ...d back to NORM An EGI status of 8 1 10 is sufficient actually as with ground align the alignment in BMS is accurate with GPS as soon as the AUX flag disappears from the ADI The EGI knob can then be moved back to NORM and navigation data will be displayed in the HUD and MFDs 3 7 8 Controllability Check A controllability check should be performed anytime structural damage or any failure impacting ai...

Page 220: ...mum 30 psi at flight idle for the PW engine and minimum 25 psi at flight idle for the GE engine F 16 Any pressure below these limits should be considered as an in flight emergency and landing should be considered as soon as possible Please note the HYD OIL PRESS warning light may not illuminate immediately Oil pressure issues are usually slow to develop Whenever suspecting an OIL pressure loss min...

Page 221: ...odelled NWS might be more critical Land on the side away from the blown tyre Use roll control to relieve pressure on the blown tyre and NWS to maintain directional control Brake on the good tyre if you have differential braking Stop the aircraft straight ahead and shut down the engine Do not attempt to taxi unless an emergency situation exists 3 8 2 LG EXTENSION MALFUNCTIONS Malfunctions in the la...

Page 222: ...in landing gear up or unsafe Alternate Gear handle in wait 5 seconds Landing Gear handle up Depress Alternate Gear reset button If nose landing gear does not retract consider a low angle approach at 13 AOA with empty fuel tanks if carried Nose landing gear up or unsafe EPU ON Consider low angle approach at 13 AOA Throttle OFF after touchdown Lower the nose to the runway before control effectivenes...

Page 223: ...alling the ATC for wind speed and direction prior to departure or by switching to the VHF ATIS frequency for latest conditions In the air you can receive wind data from the F 16 probes by moving DCS right on the UFC CNI page The second step is to calculate the real annoying component of the wind the full crosswind As you know headwind is desirable for take off and landing When the wind is not full...

Page 224: ...ts You enter the graph on the line giving the wind direction relative to the runway 360 330 30 Then find the wind speed on the left of the graph and follow the curve until you intersect the first line By plotting the found coordinates on the two axes you will have the full headwind and full crosswind component of this scenario in this case 17 5 knots headwind and 10 knots crosswind ...

Page 225: ...The wing level crab is the only technique for landing the F 16 Take your feet off the rudder pedals and point the aircraft nose into the wind In high crosswind situations the FPM may drift outside the HUD field of view and you may have to centre the FPM with the DRIFT C O switch and estimate your flight path Always plan your touch down point on the upwind side of the runway On touchdown the ARI sw...

Page 226: ...T O BMS1F 16CM 1 BMS 4 34 Change 2 00 BMS 4 34 Dash 1 Red Dog 2012 2019 Page 226 SECTION IV FLIGHT CHARACTERISTICS ...

Page 227: ...e or descent during the departure phase of flight The Voice Message Unit VMU descent warning advisory Altitude Altitude will occur when all the following conditions are met The landing gear handle is up The time from takeoff is less than 3 minutes from WOW The aircraft has climbed at least 300 feet above the runway elevation referenced to Mean Sea Level MSL but not yet gained 10 000 feet above run...

Page 228: ...mited at 3 AOA and reaches zero deflection at 15 AOA Although the FLCS through the CAT limiting switch offers further protection against departure the pilot still has to be careful with heavier and especially asymmetric loads CAT III or at slow speeds with lighter loads CAT I 4 4 Departure from controlled flight Departure from controlled flight is something any fighter pilot will strive to avoid B...

Page 229: ...e Still BMS being a simulation roll departure is a real possibility if rolls limits are exceeded Roll departure will lead to pitch departure Pitch departure upright or inverted Occurs when the AOA exceeds the AOA limiters During a pitch departure the instruments will usually report erroneous low speed 0 150kts and AOA above positive 32 and negative 5 instrument limits This may happen at slow speed...

Page 230: ...vely applied and maintained until the aircraft starts to pitch back up following its deep stall oscillation At this time stick commands should be inverted with a hard aft stick commanded and maintained until the next oscillation Basically you must accompany the pitching motion of the aircraft with aggressive stick inputs After a few oscillations with correct stick input and MPO override the down o...

Page 231: ...shutdown due to a reduction in electrical power available to the JFS Close the canopy before switching the JFS on ENGINE GAUGES ENGINE F100 PW 229 blocks ending with a 2 Block 32 42 52 GROUND CONDITION FTIT C RPM OIL psi REMARKS START 800 If FTIT rises past 750 C expect a hot start IDLE 625 15 min If Oil remains under 15 psi expect engine failure and or fire MIL AB 1070 97 30 95 At MIL and above o...

Page 232: ... 30000 feet M2 05 above 30000 ft Max speed may be further reduced according to stores carried Maximum airspeed with Gear Down 305 Kts Maximum airspeed for AAR door opening 400 Kts Max Gross Weight 48000 lbs Centre of Gravity Limitations Generally CG is always within limits unless the red portion of the AL Fuel Quantity needle is visible Without external tanks the most aft CG occurs with 2000 lbs o...

Page 233: ... 2019 Page 233 5 BIBLIOGRAPHY SuperPak 3 Manual BMS 2 0 manual BMS 2 0 technical manual F 16 dash 1 BMS manual BMS1 F16CM 34 1 1 BMS checklists BMS website published articles BMS Comms and Nav book former Chart Tutorial Vol 3 11 2f 16 pdf Vol 5 Basic Employment Manual ...

Page 234: ...ows and Tom Zipgun Wise Nevertheless I take full responsibility for any errors remaining Thanks also to Laurent Amraam Dauxbrebis for allowing me to use his refuelling article published on the BMS website and to Dee Jay for his advice about configuring sound in BMS Obviously this manual wouldn t have been possible without the tremendous work done by the BMS development team So heartfelt thanks to ...

Reviews: