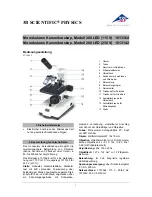
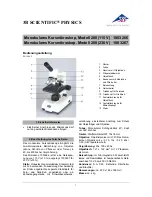
background image


MICROSCOPY 


1. Lamp 

illumination 

Turn the brightness control dial forward to achieve the desired 

brightness. 


2. Specimen 

Mounting 

Mounting with the cover glass facing upwards. 


3. Focusing with 10X Objectives 

Choose the objective 4X or 10X. Turn the coarse focusing 

knob to get the objective focused on the slide and then turn 

the fine focus adjustment knob to get the image sharp and 

clear. 


4.Interpupillary Distance Adjustment 

Adjust the interpupillary distance of binocular until the 

right-left field of view can be composed one.   


5. Eyepiece Diopter Adjustment   

Firstly, observe at right tube with right eye, adjust coarse-fine 

focusing knob to image clearly. 

Secondly, observe at left tube with left eye, adjust the diopter 

control 1 to image clearly. 


6. Objective Selection   

Rotate the revolving nosepiece to the desired objective 

magnification, assuring it click-stops into position. 


7. Aperture Diaphragm Adjustment 

(This diaphragm is designed for numerical aperture 

adjustment, not brightness.) 


General, a good image of sufficient contrast can be achieved 

with the aperture diaphragm stopped down to approximately 

70-80% of the objective’s numerical aperture. To observe the 

Summary of Contents for C2

Page 1: ...ce making you familiar with the instrument entirely it is strongly recommended that you read this manual carefully before using the microscope For the further reference please place this manual in a position where nearby the worktable and fetched easily BMS C2 Microscope Operation Instruction ...

Page 2: ...OVERVIEW ...

Page 3: ...he specifications of power supply which marked on the microscope base The power supply must comply with the specifications otherwise the microscope will be damaged 5 Changing the Light bulb Before replacing the light bulb with new one first turn off the light switch on the microscope base then take off the power plug and wait until the bulb cools down Only halogen bulb 6V 20W is workable on this m...

Page 4: ...ing environment Room temperature 0 to 40 Relative humidity max 85 High temperature and humidity will cause molds dew formation and damage z Avoid placing the microscope under the direct sunlight or the room light Bright circumstances deteriorate the specimen image z Avoid placing the microscope in dusty surroundings When the microscope is not in use cover it up with a vinyl cover ...

Page 5: ... the cover to their original place Eyepiece tube Mount the eyepiece tube onto the arm and tighten the clamp screw Eyepieces Insert the eyepieces into the eyepiece sleeves and tighten the clamp screw Objectives Lower the stage to its full limit then screw the objectives into the revolving nosepiece Daylight Filter Press the filter into the bottom of the auxiliary lens and then insert the auxiliary ...

Page 6: ...he right left field of view can be composed one 5 Eyepiece Diopter Adjustment Firstly observe at right tube with right eye adjust coarse fine focusing knob to image clearly Secondly observe at left tube with left eye adjust the diopter control 1 to image clearly 6 Objective Selection Rotate the revolving nosepiece to the desired objective magnification assuring it click stops into position 7 Apert...

Page 7: ... If it is opened to a larger aperture than necessary extraneous light will enter the viewfield reducing image quality and contrast 9 Oil immersion Observation When using the 100X objectives it is an oil immersion type requiring the application of immersion oil between its lens tip and the coverglass If air bubbles enter the oil layer a poor image will result To remove the air bubbles rotate the no...

Page 8: ...ing No coverglass attached to the slide Attach coverglass Coverglass too thick or thin Use coverglass of specified thickness 0 17mm Slide upside down Turn over the slide Immersion oil on dry system objective especially 40X Cleaning Dirt or dust on the lens condenser objective eyepiece slide Cleaning No immersion oil used on immersion system objective Use immersion oil Air bubbles in immersion oil ...

Page 9: ...7mm Specimen image movement unsmooth Mechanical stage not securely fastened Tighten all fasteners Binocular image not integrated Interpupillary distance not correctly adjusted Adjustment Incorrect diopter adjustment Correct adjustment Excessive eye fatigue Inadequate brightness or illumination Adjust brightness with control dial 3 Electrical Symptoms Causes Countermeasures No electrical power Chec...

Page 10: ...ute alcohol and petroleum benzine are quite inflammable Take great care when handling them and when setting the power switch on and off Be very careful with fire 2 Cleaning Painted or Plastic Surfaces z Avoid use of any organic solvents such as alcohol ether thinner etc to clean the painted or plastic surfaces of the instrument We recommend the use of silicon cloth More persistent did may be clean...

Reviews: