background image

The HDMI 4K Series Camera Help Manual


22

 / 

29


8.4.9


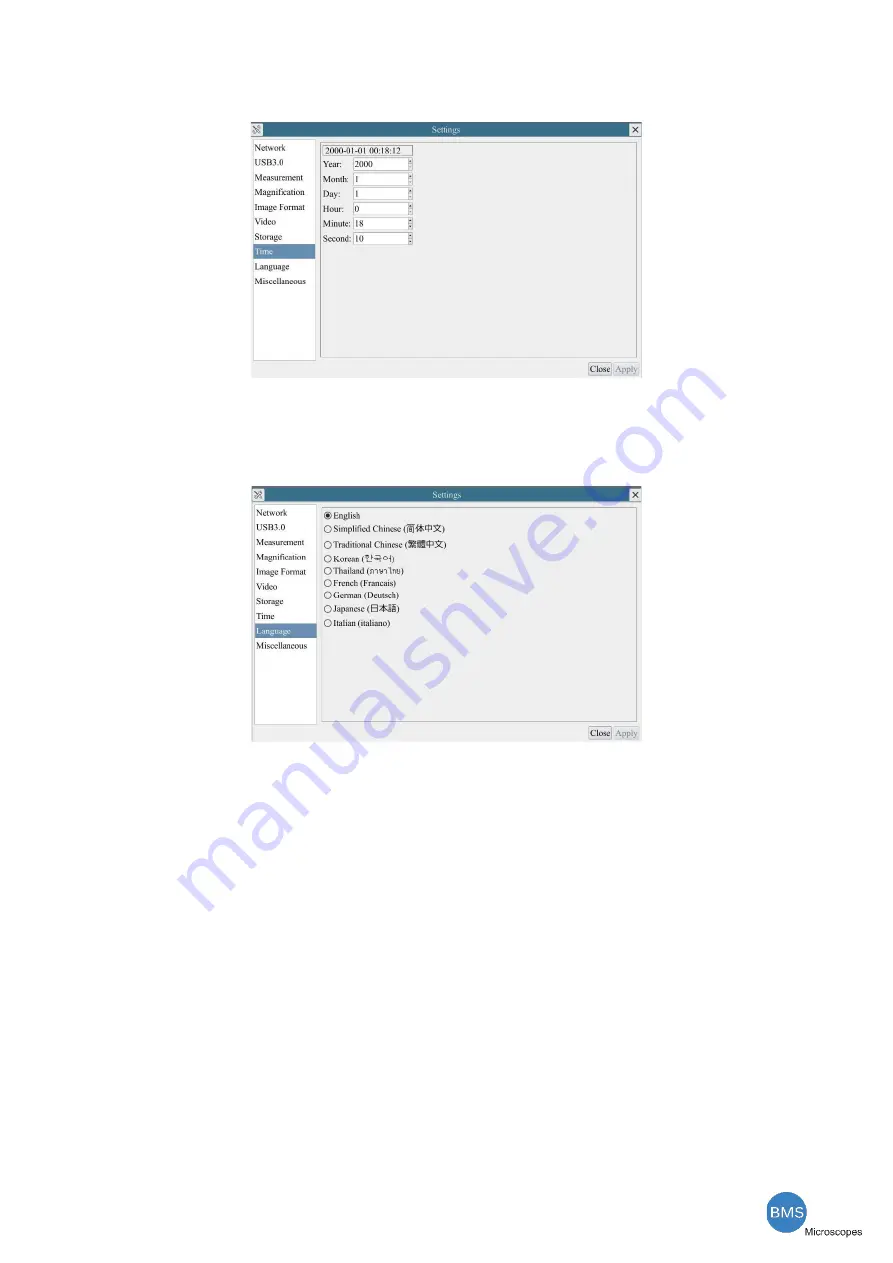
Setting>Time


Figure 8

-

8 Time Setting


Time 

User can set 

Year

Month

Day

Hour

Minute

 and 

Second

 ital.in this page. 

8.4.10


Setting>Language


Figure 8

-

15 HDMI 4K Comprehensive Setting of Language Selection Setting Page


English 

Set language of the whole software into English; 

Simplified Chinese 

Set language of the whole software into Simplified Chinese; 

Traditional Chinese 

Set language of the whole software into Traditional Chinese; 

Korean: 

Set language of the whole software into Korean; 

Thailand 

Set language of the whole software into Thailand; 

French 

Set language of the whole software into French 

German 

Set language of the whole software into German 

Japanese 

Set language of the whole software into Japanese 

Italian 

Set language of the whole software into Italian 

Summary of Contents for 76604K8MPA

Page 1: ...Manual HDMI 4K Series Camera 76604K8MPA The HDMI 4K Series Camera manual 9991002015 manual Camera 76604K8MPA ...

Page 2: ...Camera working standalone with built in Onboard BMS software 4 7 2 Connecting camera to the PC with USB3 0 port 5 7 3 Camera working in WLAN mode AP mode 6 7 4 Connecting camera to the PC with LAN port 8 7 5 Connecting multi cameras to the router through the LAN port WLAN STA mode for the network application 10 8 Brief Introduction of HDMI 4K UI and Its Functions 13 8 1 Onboard BMS UI 13 8 2 The c...

Page 3: ...lications for smart phones or tablets 2 Available Ports on the Back of the Camera Body Figure 2 1 Available Ports on the Back Panel of the Camera Body Interface Function Description USB Mouse Connect USB mouse for easy operation with embedded Onboard BMS software USB3 0 1 Connect USB flash drive to save pictures and videos 2 Connect 5G WLAN modules to transfer video wirelessly in real time AP STA ...

Page 4: ...4 encoded MP4 file 2 Video saving frame rate 50 60fps XCAM4K8MPA related with SD card and video resolution Image Capture 8M 3840 2160 XCAM4K8MPA JPEG TIFF image in SD card or USB flash disk Measurement Saving 1 Measurement information saved in different layer with image content 2 Measurement information is saved together with image content in burn in mode 4 3 ISP Function Function Name Function De...

Page 5: ...N61204 3 EN61000 3 2 3 FCC Part 152 class B BSMI CNS14338 EMS Standard EN61000 4 2 3 4 5 6 8 11 EN61204 3 Class A Light Industry Standard D USB Mouse E HDMI 2 0 Cable F High speed USB3 0 A male to A male gold plated connectors cable 2 0m G CD Driver utilities software Ø12cm H SD Card 16G or above Speed class 10 or USB flash disk I USB WLAN adapter J Ethernet cable K L Fixed lens adapter C Mount to...

Page 6: ...environment 7 1 Camera working standalone with built in Onboard BMS software For this application apart from the microscope you only need an HDMI displayer the supplied USB mouse and the camera embedded Onboard BMS software A computer or a network connection is not required to operate the camera in this application The steps to start the camera are listed as below Figure 7 1HDMI 4K Camera with the...

Page 7: ...SB3 0 port For Windows user Windows XP 32bit Windows 7 8 10 32 64 bit please use BMS_pix3 For macOS and Linux user macOS 10 10 or above or Linux distributions with kernel 2 6 27 or higher please use latest version of BMS_pix3 from download The steps to start the camera are listed below Start the camera according to Sec 7 1 After the camera is running moving the mouse to the bottom of the UI and cl...

Page 8: ...amera with a mobile device the free BMS_pix3 App is required Just make sure that the mobile device uses iOS 11 or higher Android 5 1 or higher operating systems Figure 7 2 The PC or Mobile Device Connect to the Camera through WLAN The steps to start the camera are listed below Start the camera according to Sec 7 1 After the camera is running moving the mouse to the bottom of the UI and clicking th...

Page 9: ...provides The network name SSID and the WLAN password The default one is 12345678 can be found on the camera s Setting Network WLAN page in AP mode Start the BMS_pix3 software or BMS_pix3 App and check the configuration Normally active HDMI 4K cameras are automatically recognized The live image of each camera is displayed For the display the Camera List tool window is used in the BMS_pix3 software ...

Page 10: ...on on the Synthesis Camera Control Toolbar at the bottom of the video window a small window called Settings will pop up as shown below on the left side clicking the LAN property page uncheck the DHCP item Input the IP Address Subnet Mask and Default Gateway for the camera Designate the Internet Protocol Version 4 TCP IPv4 Settings page s IP address on the PC with similar configuration as shown bel...

Page 11: ...s network port Insert the supplied SD card USB flash disk USB3 0 interface into the HDMI camera SD card slot USB3 0 interface Install the BMS_pix3 on your PC or install the BMS_pix3 App on the mobile device Run the software BMS_pix3 clicking the camera name in the camera list starts the live video ...

Page 12: ...uration are just the same as in Sec 7 1 or Sec 7 4 But here users need to check DHCP If Multicast is disabled or is not supported users should only select Unicast If Multicast is supported by the network users could select Multicast to achieve a better performance especially in the case that multi users connecting to the same camera In addition please guarantee that the broadcasting function is en...

Page 13: ...tall the BMS_pix3 software on your PC Alternatively install the free BMS_pix3 App on the mobile device Plug the Ethernet cable into the camera s LAN port and the other end to the PC for those connected to router with WLAN STA mode Or plug the USB WLAN adapter into the camera s USB3 0 port for those connected to router with WLAN STA mode Finally as shown below 2 HDMI cameras are connected to the ro...

Page 14: ... click the camera s name in the Camera List tool window if you use the BMS_pix3 software If you use the BMS_pix3 App tap the camera s thumbnail in the Camera List page Note on data security The data transfer of the HDMI 4K camera in LAN or WLAN is not encrypted Anyone who is connected to the network and has installed the BMS_pix3 software or BMS_pix3 App can see the live image of all active HDMI 4...

Page 15: ...rations When user left clicks the Float Fixed button on the Measurement Toolbar the Measurement Toolbar will be fixed In this case the Camera Control Panel will not pop up automatically even if users move mouse cursor to left side of the video window Only when user left clicks the button on the Measurement Toolbar to exit from measuring procedure will they be able to do other operations on the Cam...

Page 16: ...de to left or right to reduce or increase exposure time adjusting brightness of the video Gain Adjust Gain to reduce or increase brightness of video The Noise will be reduced or increased accordingly Red Slide to left or right to decrease or increase the proportion of Red in RGB on video Green Slide to left or right to decrease or increase the proportion of Green in RGB on video Blue Slide to left...

Page 17: ...Toolbar on the upper Side of the Video Window Icon Function Float Fix switch of the Measurement Toolbar Show Hide Measurement Objects Select the desired Measurement Unit Select Magnification for Measurement after Calibration Object Select Angle 4 Points Angle Point Arbitrary Line 3 Points Line Horizontal Line Vertical Line 3 Points Vertical Line Parallel Rectangle Ellipse Circle 3 Points Circle An...

Page 18: ...ject by dragging the object with the mouse But more accurate movement could be done with the control bar The icons on the control bar mean Move Left Move Right Move Up Move Down Color Adjustment and Delete Note 1 When user left clicks Display Hide button on the Measurement Toolbar the Measurement Toolbar will be fixed In this case the Camera Control Panel will not pop up automatically even if movi...

Page 19: ...Browse Images and Videos in the SD Card Settings Check the Version of Onboard BMS Color gray The Setting function is relatively more complicated than the other functions Here are more informations about it 8 4 1 Setting Network General Figure 8 3 Comprehensive Network Settings Page Name The current camera name recognized as the network name Bandwidth The encoding bandwidth for the video transmissi...

Page 20: ... well Users must manually configure their IP addresses on the camera side and computer side The IP addresses set on the camera side and computer side should be in the same network segment The specific settings are shown Figure 8 5 It s usually a private address Private address is a non registered address used exclusively within an organization The internal private addresses retained are listed bel...

Page 21: ...he STA mode Here the SSID is the router s SSID Password Camera Password for the AP mode Router Password for the STA mode 8 4 4 Setting USB3 0 Figure 8 9USB Mode Choice Host Mode Connect usb flash drive or WiFi adaptor Device Mode Video output through connection to PC wich usb cable 8 4 5 Setting Measurement This page is used for the define of the Measurement Object properties ...

Page 22: ...above will unfold the corresponding attribute settings to set the individual property of the Measurement Objects 8 4 6 Setting Magnification This page s items are formed by the Measurement Toolbar s Calibration command Figure 8 11 Comprehensive Magnification Calibration Settings Page Name Names such as 10X 40X 100X are based on magnification of the microscopes For continuous zoom microscopes ensur...

Page 23: ...urement objects any more This mode is not reversable Layered Mode The measurement objects are saved in different layer with current image data in the target file User could edit the measurement objects in the target file with some software on the PC This mode is reversable 8 4 8 Setting Storage Figure 8 13 Comprehensive Setting of SD Card Setting Page Prefered Storage Page SD Card Select it to sav...

Page 24: ... into English Simplified Chinese Set language of the whole software into Simplified Chinese Traditional Chinese Set language of the whole software into Traditional Chinese Korean Set language of the whole software into Korean Thailand Set language of the whole software into Thailand French Set language of the whole software into French German Set language of the whole software into German Japanese...

Page 25: ...Choosing the ROI rectangle line color Cursor Choosing the Cursor size according to the screen resolution or personal preference Camera Parameters Import Import the Camera Parameters from the SD card or USB flash disk to use the previously exported Camera Parameters Camera Parameters Export Export the Camera Parameters to the SD card or USB flash disk to use the previously exported Camera Parameter...

Page 26: ...The HDMI 4K Series Camera Help Manual 24 29 9 Sample Photos Captured with HDMI 4K Series Camera Rabbit Emdryo captured XCAM4K8MPA Ovary Captured with XCAM4K8MPA ...

Page 27: ...The HDMI 4K Series Camera Help Manual 25 29 Cotton Stem captured with XCAM4K8MPA Taste Bad Captured with XCAM4K8MPA ...

Page 28: ...The HDMI 4K Series Camera Help Manual 26 29 MK54 40 Corn Leaf ...

Page 29: ...e Please contact your local distributor if you have any questions about the product BMS Microscopes b v Essebaan 50 2908 LK Capelle aan den IJssel Die Niederlande Tel 010 458 42 22 Fax 010 450 82 51 sales bmsmicroscopes com www bmsmicroscopes com January 2021 BMS Microscopes ...

Reviews: