Quick Start Guide - Sentis-ToF-P509
Last change: 2 June 2015
Version 2
© Bluetechnix 2015
Page 6 | 14
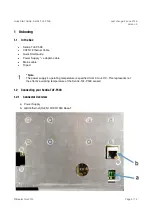
Figure 1-1: Sentis-ToF-P509 connectors and interfaces
Note
Please follow the next steps in the right order to get your Sentis-ToF-P509 up and running
correctly.
1.2.2
Power Connector (a)
Connect the power supply to the power connector (a) using the adapter cable.
Pin assignment on the power supply connector (without connected adapter):
Connector Type: 2.1mm ID / 5.5mm OD
Voltage: 18-30V
Polarity:
This pins are protected against wrong polarity.
Note
Use inherently limited power sources only!
The power supply connector is protected against wrong polarity but the P509
will not work in
case you don’t use the correct polarity!
To ensure, that your P509 works correctly, connect the P509 to the
24V DC
power supply using connector
(a)
and wait for approximately 20 seconds until the camera boots up.
1.2.3
GBit Ethernet Connector (b)
This standard RJ45 connector provides a 10/100/1000 Base-T interface to the P509.
Plug in the Ethernet cable
(b)
and connect your P509 to your PC.

