background image

Installation 

5. Components 

having 

adjustments 

protected (e.g. paint sealed) by manufacturer are only allowed to 

be adjusted by an Qualified service agent.  They are not to be adjusted by the installation person. 


NOTE:  Do not obstruct or block the appliances flue.  Never directly connect a ventilation system to 

the appliance flue outlet. 


Clearances 

NOTE:  Only non-combustible materials can be used in close proximity to this appliance. 


Any gas burning appliance requires adequate clearance and ventilation for optimum and trouble-free  

operation.  The following minimum installation clearances are to be adhered to: 

Assembly 

G55T model only 

This model is delivered completely assembled.  No further assembly is required. 


NOTE: 



This appliance is fitted with adjustable feet to enable appliance to be positioned securely 
and level.  This should be carried out on completion of the gas connection.  Refer to 'Gas 
Connection' section below. 


Optional Accessories (Refer to Replacement Parts List) 



Plinth Kit.  For installation details, refer to instructions supplied with each kit. 


1. 

Check all feet (castors) are securely fitted. 

2. 

Adjust feet to make gas griddle toaster steady and level. 


Gas Connection 

NOTE:  ALL GAS FITTING MUST ONLY BE CARRIED OUT BY A QUALIFIED SERVICE PERSON. 


1. 

Blue Seal Gas Griddle Toasters do not require an electrical connection, as they function totally on the 

gas supply only. 

2. 

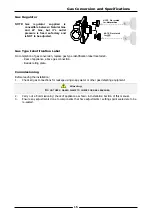
It is essential that gas supply is correct for appliance being installed and that adequate supply  

pressure and volume are available.  The following checks should be made before installation: 

a. 

Gas Type 

the appliance has been supplied for, is shown on 

a coloured sticker located above gas connection and on  

rating plate.  Check this is correct for gas supply appliance is 

being installed for.  Gas conversion procedure is detailed in 

this manual. 

b. 

Supply Pressure 

required for this appliance is shown in 

‘Specifications’ Section of this manual.  Check gas supply to 

ensure adequate supply pressure exists. 

c. 

Input Rate 

of this appliance is stated on Rating Plate and in 

‘Specifications’ section of this manual.  Input rate should be 
checked against available supply line capacity.  

Particular 

note should be taken if appliance is being added to an 

existing installation.


NOTE:  It is important that adequately sized piping runs directly 

to connection joint on griddle toaster with as few tees and 
elbows as possible to give maximum supply volume. 

Rating Plate 

Fig 1 


Combustible Surface 

Non Combustible Surface 

Left / Right hand side 

50mm 

0mm 

Rear 

50mm 

0mm 

Summary of Contents for Evolution G55T

Page 1: ...228001 7 GAS GRIDDLE TOASTER G55T I N S T A L L A T I O N A N D O P E R A T I O N M A N U A L For use in GB IE ...

Page 2: ...ares tel 1800 337 963 Customer Service tel 1800 335 315 fax 1800 350 281 CANADA Serve Canada Web www servecanada com E Mail info servecanada com Sales tel 800 551 8795 Toll Free Service tel 800 263 1455 Toll Free NEW ZEALAND Moffat Limited Web www moffat co nz E Mail sales moffat co nz Main Office tel 0800 663328 UNITED KINGDOM Blue Seal Web www blue seal co uk E Mail sales blue seal co uk Sales t...

Page 3: ...on 5 Installation Requirements Unpacking Location Clearances Assembly Gas Connection Commissioning Operation 8 Operation Guide Description of Controls Lighting Pilot Burners Using Griddle Using Toaster Cleaning and Maintenance 10 General After Each Use Daily Cleaning Weekly Cleaning Periodic Maintenance Fault Finding 13 Gas Conversion and Specifications 14 Conversion Procedure Gas Specifications R...

Page 4: ...IANCE MUST NOT BE LEFT ON UNATTENDED IT IS RECOMMENDED THAT A REGULAR INSPECTION IS MADE BY A COMPETENT SERVICE PERSON TO ENSURE CORRECT AND SAFE OPERATION OF YOUR APPLIANCE IS MAINTAINED DO NOT STORE OR USE GASOLINE OR OTHER FLAMMABLE VAPOURS OR LIQUIDS IN THE VICINITY OF THIS OR ANY OTHER APPLIANCE DO NOT SPRAY AEROSOLS IN THE VICINITY OF THIS APPLIANCE WHILE IT IS IN OPERATION Warning This appl...

Page 5: ...ing Operating pressure is ex factory set through appliance regulator and is not to be adjusted apart from when converting between gases if required Refer to Gas Conversion section for details Gas Connection Gas supply connection point is located 130mm from right hand side of appliance 32mm from rear 655mm from floor and is entered from beneath appliance An optional underside connection is availabl...

Page 6: ...4 Dimensions G55T Gas Griddle Toaster TOP Weight Nett G55T 120kg SIDE FRONT Gas Connection Point ...

Page 7: ...n this section will void the warranty Components having adjustments protected e g paint sealed by manufacturer are only to be adjusted by a qualified service person They are not to be adjusted by the installation person Unpacking Remove all packaging and transit protection from appliance including all protective plastic coating from exterior stainless steel panels Check equipment and parts for dam...

Page 8: ...vel Gas Connection NOTE ALL GAS FITTING MUST ONLY BE CARRIED OUT BY A QUALIFIED SERVICE PERSON 1 Blue Seal Gas Griddle Toasters do not require an electrical connection as they function totally on the gas supply only 2 It is essential that gas supply is correct for appliance being installed and that adequate supply pressure and volume are available The following checks should be made before install...

Page 9: ...ting equipment 7 Check gas operating pressure is as shown in Specifications section NOTE Operating pressure to be measured at manifold pressure test point and with all burners operating at High Flame setting 8 Turn Off mains gas supply and bleed gas out of appliance gas lines 9 Turn On gas supply and appliance 10 Verify operating pressure remains correct Commissioning 1 Before leaving new installa...

Page 10: ...the following sections carefully before use Lighting Pilot Burners Using Griddle Using Toaster Description of Controls Gas Control Knobs OFF Position PILOT Burner HIGH Flame LOW Flame Piezo Igniters Ignites the Pilot Burners Fig 3 This appliance is for professional use and is only to be used by qualified persons Only authorised service persons are to carry out installation servicing or gas convers...

Page 11: ...eve desired heat 5 During idle periods burners can be turned down to maintain an appropriate griddle plate temperature or gas controls can be set to PILOT position as required Using Toaster 1 Light pilot burners as shown above 2 If starting from cold set burners to FULL flame position and allow 5 minutes preheat before commencing toasting 3 Adjust rack position to desired height 4 Place product on...

Page 12: ...at any detergent or cleaning material has been completely removed after each cleaning Appliance should be switched On briefly to ensure griddle plate becomes dry Oil or grease should be spread over griddle surface to form a thin protective greasy film To keep your griddle clean and operating at peak efficiency follow procedures shown below After Each Use 1 Clean griddle with scraper tool to remove...

Page 13: ... drawer frequently to prevent over spills b Remove crumb tray frequently to prevent overfilling crumb tray c Clean griddle surface thoroughly with a scraper tool or a wire brush If necessary use a griddle stone or a scotch bright pad on griddle surface to remove stubborn or accumulated carbon deposits d Occasionally bleach griddle plate with vinegar when plate is cold e Clean with hot water a mild...

Page 14: ... correct operation To carry out this operation a Remove gas control knobs from gas tap spindles b Remove drip tray from appliance c Remove two screws on underside of control panel securing control panel to hob and remove control panel d Remove the 2 screws holding shaft plate to gas control body and remove control shaft and plate Note orientation of shaft for correct re assembly e Using needle nos...

Page 15: ...ovider NOTE Components having adjustments protected e g paint sealed by manufacturer should only be adjusted by an authorised service agent They are not to be adjusted by an unauthorised service person This section provides an easy reference guide to the more common problems that may occur during operation of your equipment The fault finding guide in this section is intended to help you correct or...

Page 16: ...r Toasting Rack Pilot Burners 1 Disconnect the following Pilot Supply and Thermocouple Tubes from Gas Control Valve Pilot Assembly from Griddle Toaster 2 Remove pilot injectors and replace with correct size pilot injectors as shown in Gas Specifications Tables at rear of this section 3 Re connect the following Pilot Supply and Thermocouple Tubes to Gas Control Valve Pilot Assembly to Griddle Toast...

Page 17: ...r of appliance above gas connection Beside rating plate Commissioning Before leaving the installation 1 Check all gas connections for leakage using soapy water or other gas detecting equipment 2 Carry out a Commissioning check of appliance as shown in Installation Section of this manual 3 Ensure any adjustments done to components that have adjustments settings paint sealed are to be re sealed NOTE...

Page 18: ...as LP GAS Propane Main Burner Injector 2 10 mm 1 30 mm Pilot Burner Injector 0 35 mm 0 23 mm Low Fire Adjustment 1 turn out c c w turn out c c w Operating Pressure 1 0 kPa 2 5 kPa Burner Aeration Gap 15 mm Open 15 mm Open Gas Regulator Cap Screw Supply Pressure 1 13 3 40 kPa 4 5 13 5 w c 2 75 4 50 kPa 11 18 w c Natural Gas G20 Propane G31 Main Burner Injectors 2 10 mm 1 30 mm Pilot Burner Injector...

Page 19: ... convertible 1 2 BSP F F General 227007 Toasting Rack 227006 Side Racks 227086 Toasting Rack Tray Stainless Steel 227083 Crumb Tray Enamelled 227070 Grease Drawer 227850 Adjustable Legs 150mm 229674 Rear Roller Assy Accessories 228795 Plinth Kit 600mm 228566 Griddle Scraper Tool 228567 Smooth Plate Scraper Blades Pack of 5 blades Gas Conversion Kits Model Gas Type to Convert to Australia New Zeala...

Page 20: ......
Reviews: