background image

Boxfish Grabber – Blue Robotics


All rights reserved. Information and specifications may change at any time without notice.                                   

p8 

6


Care of your grabber after a dive 

Thoroughly rinse the grabber with fresh water after a dive, along with the ROV. 

7


How to use the ROV without a grabber 

You can dive with the grabber mounted backwards if it is not needed for a dive. 

If you wish to dive without the grabber, you must remove the whole device 
including its cable into the ROV.  

7.1


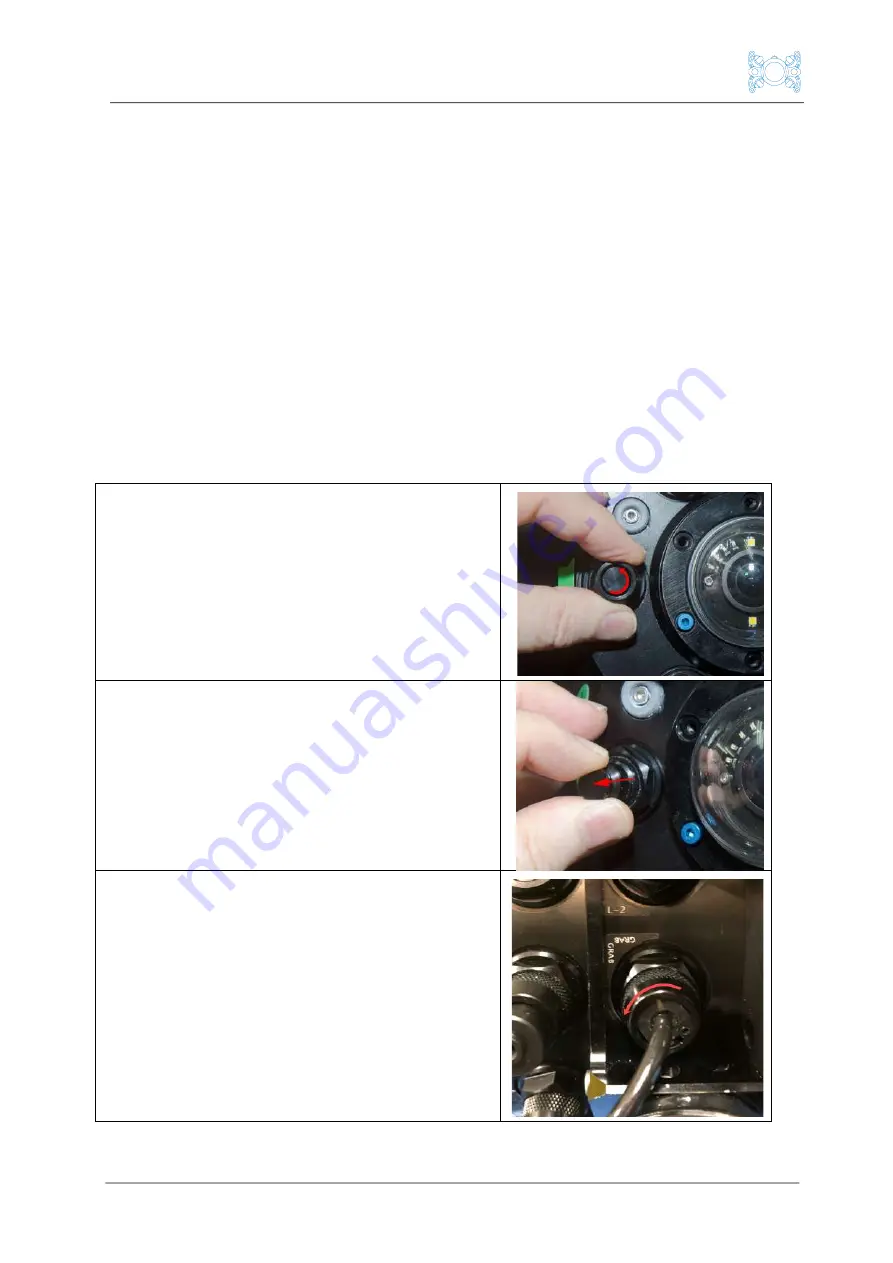
How to remove grabber cable 

This procedure involves releasing the vacuum from the ROV so that you can 
remove the grabber port plug from the pressure vessel. You will also need to 
locate a port plug from your accessories box to replace the grabber cable plug. 

1.


Ensure the ROV is powered off

. Then, 

unscrew the black knurled collar from 
the vacuum port at the rear of the ROV.  


2.


Pull out the valve to release the vacuum. 
As soon as the vacuum is released, 
replace the cap onto vacuum port. 


3.


After the vacuum is released, locate the 
port for the grabber cable (it will be 
labelled ‘GRAB’).  

4.


Unscrew the black knurled collar with 
your fingers.  


Summary of Contents for Newton Subsea Gripper

Page 1: ...Boxfish Grabber Blue Robotics All rights reserved Information and specifications may change at any time without notice p0 Grabber Manual Blue Robotics Grabber for Boxfish ROV...

Page 2: ...Boxfish Grabber Blue Robotics p1 All rights reserved Information and specifications may change at any time without notice...

Page 3: ...ounting the grabber to the ROV 4 3 1 Mounting components 4 3 2 Mounting configuration for shipping storage 4 3 3 Mounting the grabber for a dive 5 4 How to control the grabber using the Control Statio...

Page 4: ...wish to dive without it 4 Reattaching the grabber again after disconnecting it Boxfish ROV shown with grabber accessory installed 2 About the grabber accessory The grabber is shown below as it appears...

Page 5: ...ing bracket to hold the grabber in place We have permanently attached the bottom plate of the bracket to the float 3 2 Mounting configuration for shipping storage When you receive your Boxfish ROV the...

Page 6: ...ate of the mounting bracket to the bottom plate Note that mounting screw may differ from picture shown 2 Take out the screw and remove the top of the mounting bracket by sliding it horizontally toward...

Page 7: ...arms will move slowly apart until the grabber is fully open Release the button when you d like the arms to stop opening or when the arms are fully open 2 Grabber close control button Press down and h...

Page 8: ...ms While holding the button the arms will move slowly apart until the grabber is fully open Release the button when you d like the arms to stop opening or when the arms are fully open 2 Grabber close...

Page 9: ...into the ROV 7 1 How to remove grabber cable This procedure involves releasing the vacuum from the ROV so that you can remove the grabber port plug from the pressure vessel You will also need to loca...

Page 10: ...the cable safely in your accessories box Note that the penetrator plug has a single pin protruding from it so please store it with adequate protection 8 Put a port plug in the grabber port and screw i...

Page 11: ...lug by applying a thin coating of silicone grease 4 Unscrew the collar from the port plug in the GRAB port and take the port plug out 5 Line up the grabber cable plug with the port The grabber cable p...

Page 12: ...Boxfish Grabber Blue Robotics p11 All rights reserved Information and specifications may change at any time without notice...

Page 13: ...Boxfish Grabber Blue Robotics All rights reserved Information and specifications may change at any time without notice p12...

Reviews: