


15
REAR ROTISSERIE BURNER MATCH
LIGHTING PROCEDURE
1. Read instructions before lighting.
2. Open lid prior to lighting.
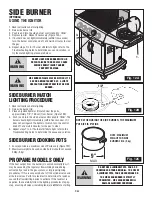
3. Place an ignited lighter or lit match near the ports, approximately 1/2"
(1.25 cm) from burner (see Fig 12E).
4. Push in and turn the rotisserie burner control knob to
'HIGH'. The
burner should light immediately (within five seconds). If it does not turn
‘OFF’ the control knob, extinguish the lighter or match, and wait 5
minutes for gas to clear.
5. Repeat steps 1 to 4. If burner still fails to light, refer to the
Troubleshooting Guide to determine the cause and solution.
NOTE: DO NOT USE THE MAIN BURNERS WHEN THE ROTISSERIE
BURNER IS LIT.
Fig. 12E
REAR ROTISSERIE BURNER
(Optional)
USING THE IGNITOR
1. Read instructions before lighting.
2. Open the lid before lighting.
3. Push in and turn the rotisserie control knob to
'HIGH'.
4. Depress ignitor. Repeat if necessary (see Fig 12D).
5. If burner does not light immediately (within five seconds), turn the burner
control knob
‘OFF’, and wait 5 minutes to clear the gas.
6. Repeat steps 1 to 5. If burner still fails to light, refer to the
Troubleshooting Guide to determine cause and solution, or try the match
lighting procedure below.
2.
Fig. 12D
1.
3.
ROTISSERIE
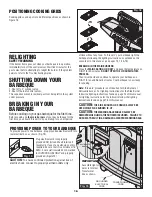
MOTOR LOCATION
ROTISSERIE COOKING
is one of the fastest growing barbeque cooking
techniques, especially if your barbeque is equipped with a rear rotisserie
burner. Just imagine, cooking restaurant style rotisserie meat in your own
backyard! Rotisserie cooking allows the food to self-baste while turning on
the motorized spit, sealing in the juices while browning the outside surface.
Rotisserie-cooked food is an excellent cooking option for large cuts of meat
such as roasts, leg of lamb or poultry. Locate the motor of the rotisserie on
the left side of the barbeque as illustrated in Figure 13.
Fig. 13
CAUTION
THE WARMING RACK AND GRILLS
& GRIDDLE SHOULD ALWAYS BE
REMOVED WHEN USING
THE ROTISSERIE BURNER. FAILURE
TO DO SO MAY RESULT IN
DAMAGED AND WARPED RACKS.
!


