FIG.9
4
3
2
1
5
6
7
8
3
201
6
-0
2
blubathworks.com
®
EN - MAINTENANCE
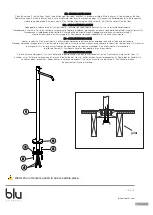
Unscrew the lever (1) and the grub screw (2) using the supplied allen wrench (3). Remove the handle (4). Unscrew the ring nut (5) using
the supplied key (6). Extract the cartridge (7). To fit, proceed in reverse order, making sure the reference pins at the bottom of the cartridge (7) are
correctly positioned in the corresponding seat inside the tap body (8) and the support surface is perfectly clean (fig.9). Open the water
inlet and check the tightness of the connections and that the tap works properly.
ITA - MANUTENZIONE
Svitare la leva (1), svitare il grano (2) con una chiave a brugola esagonale 2 mm (3) inclusa nella confezione. Sfilare la manopola (4),
svitare la ghiera di serraggio (5) con l’apposita chiave data in dotazione (6). Sfilare la cartuccia (7). Per il montaggio procedere in
ordine inverso, assicurandosi che i perni di riferimento alla base della cartuccia (7) siano correttamente posizionati nella sede corrispondente all’interno
del corpo del rubinetto (8) e che il piano di appoggio sia accuratamente pulito (fig. 9). Aprire l’ingresso delle acque e verificare
la tenuta dei collegamenti e il funzionamento del miscelatore.
ES - SUSTITUCION CARTUCHO
Destornillar la palanca (1) y el tornillo (2) con una llave Allen hexagonal 2 mm (3) incluida en la caja. Sacar el mando (4). Destornillar la tuerca de fijacion
(5) con una llave incluida en la caja (6). Sacar el cartucho (7). Para el montaje proceder a la inversa, comprobando que los pernos
de referencia en la base del cartucho (7) estén correctamente posicionados en el alojamiento correspondiente en el interior del cuerpo del grifo (8) y
que el plano de apoyo esté perfectamente limpio (fig.9). Abrir le entrade de las aguas y verificar la estanqueidad de las conexiones y el funcionamiento
del grifo.
FR - REMPLACEMENT DE LA CARTOUCHE
Dévisser le levier (1) et dévisser le grain (2) à l’aide d’ue clè à vis crantèe hexagonale 2 mm (3) incluse dans l’emballage. Enlever le bouton (4). Dèvisser
l’ècrou de fixage (6) avec une clè hexagonale. Oter la cartouche (7). Pour le montage continuer dans le sens inverse, en s’assurant que les pivots de
repère à la base de la cartouche (7) soient positionnès correctement dans l’emplacement correspondant à l’intèrieur du corps du robinet (8) et que le
point d’appui soit soigneusement nettoyè (fig.9). Ouvrir l’entrèe de l’eau et vèrifier la tenue des enclenchements et le fonctionnement du robinet.


