


Blocks One
3D Printer User Manual
www.blockstec.com | [email protected]
4
BOX CONTENTS
1.
1x Blocks one 3D printer
2.
1x Power cable
3.
1x Usb cable
4.
1x Printing Glass
5.
2x Spool holder
6.
4x Bulldog clips
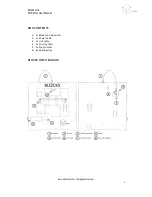
BLOCKS ONE DIAGRAM
Blocks One
3D Printer User Manual
www.blockstec.com | [email protected]
4
BOX CONTENTS
1.
1x Blocks one 3D printer
2.
1x Power cable
3.
1x Usb cable
4.
1x Printing Glass
5.
2x Spool holder
6.
4x Bulldog clips
BLOCKS ONE DIAGRAM