Blichmann Engineering WineEasy Assembly Operation Maintenance Manual Download Page 2

WineEasy™ V2 

© Blichmann Engineering, LLC 2018 

For replacement parts, visit: blichmannengineering.com/genuine-replacement-parts

2

Description

Quantity

20,30 or 55 gal fermenting tank assembly with lid

1

Stainless steel pressure plate in 20, 30 or 55 gal size (disc with tabs)

1

Stainless steel perforated false bottom in 20, 30 or 55 gal size

1

1/4 -20 stainless wing nut and large washer

1

Tri-clamp bulkhead fitting with o-ring (2ps-nut and fitting)

1

Tri-clamp tightening tool (1” dia disc with 3 small tabs)

1

Tri-clamp butterfly valve (1”)

1

Tri-clamp 90 deg elbow (1”)

1

Tri-clamp cover cap

1

Tri-clamp clamps (1”)

3

Tri-clamp gaskets (1”)

3

20, 30 or 55 gal ring stand assembly

1

Description

Quantity

Vacuum Pump

1

Hose clamps

2

1/2” barb x 1” tri-clamp fitting

1

6 ft piece of 1/2” ID vinyl hose

1

7 ft piece of 1/4” OD hard plastic vacuum tube

1

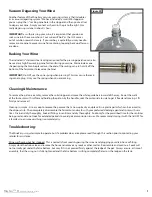
1/2” stainless steel racking cane

1

#7 two-hole silicone stopper

1

#7 solid silicone stopper

1

#00 solid tan rubber stopper (used to plug the racking tube hole for degassing) 1
1/4” quick connect 

3

1/4” NPT stainless nut

2

Ball wide mouth quart mason jar

1

Black o-ring

2

SS jar lid

1

Cone spring for racking cane

1

Description

Quantity

20, 30 or 55 gal disc with (8) 10-32 suds and acorn nuts installed

1

20, 30 or 55 gal silicone wiper seal

1

Stainless steel guide plates

4

White plastic guide bars

4

10-32 carriage bolts and wing nuts

8

10-24 Phillips head maching screws and nuts

8

Short pieces of black protective edge trim

4

Base Fermentor

Press Piston

Vacuum Press Kit

Summary of Contents for WineEasy

Page 1: ...ease thoroughly read these sections and understand them completely before use If you do not understand them or have any questions contact your retailer or Blichmann Engineering www BlichmannEngineering com before use Sections labeled Caution can lead to equipment damage or unsatisfactory performance of the equipment Please read these sections thoroughly If you have any questions contact your retai...

Page 2: ...tand assembly 1 Description Quantity Vacuum Pump 1 Hose clamps 2 1 2 barb x 1 tri clamp fitting 1 6 ft piece of 1 2 ID vinyl hose 1 7 ft piece of 1 4 OD hard plastic vacuum tube 1 1 2 stainless steel racking cane 1 7 two hole silicone stopper 1 7 solid silicone stopper 1 00 solid tan rubber stopper used to plug the racking tube hole for degassing 1 1 4 quick connect 3 1 4 NPT stainless nut 2 Ball ...

Page 3: ...he tank should be less than 1 8 If it is slightly out of round simple lay the fermentor on its side and push gently to reshape it Otherwise contact your retailer Product Assembly Figure 1 The first step of assembly is placing the stand ring on a level floor Placing a tarp under it is recommended if you do not have stain proof flooring After soaking all the fittings in sanitizer begin assembly of t...

Page 4: ... and lid and wait 2 3 min and spray the walls one last time Place the pressure plate disc with tabs on the bottom of the tank making sure it is clear of the drain fitting and sits flat on the bottom IMPORTANT The tabs must face upward Installing the tabs downward will block off most of the perforated screen causing the press to malfunction The screw eye in the false bottom Figure 9 is used as a ha...

Page 5: ...scouring pad or a sponge to remove any remaining manufacturing residues and oil Do not use a steel wool scouring pad as the metal particles will rust on the surface of the parts Rinse well and allow to dry thoroughly Drying thoroughly allows a protective layer to naturally re form on the surface of the stainless steel as the oxygen in the atmosphere naturally reacts with the chromium in the stainl...

Page 6: ...in a sanitizing solution Spray the surfaces of the press piston with StarSantm and let sit for 5 minutes and then repeat Or flood with a sulfite citric acid solution Install the seal back on the press piston ensuring that the seal is oriented as shown Caution Failure to orient it correctly will prevent it from sealing properly Assembling the liquid trap Install the 1 4 quick connect into the lid w...

Page 7: ...e vacuum pump system as shown in the pictures below Open the valve on the fermentor and then turn on the vacuum pump Wine will begin to flow from the fermentor through the racking tube and into the carboy Figure 20 Caution The liquid catch is intended to be an emergency backup only to prevent wine from getting sucked into and damaging the vacuum pump Be ready to close the valve on the tank when th...

Page 8: ... Connect the vacuum pump kit as shown on page 7 Figure 21 if you have not already done so Open the valve on the fermentor and turn on the vacuum pump At this time you will notice the piston slowly moving down as the carboy fills Note Initially and when free running the pressure gauge on the vacuum pump will move wildly but as you begin pressing the pomace it will stabilize and gradually increase I...

Page 9: ...sembly remove the solid stopper and move the white guide bars inward all the way Rewet the walls of the fermentor with sulfites and holding the piston by the handles rock the piston side to side to get it freed and moving Lift firmly and remove it Cleanup is simple Use a scoop to remove the pomace that is now quite dry and place it in a plastic pail which can be carried to the disposal site Then c...

Page 10: ...tateorfederallaw includinganyimpliedwarrantyofmerchantabilityoranyimpliedwarrantyoffitness islimitedindurationtothetermsofthislimitedwarrantyandis limitedinscopeofcoveragetothiswarranty BlichmannEngineeringdisclaimsanyexpressorimpliedwarranty includinganyimpliedwarrantyoffitnessforaparticularpurposeormerchantability onitemsexcludedfrom coverageassetforthinthislimitedwarranty 2 BlichmannEngineering...

Reviews: