background image

13

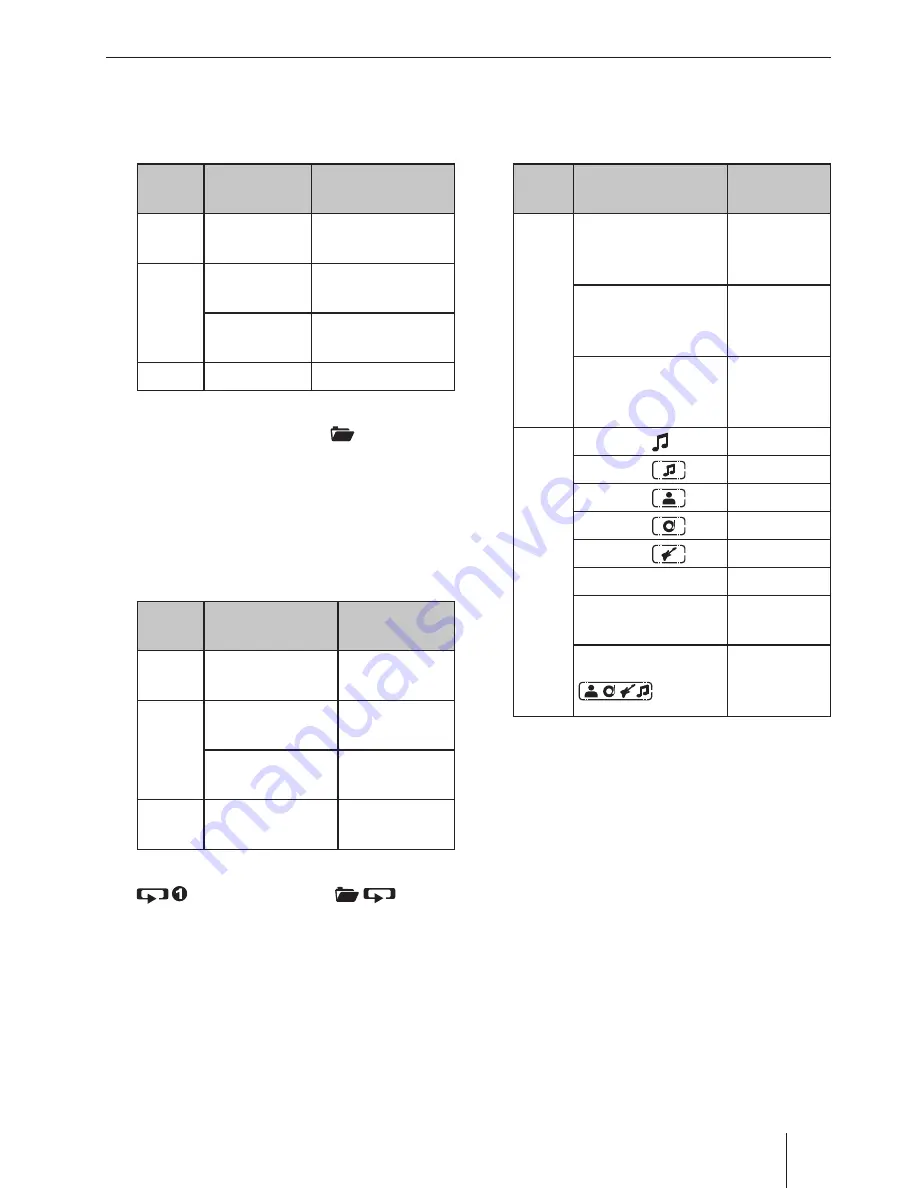
Playing tracks in random order


Press the 

5 MIX

 button 

>

 to change among 

the playback modes:

Opera-
tion

Display

Meaning

CD/
iPod

MIX ALL

Mixing tracks

MP3/
WMA

MIX FOLDER

Mixing tracks of 
the current folder

MIX ALL

Mixing tracks of 
the data carrier

Gen.

MIX OFF

Regular playback

If the MIX function is switched on, the icon 

MIX

 (mix all tracks) or 

MIX 

 (mix tracks of 

current folder) is shown on the display.

Repeatedly playing individual tracks 
or directories


Press the 

4 RPT

 button 

>

 to change among 

the playback modes:

Opera-
tion

Display

Meaning

CD/
iPod

REPEAT TRACK

Repeating 
tracks

MP3/
WMA

REPEAT TRACK 

Repeating 
tracks

REPEAT FOLDER

Repeating 
folders

Gen.

REPEAT OFF 

Regular 
playback

If the REPEAT function is switched on, the icon 

 (repeat tracks) or 

 (repeat 

folders) is shown on the display.

Confi guring the display


Press the 

DIS

 button 

A

 once or several times 

to toggle between these displays:

Opera-
tion

Display / icon

Meaning

CD 

TRACK 01  00:15

Track num-
ber and play-
ing time

TRACK 01  03:37

Track 
number and 
duration

TRACK 01  08:40

Track 
number and 
time

MP3/
WMA/
iPod

ABCDEF / 

File name ²

ABCDEF / 

Track name ¹

ABCDEF / 

Artist ¹

ABCDEF / 

Album ¹

ABCDEF / 

Genre ³

PLAY TIME  00:15

Playing time

TOTAL TIME  03:37

Track dura-
tion

ALL INFO / 

All informa-
tion as scroll-
ing text 

¹  Track name, artist and album name must be 

stored as ID3 tag to be able to display them.

² The fi le name is displayed only in MP3/WMA 

mode.

³ The genre information is available only on 

iPod mode.

Note:

With every track change, the fi le name is 
briefl y shown in MP3/WMA mode and the 
track name in iPod mode before the display 
switches to the defi ned display.

CD/MP3/WMA/iPod mode

Summary of Contents for Frankfurt 320

Page 1: ...Operating and installation instructions www blaupunkt com www blaupunkt com Hamburg 420 BT 1 011 202 422 1 011 202 423 Frankfurt 320 1 011 202 322 1 011 202 323 Car Radio CD USB SD Bluetooth ...

Page 2: ...selection fast forward reverse Browse mode in MP3 WMA iPod mode ID3 category iPod only select folder and track 8 button Eject Eject a CD 9 Microphone Hamburg 420 BT only USB port Front AUX IN socket button only Hamburg 420 BT Ending rejecting a phone call button Hamburg 420 BT only Short press Answering a call speed dial Long press Open the phone book of the cell phone or activate voice dialing Ke...

Page 3: ... Inserting removing the memory card 12 Selecting tracks 12 Fast searching 12 Interrupting playback 12 Scanning all tracks 12 Playing tracks in random order 13 Repeatedly playing individual tracks or directories 13 Configuring the display 13 Browse mode 14 Searching by track names not in iPod mode 15 Bluetooth Hamburg 420 BT only 15 Bluetooth menu 15 Pairing and connecting a device 16 Telephone fun...

Page 4: ...he vehicle is standing Remove or attach the control panel only while the vehicle is standing Always listen at a moderate volume to pro tect your hearing and to be able to hear acous tic warning signals e g police sirens During mute phases e g when changing the audio source changing the volume is not audible Do not increase the volume during this mute phase General safety notes Observe the followin...

Page 5: ...on adapter Extended scope of delivery for 1 011 202 323 1 011 202 423 only 1 Handheld remote control incl battery 1 Connecting cable chamber A 1 Connecting cable chamber B Optional equipment not part of the scope of delivery Use only accessories approved by Blaupunkt Information is available from your Blaupunkt specialised dealer or on the Internet under www blaupunkt com Placing the device in ope...

Page 6: ...uitable re ceptionareaintheusermenu seethechapter User settings section Making settings in the TUNER menu menu item TUNER AREA Switching on off Switching on off with the On Off button 쏅 For switch on press the On Off button 3 The car sound system switches on 쏅 To switch off the device press and hold down the On Off button 3 for longer than 2 sec onds The car sound system switches off Note If you s...

Page 7: ...NER menu menu item TRAFFICINFO Notes The volume is increased for the duration of the switched through traffic announce ment Youcanadjusttheminimumvolume for traffic announcements see the chapter User settings section Making settings in the VOLUME menu menu item TRAFFIC VOL To cancel a switched through traffic an nouncement press the SRC button Radio mode RDS Many FM stations broadcast an RDS Radio...

Page 8: ...tings section Making settings in the TUNER menu menu item SENSITIVITY Tuning into stations manually 쏅 Press the rotary button 7 once to activate manual station tuning The display briefly shows SEARCH MANUAL 쏅 Turn the rotary control 7 to change the fre quency in increments Note The manual station tuning is automatically exited approx 15 seconds after the last fre quency change and the station seek...

Page 9: ...ction Making settings in the TUNER menu menu item BAND SELECTION it is automatically reactivated if you initiate the Travelstore function PTY In the reception areas EUROPE and USA an FM station can transmit its current programme type e g CULTURE POP JAZZ ROCK SPORTorSCIENCE Hence the PTY function allows a targeted search for broadcasts of a certain programme type e g for rock or sports broadcasts ...

Page 10: ...cters without the file exten sion mp3 or wma the use of more characters reduces the number of tracks and folders that the car sound system can recognise No umlauts or special characters CD formats audio CD CDDA CD R RW Ø 12 cm CD data formats ISO 9669 Level 1 and 2 Joliet CD burn speed Max 16x recommended USB format file system Mass storage device FAT16 32 Memory card file system FAT16 32 File ext...

Page 11: ...ve that may occur as a result of the use of unsuitable CDs Note You must not hinder or assist the drive as it automatically draws in the CD 쏅 Insert the CD with its printed side up into the CD tray 5 until you feel a slight resistance The drive automatically draws in the CD and checks its data Afterwards the playback starts in CD or MP3 mode Note If the inserted CD cannot be played back CD ERROR i...

Page 12: ...nel 쏅 Push on the memory card until it disengages 쏅 Pull the memory card out of the card slot B 쏅 Attach the control panel Selecting tracks 쏅 Turn rotary control 7 one notch counter clockwise or clockwise to change to the pre vious next track Notes If you turn rotary control 7 several notches counter clockwise or clockwise you jump forward or reverse by the corre sponding number of tracks If the c...

Page 13: ...s switched on the icon repeat tracks or repeat folders is shown on the display Configuring the display 쏅 Press the DIS button A once or several times to toggle between these displays Opera tion Display icon Meaning CD TRACK 01 00 15 Track num ber and play ing time TRACK 01 03 37 Track number and duration TRACK 01 08 40 Track number and time MP3 WMA iPod ABCDEF File name ABCDEF Track name ABCDEF Ar...

Page 14: ...rol 7 to select a differ ent track 쏅 Press the rotary control 7 to play the track The playback starts You are exiting the browse mode Browse mode in iPod mode In iPod mode you can select and play the tracks via the categories ARTISTS ALBUMS GENRES or PLAYLISTS 쏅 Press the 2 ID3 button to call up the Browse mode in the iPod mode The display shows the icon The first category ARTISTS is displayed Not...

Page 15: ...s hands free system for connected cell phones and control the audio output of other Bluetooth devices and play them back via the loudspeakers of the car sound system Bluetooth streaming Note You can also connect an external microphone for hands free calling see the chapter Instal lation instructions Bluetooth technology is a wireless connection of short range For this reason Bluetooth devices must...

Page 16: ...tion Managing paired devices If you should attempt to pair a sixth Blue tooth device PHONE LIST FULL PLEASE DELETE ENTRIES FROM LIST is displayed Pairing and connecting a cell phone Note If a connection with a cell phone currently ex ists this connection is automatically discon nected if you pair and connect another cell phone 쏅 In the Bluetooth menu select the PAIRING menu item 쏅 Press the rotary...

Page 17: ...y may show PAIRED followed by CONNECTED as soon as the car sound sys tem and the streaming device are paired and connected Notes If no connection can be established the display briefly shows CONNECT FAILED After switch on the car sound system automatically attempts to reconnect the device connected last If the connection attempt fails the display briefly shows CONNECTION LOST If necessary attempt ...

Page 18: ...t yet been trans ferred the display briefly shows PHONE BOOK NOT AVAILABLE 쏅 Turn the rotary control 7 to select a differ ent entry 쏅 Press the rotary control 7 or the but ton to call the number CALLING and the dialed number are alter nately shown on the display Note You can also call an entry in the phone book via speed dial see the section Speed dial for phone book entries in this chapter Making...

Page 19: ...h menu and the DIAL NEW NUMBER menu item Notes A number previously stored on the memo ry button is replaced If a telephone is unpaired the numbers stored for this telephone are automatically deleted Speed dial for any phone number or for the number dialed last or a stored number With speed dial you can make a call without first having to select the corresponding function in the Bluetooth menu To c...

Page 20: ...er Bluetooth streaming mode Starting the Bluetooth streaming mode 쏅 Press the SRC button repeatedly until BT STREAM appears on the display The playback starts Notes The Bluetooth streaming mode can be se lected only if a suitable streaming device is connected If the connection to the streaming device is lost during playback the display briefly shows CONNECTION LOST and the car sound system changes...

Page 21: ... delete the already transferred phone book see the next section or unpair another cell phone if necessary so that its phone book is also deletedfromthecarsoundsystem seethe chapter Additional functions in the Blue tooth menu section Managing paired devices If you insert a CD during an ongoing trans fer the playback does not start until the transfer is completed Deleting the phone book of the cell ...

Page 22: ...dy connected the display briefly shows CONNECT EXIST To disconnect the connection to the displayed device 쏅 press the button The display briefly shows DISCONNECTED and you are returned to the Bluetooth menu Note If the device was not connected the display briefly shows NO CONNECTION To unpair the displayed device 쏅 press the button for approx 2 sec onds The display briefly shows DELETED and you ar...

Page 23: ...evels of both audio sources to each other For more details please read the section Making settings in the VARIOUS menu menu items AUX MIX and AUX MIX GAIN in the chapter User settings Sound settings The following sound settings can be changed in the AUDIO menu Adjusting bass and treble Setting the left right volume distribution Balance or front rear Fader Adjusting the increase of bass at low volu...

Page 24: ...n is set 쏅 Press the rotary control 7 to confirm the setting LOUDNESS Increase of bass at low volume Settings ON OFF 쏅 Press the rotary control 7 to change the setting 쏅 Turn the rotary control 7 to change be tween the settings 쏅 Press the rotary control 7 to confirm the setting PRESET EQ sound profile Selecting equalizer presettings Settings PRESET EQ POP PRESET EQ ROCK PRESET EQ CLAS clas sic PR...

Page 25: ...ted after the last key has been activated After the setting press the MENU button 2 to exit the menu EQUALIZER Switching the equalizer on or off Settings ON OFF 쏅 Press the rotary control 7 to change the setting 쏅 Turn the rotary control 7 to change be tween the settings 쏅 Press the rotary control 7 to confirm the setting EQTREBLE Adjusting treble frequency and level of the equal izer 쏅 Press the ...

Page 26: ...ntrol 7 to change the setting for the selected menu item 쏅 Turn the rotary control 7 to set the level or frequency 쏅 Press the rotary control 7 to confirm the setting User settings Calling the user menu and selecting a menu 쏅 Briefly press the MENU 2 button to open the user menu In the user menu the user settings can be found in the following menus TUNER AUDIO see chapter Sound settings DISPLAY VO...

Page 27: ...o confirm the setting Deactivated memory banks are skipped during the source selection with the SRC button Notes In the factory default all AM memory banks are deactivated If a memory bank is deactivated the sta tions stored in this memory bank are re tained REGIONAL only for reception area EUROPE Only possible in FM radio mode Switching REGIONAL function on or off Settings ON OFF 쏅 Press the rota...

Page 28: ...USA SOUTH AMERICA THAI LAND 쏅 Press the rotary control 7 to open the menu 쏅 Turn the rotary control 7 to change be tween the reception areas 쏅 Press the rotary control 7 to select a recep tion area The display shows PLEASE CONFIRM 쏅 Press the rotary control 7 to confirm the selected reception area Making settings in the DISPLAY menu DIMMER Select automatic or manual switching of the dis play brigh...

Page 29: ... setting Upon selecting ON VOLUME 쏅 Press the rotary control 7 to change the setting 쏅 Turn the rotary control 7 to set the volume 쏅 Press the rotary control 7 to confirm the setting TRAFFICVOL traffic information volume reception area EUROPE only Settingtheminimumvolumefortrafficannounce ments Settings 1 50 쏅 Press the rotary control 7 to change the setting 쏅 Turn the rotary control 7 to set the ...

Page 30: ...a PM for the time after noon Making settings in the VARIOUS menu DEMO MODE Switching the demo mode on or off Settings ON OFF 쏅 Press the rotary control 7 to change the setting 쏅 Turn the rotary control 7 to change be tween the settings 쏅 Press the rotary control 7 to confirm the setting In demo mode the features of the radio are shown as scrolling text on the display MIX AUX Switching the combined...

Page 31: ...otary control 7 to toggle between the display of the version number of CPU P and software E NORMSET Restoring the original factory settings of the car sound system 쏅 Press the rotary control 7 The display shows PLEASE CONFIRM 쏅 Press the rotary control 7 again to confirm the resetting The car sound system switches off and is reset to the factory settings If a CD has been inserted in the CD drive t...

Page 32: ...up service for your car sound system via the Internet Technical data Voltage supply Operating voltage 10 5 14 4 V Current consumption In operation 10 A 10 sec after switch off 3 5 mA Amplifier Output power 4 x 22 watts sine at 14 4 V at 4 ohms 4 x 50 watts max power Tuner Wavebands in Europe Thailand FM 87 5 108 MHz AM MW 531 1 602 kHz LW Europe only 153 279 kHz Wavebands in the US FM 87 7 107 9 M...

Page 33: ...e required for your vehicle type from any BLAUPUNKT dealer Depending on the model your vehicle may differ from the description provided here We accept no responsibility for any damages due to incorrect installation or connection or for any consequential damages If the information provided here is not suita ble for your specific installation requirements please contact your Blaupunkt dealer your ve...

Page 34: ...34 1 12V 2 3 0 30 10 10 A 7 607 621 7 608 Installation instructions Available as an optional accessory Installation kits ...

Page 35: ...35 1 2 3 1 2 4 5 53 182 165 1 20 7 12V Antenna Preamp Out 4x Antenna connection Microphone In Bluetooth Hamburg 420 BT only Rear USB Installation instructions 6 Removal ...

Page 36: ...V 4 Speaker out RF 5 Aut antenna 12V 5 Speaker out LF 6 Illumination 6 Speaker out LF 7 Kl 15 Ignition 7 Speaker out LR 8 Ground 8 Speaker out LR C1 C2 C3 1 NC 7 Telephone AF 13 NC 2 NC 8 Telephone AF 14 NC 3 NC 9 Radio Mute 15 NC 4 NC 10 Remote Control 12V 16 NC 5 NC 11 Remote Control IN 17 NC 6 NC 12 Remote Control GND 18 NC 19 NC 20 NC Aut antenna Amplifier 12V Remote Control 12V max 150 mA Ins...

Page 37: ...37 1 3 5 2 4 8 7 4 Ohm Relais Radio Mute 4 Ohm 4 Ohm 4 Ohm 6 12V Sub Out GND Sub Out 12V 12V Kl 15 12V Installation instructions Subject to changes ...

Page 38: ...iPhone 3GS iPhone 3G iPhone Made for iPod and Made for iPhone mean that an electronic accessory has been designed to connect specifically to iPod iPhone respectively and has been certified by the developer to meet Apple performance standards Apple is not responsible for the operation of this device or its compliance with safety and regulatory standards Please note that the use of this accessory wi...

Page 39: ...39 Please keep the filled in radio pass in a safe place ...

Page 40: ...Name Type Serial no BP Passport 1 011 202 _ _ _ Blaupunkt AudioVision GmbH Co KG Robert Bosch Straße 200 D 31139 Hildesheim http www blaupunkt com 01 12 ...

Reviews: