background image

ENGLISH

5

Placing the device in operation

Caution!
Transport securing screws

Ensure that the transport securing screws at the 
top side of the device are re

m

oved before the 

startup of the device.

Turn on/off the power


   Press and release [ 

 ] button to turn the 

unit on. 


   Press and hold the [ 

 ] button to turn the 

unit off.


Note: 


 The unit will power on in the sa

m

e state it was 

in when powered off. 

Mute


   Press the [ 

 ] button to 

m

ute the sound. 

 Note: 


t 1SFTTJOHUIF<

 ] button again or adjusting 

volu

m

e will un

m

ute.

Adjust the Volu

m

e

Press the [ 

 ] or [ 

 ] button to increase or 

decrease the volu

m

e level.

The adjustable range of volu

m

e is 0 to 50.

Playing Source Selection


Press 

the 


button on the panel to show 

m

ain source 

m

enu.


   Touch desired icon on the the screen to 

enter corresponding working 

m

ode, such as 

Disc, Navi, Radio, etc.


   Drag left/right to scroll.

Note:  

t 8IFO TPNF EFWJDFT BSF OPU SFBEZ UIFZ

cannot be selected.

t :PVTIPVMETUPQTXJUDIJOHXIFOUIFQMBZJOH

source 

y

ou desired has been selected and 

wait for so

m

e seconds, the unit will auto enter 

the pla

y

ing source 

m

ode 

y

ou have selected.

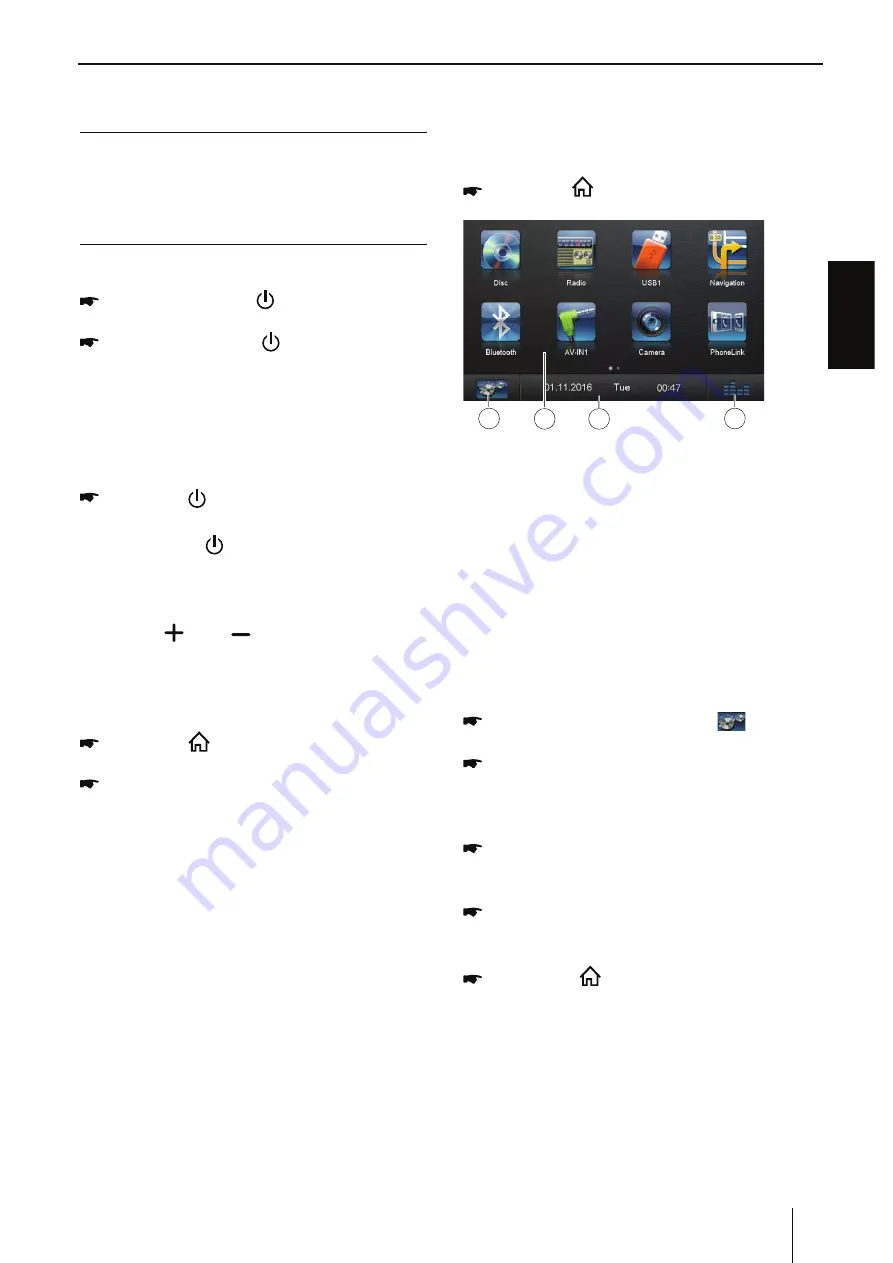
Main Menu

In the 

m

ain 

m

enu, 

y

ou press the buttons on the 

touch-screen to call up the different sources and 
operating 

m

odes. 


Press 

the 


]

 button to enter 

m

ain source  

m

enu.

1. Enter setting 

m

ode.

2. Function icons
3. Clock
4.  Touch to access Equalizer level settings 

m

enu.

Setting the reception area

This car sound s

y

ste

m

 is designed for operation in 

different regions with different frequenc

y

 ranges 

and station technologies. The factor

y

 default 

of the reception area is "ASIA (FM/AM)". If 

y

ou 

operate the car sound s

y

ste

m

 outside of Asia, 

y

ou 

m

a

y

 first have to set a suitable reception area in 

the 

m

enu:


In the 

m

ain 

m

enu, press the [ 

 ] button. 

The Settings 

m

enu is displa

y

ed.


   In the botto

m

 area of the Settings 

m

enu, 

press the [ General ] button.


   The current setting is displa

y

ed behind 

“Radio region”.


   Tap twice (double -click) on the [ Radio 

region ] button to displa

y

 the list of available 

reception areas.


   Select the desired reception area b

y

 double-

clicking.The list is hidden, the selected 
reception area is set.


Press the [ 

 ] button. The 

m

ain 

m

enu is 

displa

y

ed again. 

Startup

Summary of Contents for Chicago 600

Page 1: ...Enjoyit Operating and installation instruction MULTIMEDIA NAGIVATION READY CHICAGO 600 AV Optional iGO Primo Nextgen Mapping...

Page 2: ...urce Long press Call up Bluetooth function directly 4 Volume Increase Decrease the volume 5 Microphone 6 Disc Slot Insert the disc with label side facing up 7 microSD card reader The card reader suppo...

Page 3: ...Turns on off PBC VCD 23 Digit area 24 Repeat playback 25 Change to next source 26 Power on off 27 Access to Bluetooth source 28 Access to navigation source 29 Pause playback Start playback 30 Search a...

Page 4: ...Screen Controls 7 DVD movie playback 8 Audio playback from DVD CD USB or microSDHC 8 Video playback from DVD CD USB or microSDHC 9 Image playback from DVD CD USB or audioSDHC 10 Bluetooth mode 10 Pair...

Page 5: ...as been selected and wait for some seconds the unit will auto enter the playing source mode you have selected Main Menu In the main menu you press the buttons on the touch screen to call up the differ...

Page 6: ...the icon on the user interface to select one radio band among FM1 FM2 FM3 AM1 and AM2 Tune Auto Tuning Hold icon on the user interface more than 2 second to seek a higher lower station To stop searchi...

Page 7: ...also weaker stations that may be noisy Press the LO or DX button to adjust the sensitiv ity of station seek tuning If LO is displayed only stations with a strong signal are found during seek tuning If...

Page 8: ...udio playback from DVD CD USB or microSDHC 5IF QSJODJQMFT PG BVEJP QMBZCBDL 1 8 from data carriers are identical for all sources Select the desired source via the main menu The device changes to the d...

Page 9: ...the main menu The device changes to the desired source and the playback starts If the playback does not start with the video playback Press the button to change to the folder file list Press the butt...

Page 10: ...ir the device to the unit Pairing needs POMZ UP CF EPOF PODF PV DBO QBJS VQ UP GJWF EFWJDFT PV BMTP DBO TFBSDI GPS MVFUPPUI EFWJDFT by mobile phone Turn on the Bluetooth function on the device Touch t...

Page 11: ...calls are received automaticaly 1 If there is an incoming call Incoming will appear on the screen PV NBZ UPVDI UIF TDSFFO UP TFMFDU Hang up or Answer Speak into the Bluetooth microphone Touch to mute...

Page 12: ...t Finish connection If it is not connected successfully please replace USB cable or vehicle USB interface or re insert USB wire or restart Android phone and re try After connection operate according t...

Page 13: ...ion After connecting successfully the desktop of you iPhone will display on the screen of the unit If it is not connected successfully please restart UIF 8J J PG ZPVS J1IPOF BOE SFGSFTI UIF IPUTQPU li...

Page 14: ...ovies can be played back If a password was configured the rating level can be changed only with the password Video out Switch video out on off Aspect ratio Full Normal mode Sound The following setting...

Page 15: ...H LQWR WKH HQJLQH FRPSDUWPHQW DQG FRQQHFW WR WKH FDU EDWWHU 2WKHUZLVH D KLJK SRVVLELOLW RI VHULRXV VKRUW FLUFXLW WR WKH HOHFWULFDO V VWHP PD EH RFFXUUHG 5HSODFLQJ D QHZ IXVH ZLWK UDWLQJ ZKHQ WKH ROG R...

Page 16: ...SUB OUT 1 SUB OUT 2 VIDEO IN AUX_IN_L AUX_IN_R AUX_DET KGND KEYB KEYA RCA WHITE RCA RED RCA WHITE RCA BROWN RCA BROWN RCA YELLOW RCA YELLOW RCA YELLOW BLACK BLACK BLACK RCA YELLOW BLACK RCA RED RCA W...

Page 17: ...TGEV JGEM YKTKPI CPF EQTTGEV Flashing image or interference appears on screen The color system of DVD disc does not OCVEJ VJG OQPKVQT Adjust the color system of the DVD FKUE RNC KPI DCEM QT VJG OQPKVQ...

Page 18: ...PEG2 MPEG4 MPEG2 Simple Main High MPEG4 avi xvid MPEG MP3 AC3 PCM AAC FLAC RM RV8 9 10 N A rm rmvb COOK AAC FLV H264 SH 263 H 264 Baseline Main High flv PCM MP3 AAC ASF 8 7 MPEG4 MPEG 1 2 H264 H263 MP...

Page 19: ...ted 8KHz 16KHz 1 32KHz 11KHz 22KHz 44KHz AAC aac AAC supported 8 96KHz FLAC flac FLAC supported 8 192KHz APE ape APE supported 8 96KHz t Picture File Format supported file extension limitation JPEG jp...

Page 20: ...trate 32k 192k MP4 MPEG 4 Video MPEG4 Advanced Simple Simple800 600 mp4 mov AAC MP2 MP3 AC3 MPEG4 Video 10Mbps FLV H 263 H 263 main flv f4v mpeg 3Mbps DAT MPEG1 MPEG1 main dat mpeg pcm ac3 3Mbps VOB M...

Page 21: ...Designed and enginereed by Blaupunkt...

Reviews: