background image

English

33

Tip: If you do not press any buttons for 10 seconds, the menu 
will automatically exit. You can change the length of time 
before the menu exits automatically - see ‘Menu Duration’ 
section.

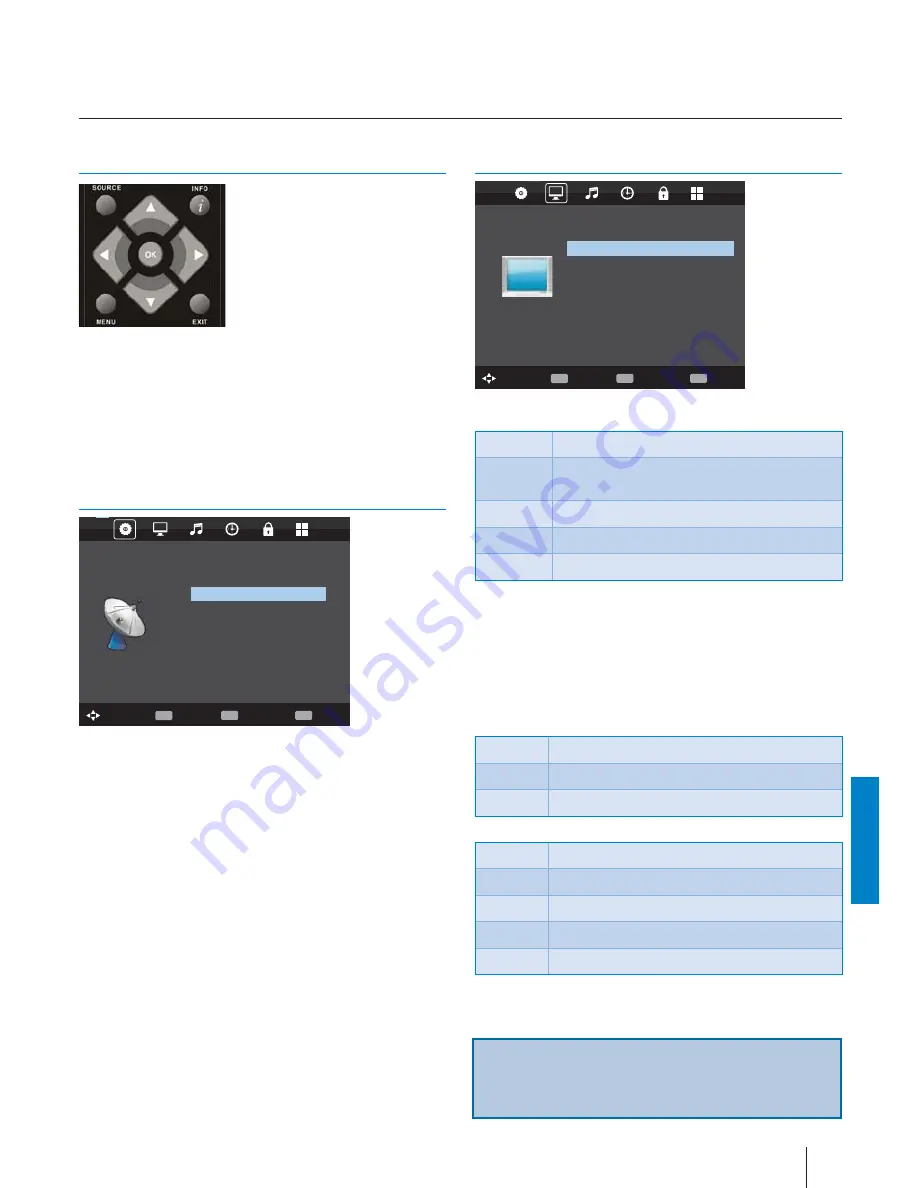
TV Menu navigation

AV

To access this menu, press [MENU] button on the remote 
control. To enter a menu press [OK]
If you wish to make changes to any of the default settings, use 
the scroll 

(

Ÿ

/

ź

/

Ż

/

Ź

buttons. To confi rm any settings press 

[OK] button.

To exit this menu at anytime, press [EXIT] button.

Channel

CHANNEL

Auto Tuning

DTV Manual Tuning
ATV Manual Tuning
Programe Edit 
Schedule list
Signal Information
CI Information
Dish Setup 

Move

Return

MENU

Select

OK

EXIT

EXIT

Auto Tuning 

- Allows you to retune the television for all digital 

channels, digital radio stations and analogue channels.

DTV Manual Tuning

- Allows you to manually tune your digital 

signal.

ATV Manual Tuning 

- Allows you to manually tune your 

analogue signal.

Programme Edit 

- Allows you to delete, skip and add favourite 

channels.

Schedule List 

- Lists your programme reminders.

Signal Information 

- Information about satellit signal.

CI Information 

- Pay per view services require a “smartcard” 

to be inserted into the TV. If you subscribe to a pay per 
view service the provider will issue you with a ‘CAM’ and a 
“smartcard”. The CAM can then be inserted into the COMMON 
INTERFACE PORT (CI Card In).

Dish Setup 

- This menu is only available in DVB-S2 mode. You 

can select the type of satellite, your transponder and your LNB 
type, etc..

Picture

PICTURE

Picture Mode 

Ecohome

Contrast 50
Brightness 50
Colour 50
Tint 50
Sharpness 30
Colout temp 

Normal

Noise reduction 

Off

3D Setup

Move

Return

MENU

Select

OK

EXIT

EXIT

Picture Mode

 - Choose from the following presets.

Standard

Default settings

Dynamic

Recommended settings for fast moving 
pictures

Mild

Set to be lighter in colour and less bright

Personal

Lets you manually alter all the settings

Ecohome

Consume 15% less energy.

Contrast 

- Switch the balance between black and white.

Brightness 

- Increase or decrease the brightness of the picture.

Colour 

- Increases the colour from black and white.

Tint 

- Lets you increase or decrease the level of tint within the 

picture.

Sharpness 

- Increase or decrease the sharpness of the picture.

Colour Temperature 

- Choose from the following presets.

Normal

Default settings

Warm

Increases red within the picture

Cold

Increases blue within the picturew

Noise Reduction 

- Choose from the following presets.

Off 

Turns noise reduction off 

Low

Minor system adjustment

Middle

Medium system adjustments

High

Maximum system adjustments

Default

Default settings

100 Hz Mode* –

 Settings for smooth playback in 100Hz mode.

TV Menu operation 

TV Menu navigation | Channel | Picture

* - Only for models with AMR 400

Summary of Contents for 32/124I-WB-5B-HBKUP-UK

Page 1: ...32 124I WB 5B HBKUP UK DVB T DVB C DVB S2 3D USB PVR DVD Model No User Guide ...

Page 2: ... in a place with direct sunshine as it has a negative effect on cooling of the appliance Heat storage is dangerous and it can seriously reduce the lifetime of the appliance In order to ensure the safety ask the qualified person to remove the dirt from the appliance Try to prevent the mains cable or if it is part of delivery mains adapter damage The appliance can only be connec ted with a supplied ...

Page 3: ...is mode for a long time e g while watching a DVD or a video Turn off the appliance if you are not using it Batteries Observe the correct polarity when inser ting the batteries Do not expose batteries to high tempera tures and do not place them on locations where the temperature might increase quickly e g near the fire or on the direct sunshine Do not expose batteries to excessive radiant heat do n...

Page 4: ... watching 3D TV Also certain symptoms can occur in unspecifi ed conditions without any previous history If you experience any of the following symptoms immediately stop watching the 3D imaging and consult a doctor dizziness or light headedness visual transition or altered vision visual or facial instability such as eye or muscle twitching unconscious action convulsion loss of conscience confusion ...

Page 5: ...des following parts 1x RF cable 2x AAA bateries 1x Mini Component to Component Cable 1x Mini AV Cable 1x Remote control V OL C H R E P E AT 1 2 3 4 5 6 7 8 0 9 OK S TA NDB Y MUT E A S P E C T ME NU E X IT A NG L E A B S OUR C E i S UB T IT L E D ME NU T IT L E D S E T UP G OT O FAV A UDIO S L E E P TV RADIO TV GUIDE ATV USB DVD EJECT ZOOM D DIS S IZE REC PVR DVD TIMESHIFT HOL D DISPLAY TEXT INDEX ...

Page 6: ...ity of it falling when pushed The instructions shown below are a safer way to set up the TV by fixing it to the wall avoiding the possibility of it falling forwards if pulled This will prevent the TV from falling forward and causing injury This will also prevent the TV from damage This method is used if the TV is placed on a glass surface or you do not wish to screw anything into your furniture Ens...

Page 7: ...new search Press the MENU select Automatic Channel Search and enter the network ID Start your search by clicking OK 7 Optional channel presets DVB S2 Select Satellie in the Digital type in the menu for the optional channel presets Here you can choose between the satelli te operators Then the channel preferences of the operator will be imported into your TV system If you set country to Austria in p...

Page 8: ...ress ź or Ÿ to select the input you require 3 Press OK b Using the buttons on the Television 1 Press SOURCE 2 Scroll up down using CH CH buttons to the input source you require 3 Press Vol to change input source to the one selected Eject Play Pause Vol Volume up and menu right Vol Volume down and menu left CH Programme Channel up and menu up CH Programme Channel down and menu down MENU Displays Me...

Page 9: ...LEEP Press repeatedly to cycle through the sleep options CH Ÿ ź To increase or decrease the channel being watched GOTO1 DVD mode To go to a specific chapter A B1 DVD mode Press once to set point press a second time to return to point ANGLE1 DVD mode Select different angle of DVD if available REPEAT1 DVD mode To repeat playback D DIS1 DVD mode To display the current disc information ZOOM1 DVD mode ...

Page 10: ...AX Audio Out Digital Coax output RF In RF TV Aerial Input VGA PC Audio In 3 5mm PC audio input HEADPHONES 3 5mm Headphone output R L Video YPbPr audio In Component Video audio input Video CVBS VIDEO Input YPbPr Component HD Input Mini YPbPr Mini Component HD Input optional R G B Mini Video Mini video input and Audio input rot YPbPr and Video ...

Page 11: ...io with minimal loss of quality TVs Input Source should be set to HDMI Option 2 via Component cable If you are supplied with a cable from the device which has RED GREEN BLUE RED WHITE connectors you must use included YPbPr to MINI YPbPr cable adaptor to connect via Component for picture and by phono cable for sound TVs Input Source should be set to Component Mini YPbPr L R Y PB PR L R Y PB PR Usin...

Page 12: ...d a smartcard The CAM can then be inserted into the COMMON INTERFACE PORT CI Card In Dish Setup This menu is only available in DVB S2 mode You can select the type of satellite your transponder and your LNB type etc Picture PICTURE Picture Mode Ecohome Contrast 50 Brightness 50 Colour 50 Tint 50 Sharpness 30 Colout temp Normal Noise reduction Off 3D Setup Move Return MENU Select OK EXIT EXIT Pictur...

Page 13: ...ormat 3D format is alternative for 3D broadcast which is pretty similar to side by side 3D except that it halves the vertical resolution instead Available primarily up to 720p resolution top and bottom 3D off ers 1 280 pixels horizontally The higher pixel count is generally considered more suitable for displaying panning motion in sports programs Frame Alternative As its name suggests this format ...

Page 14: ...al sound track for visually impaired Available only on selected DTV shows Time TIME Clock Off time Off On time Off Time Zone GMT 1 Sleep timer Off Auto standby 4 h OSD Timer 30 S Move Return MENU Select OK EXIT EXIT Clock Set the date and time Off Time Allows you to set a specific time for your TV to turn off On Time Allows you to set a specific time for your TV to turn on the channel it will then...

Page 15: ...plays the 4 3 picture in its original size Side bars are shown to fill the 16 9 screen 16 9 Fills the screen with a regular 16 9 signal Zoom 1 2 The picture is the correct proportion but zoomed in to fill the screen Full Screen Stretch signal to fill the screen Blue Screen Changes the background when there is no input between clear and a blue background Only available on some sources First Time In...

Page 16: ...USB memory sticks up to 32GB It is possible to use either a USB memory stick or a USB portable Hard Drive of a larger capacity however it must be formatted to the FAT32 file system in order to operate correctly At the time of printing this user guide Windows XP Vista computers are only capable of formatting up to 32GB therefore you will need a software programme utility to format larger USB drives...

Page 17: ...s in standby mode Note USB record function is only avilable in Digital TV mode Due to copyright laws and illegal copying recording it is not possible to record to from any other input output source USB mode Media player USB mode offers playback of various different types of content that you have saved on your USB Memory Stick Please refer to technical specification page for compatible file types O...

Page 18: ...the following options LT RT Set LT RT Downmix Stereo Set Stereo Downmix Dolby Digital Page Dual Mono Stereo Outputs 2 channels of sound both left and right Mono L Outputs left side sound Mono R Outputs right side sound Mix Mono Outputs a single channel of sound but mix between right and left Dynamic Range This is the difference between the quietest and loudest sounds This setting works only with D...

Page 19: ...d connect the aerial cable from the wall socket to your VCR DVD Recorder and another aerial cable from the VCR DVD Recorder to the TV Game Consoles I have connected my PS3 to the TV via HDMI but I am not receiving any pictures or sound on my Television 1 Ensure the TVs source is on HDMI 2 Check your settings on your PS3 are as per the PS3 instruction manual Game Consoles I have connected my Xbox 3...

Page 20: ...Universal Media Corporation Slovakia s r o Mickiewiczova 7104 14 811 07 Bratislava 1 Slovakia Assembled in Europe BLA MAN 0076 ...

Reviews: