background image

13

H.264 DVR User Manual

SECTION 2: HARDWARE OVERVIEW AND SETUP

13

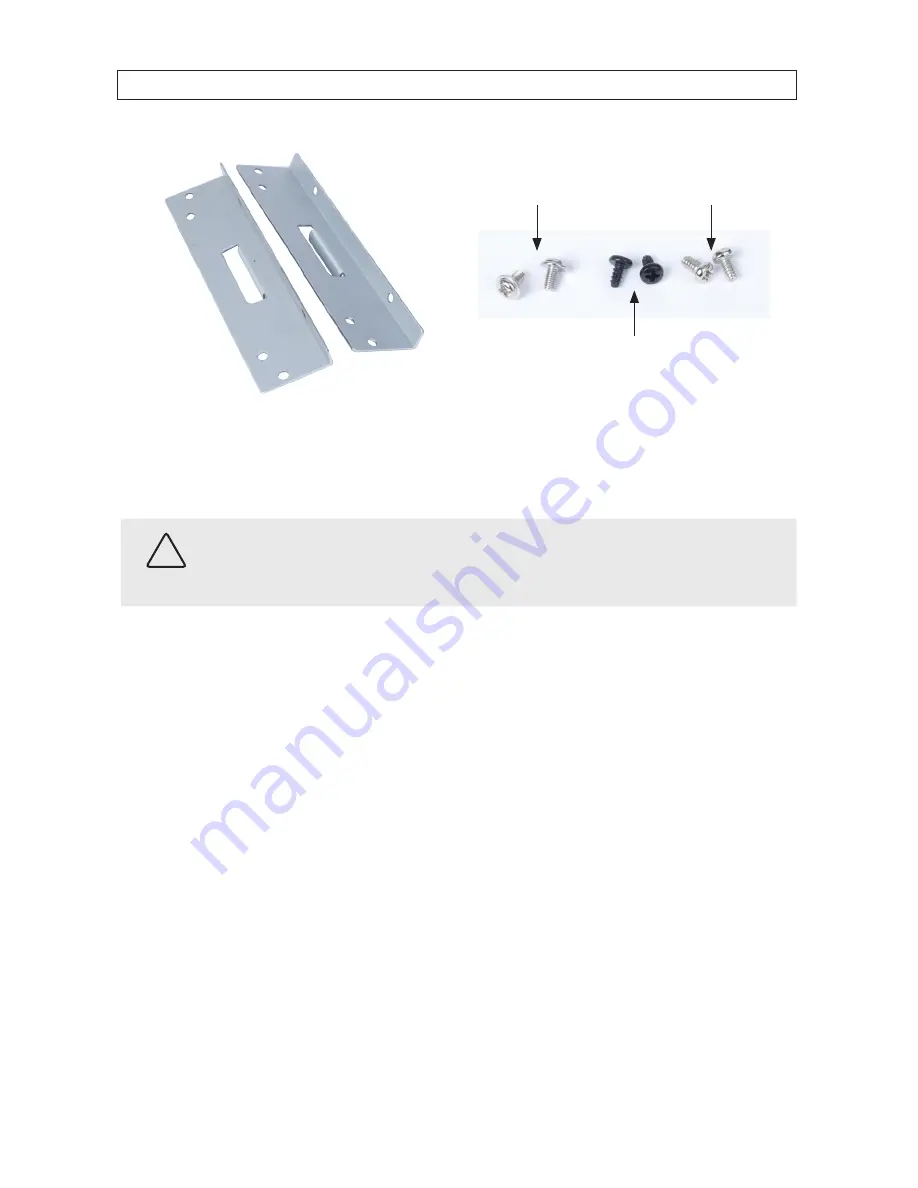
For attaching bracket 

to DVD-R/W (flat-head, 

fine-thread screws (4))

For attaching bracket to 

HDD (pan-head, medium- 

thread screws (4))

For attaching bracket 

to chassis (pan-head, 

course-thread screws)

Mounting Brackets (one pair per drive)

Screw types

To install an HDD, carefully follow the procedure below. Although this procedure is illustrated for a 16-channel DVR, it is identical for 
a 4- or 8-channel DVR. 

CAUTION

Follow recommended electrostatic discharge (ESD) guidelines while performing this procedure. Install the HDD in a static-free 
environment, wearing a certified ESD wrist strap. If a static free environment and ESD wrist strap is not available, touch the bare 
metal of the DVR chassis frequently when installing the drive to dissipate the static charge naturally generated on your skin and 
clothing. .

1. 

If your DVR is powered on, use the menu system to perform a System Shutdown. 

a. 

Right click anywhere on the live view screen, then click 

SYSTEM SHUTDOWN

 in the pop-up menu (see “3.1 Starting 

the system for the first time” on page 17), or click the SYSTEM SHUTDOWN icon on the task bar. 

b. 

Follow the on-screen instructions for shutting down the system. 

2. 

Disconnect the power adapter from the back of the DVR. 

3. 

Remove the top cover from the DVR by removing the three cover screws on the back of the chassis, and the two on each side. 
See the drawing below. 

Summary of Contents for BLK-DH200400DH

Page 1: ...r Manual Products BLK DH200400DH BLK DH200800DH BLK DH201600DH PLEASE READ THIS MANUAL BEFORE USING YOUR RECORDER and always follow the instructions for safety and proper use Save this manual for future reference BLK DH20xx00DH_RM ...

Page 2: ...check and comply with all applicable local state and federal laws and regulations before engaging in any form of surveillance or any transmission of radio frequencies Microsoft Windows Windows Media and Internet Explorer are either registered trademarks or trademarks of Microsoft Corporation in the United States and or other countries Android is a trademark of Google Inc Use of this trademark is s...

Page 3: ...n 12 2 5 1 Installing a 2nd internal HDD 16 SECTION 3 System Setup 17 3 1 Starting the system for the first time 17 3 1 1 Entering the SETUP menu 18 3 2 DISPLAY menu 20 3 3 RECORD menu 21 3 3 1 Recording Schedules 22 3 4 DEVICE menu 24 3 5 STORAGE menu 27 3 6 SYSTEM menu 30 3 7 SECURITY menu 32 3 8 NETWORK menu 34 3 8 1 Network ports 36 3 9 CONFIG menu 37 SECTION 4 Live Search and Playback 39 4 1 ...

Page 4: ...ite Setup 56 7 4 3 Event Setup 57 7 4 4 Event Search Setup 58 7 4 5 Record Setup 59 7 4 6 Record Disk Setup 59 7 4 7 Display Setup 60 7 4 8 Language Setup 60 7 5 Connecting to a DVR 60 7 5 1 Bidirectional Audio 61 7 6 Remote Search mode and functions 62 7 6 1 Searching for and playing video recorded by the DVR 63 7 6 2 Backing up video from the DVR on the Remote Client PC 64 7 6 3 Image capture 66...

Page 5: ...backup during playback 84 SECTION 9 Web Client 86 9 1 Connecting to the DVR with IE 86 9 2 Setup 91 9 2 1 Setup DISPLAY 92 9 2 2 Setup RECORD 92 9 2 3 Setup DEVICE 93 9 2 4 Setup STORAGE 94 9 2 5 Setup SYSTEM 95 9 2 6 Setup SECURITY 95 9 2 7 Setup NETWORK 96 9 2 8 Setup UPGRADE 97 9 2 9 Setup INFORMATION 97 9 3 DVR Search 97 9 3 1 Playing recorded video 99 9 4 Backup recorded video 100 9 4 1 Captu...

Page 6: ...vi ...

Page 7: ...iendly operator interface Record scheduler Software upgradable Backup via USB flash drive Network or DVD R W Exclusive file format backup AVI backup Network Access via Web Client embedded browser based client UMS Client for monitoring a single DVR Multi Client for monitoring multiple DVRs concurrently and smartphone apps for Apple iPhone and Android Your DVR includes DVR with DVD R W drive and har...

Page 8: ...triggered or motion is detected D NETWORK Indicates that a network client is connected E BACKUP Indicates that a USB or DVD R W storage device is storing images or video F POWER Indicates that the system is switched on Table 2 Front Panel Buttons No Name Description 1 Channel keys For channel 10 press the 0 key For channel 11 press the 10 and 1 key For channel 16 press the 10 and 6 key 2 Press to ...

Page 9: ... BACKUP Press to capture live or playback mode video in JPEG format 15 t LEFT Press to move left or to change the values in Setup mode When entering a password it inserts a 4 16 p UP Press to move up the menu in Setup mode When entering a password it inserts a 1 17 u RIGHT Press to move right or to change the values in Setup mode When entering a password it inserts a 2 18 q DOWN Press to move down...

Page 10: ...o input 1 RCA connector for audio output 4 HDMI HDMI video out 5 RS 232 interface Used for testing only 6 VGA Connector for a VGA monitor 7 eSATA port Connector for external storage 8 ETHERNET RJ 45 connector for LAN connection 9 USB Use with a USB flash drive to archive still images and videos and upgrade firmware or use to connect a USB mouse to the DVR 10 RS 485 sensor and alarm terminations Se...

Page 11: ...input 1 RCA connector for audio output 4 HDMI HDMI video out 5 RS 232 interface Used for testing only 6 VGA Connector for a VGA monitor 7 eSATA port Connector for external storage 8 ETHERNET RJ 45 connector for LAN connection 9 USB Use with a USB flash drive to archive still images and videos and upgrade firmware or use to connect a USB mouse to the DVR 10 RS 485 sensor and alarm terminations See ...

Page 12: ... connector for audio output 4 HDMI HDMI video out 5 RS 232 interface Used for testing only 6 VGA Connector for a VGA monitor 7 eSATA port Connector for external storage 8 ETHERNET RJ 45 connector for LAN connection 9 USB Use with a USB flash drive to archive still images and videos and upgrade firmware or use to connect a USB mouse to the DVR 10 RS 485 sensor and alarm terminations See description...

Page 13: ...3 GND Sensor 3 input S4 GND Sensor 4 input D D RS 485A and RS 485Bt A B Alarm output NOTE S1 S4sensor inputscanbenormallyopen N O ornormallyclosed N C To configurethesensortype go to SETUP Device Sensor Type NOTE A B alarmout canbetriggeredby anysingleofcombinationof sensorsandmotiononorvideo lossinupto fourcamera channels Toconfigurealarmcausingconditions goto SETUP Device AlarmOut SECTION 2 HARD...

Page 14: ...During Pause To move the playback position moves 1 frame forward 6 REW To rewind the recording Press again to increase the rewind speed 7 PLAY PAUSE To play or to pause the recording in playback mode 8 FF To fast forward the recording Press again to increase the fast forward speed 9 Direction Buttons Press to move to menu items or select a channel 10 SETUP To open the SETUP menu 11 SEARCH To go to...

Page 15: ...is illustrated for a 16 channel DVR it is identical for a 4 or 8 channel DVR CAUTION Followrecommendedelectrostaticdischarge ESD guidelines whileperformingthisprocedure InstalltheDVD R Wdrivein astatic freeenvironment wearingacertifiedESDwriststrap IfastaticfreeenvironmentandESDwriststrapisnotavailable touchthe baremetalof theDVRchassis frequentlywheninstallingthedriveto dissipatethestaticchargena...

Page 16: ...illips screwdriver Optical drive tray door retaining screw location Back side of DVR front panel Optical drive bay 5 Attach a mounting bracket to each side of the DVD R W drive as shown below using the flat head fine thread screws provided Use two screws for each bracket Tighten the screws until snug DVD R W drive Mounting bracket Flat head fine thread screws 2 ...

Page 17: ...he DVD R W drive in the optical drive bay as shown below Secure the drive to the chassis with four screws through the mounting brackets two on each side Use black pan head course thread screws provided Tighten the screws until snug DVD R W drive in optical drive bay Screws Screws 8 Plug the SATA data cable blue cable into the SATA1 connector on the PC board then plug the SATA power cable into one ...

Page 18: ... store video and snapshots recorded by the DVR Normally DVRs have one internal HDD and one internal DVD R W drive However a second internal HDD can be installed in place of the DVD drive if needed Your DVR will accommodate one standard size desktop system HDD with a SATA interface When choosing an HDD to install select onefromthelistprovidedin APPENDIXADVRCompatibleHardDiskDrives onpage104toensure...

Page 19: ... environment wearingacertifiedESDwriststrap IfastaticfreeenvironmentandESDwriststrapisnotavailable touchthebare metalofthe DVRchassisfrequentlywheninstallingthedrivetodissipatethestaticchargenaturallygeneratedonyourskinand clothing 1 If your DVR is powered on use the menu system to perform a System Shutdown a Right click anywhere on the live view screen then click SYSTEM SHUTDOWN in the pop up men...

Page 20: ... the pan head medium thread screws provided Use two screws for each bracket Tighten the screws until snug HDD Mounting bracket Pan head medium thread screws 2 5 Plug a SATA data and power cable assembly into the mating connectors on the back of the HDD Ensure the connector is fully seated SATA data and power cable ...

Page 21: ... each side of the HDD Use black pan head course thread screws provided Tighten the screws until snug Screws 2 between HDD and back of DVR front panel Screws DVR front panel DVD R W drive 7 Plug the SATA data cable blue cable into the SATA0 connector on the PC board then plug the SATA power cable into one of the SATA power connectors on the PC board SATA0 connector SATA power connectors PC board HD...

Page 22: ...hthebare metalofthe DVRchassisfrequentlywheninstallingthedrivetodissipatethestaticchargenaturallygeneratedonyourskinand clothing 1 If a DVD RW drive is installed in the optical drive bay remove it by reversing the procedure included above in 2 4 DVD R W Optical drive installation on page 9 2 Attach the mounting brackets and data power cable to the 2nd HDD See 2 5 HDD installation on page 12 above ...

Page 23: ...e system for the first time the following messages appear After the initialization sequence completes select your preferred language and set the date and time When the Set date and time window opens use the dropdown lists to show the correct date and time then click Finish The date and time setting is used to timestamp recordings ...

Page 24: ...sktop or press the SETUP button on the remote control then click the SETUP entry in the pop up menu A LOGIN window will open 7 In the LOGIN window open the virtual keyboard and enter the PASSWORD or use the direction buttons on the front panel The default password is 1111 Virtual Keyboard Button After entering the password the SETUP window will open ...

Page 25: ...ttons with the mouse Entry fields usually have drop down menus you can open to select preset parameter values Other parameters fields open submenus or keyboards you can use to enter names and other values You can also navigate through the menu items using the direction button p q t or u and change option values with the SEL button Always select or click OK to save new settings and close the SETUP ...

Page 26: ...60 seconds CHANNEL In the channel submenu you can tune the display settings for all cameras at once or setup each camera individually Click the channel drop down list to select the channel then use the click the submenu buttons to NAME the channel and set the COVERT property enable disable live display mode Drag the marker on the image adjustment bars to perfect the image BRIGHTNESS Change the bri...

Page 27: ...SETUP Item Description VIDEO OUTPUT VGA Click the submenu button to open a list of monitor resolutions then click the resolution you prefer Click OK VIDEO OUTPUT CVBS UNDER SCAN TBS 3 3 RECORD menu Clicking the RECORD tab opens the RECORD menu ...

Page 28: ...deo frame o f your recorder QUALITY Select the recording quality for the specified channel Level 1 low to Level 5 high RECORDING Assign the recording mode for each channel Options are Disable Continuous Motion Sensor Schedule PRE RECORD Enable disable pre event recording Options are OFF 15 SEC 30 SEC 1 MIN 3 MIN 20 MIN POST EVENT RECORD Set the post event recording time duration for the specified ...

Page 29: ...rs in the grid you where you want to use that mode Timeslots are color coded for the record mode applied to them CONTINUOUS green MOTION yellow and SENSOR red NONE white COPY SCHEDULE To copy the schedule you setup to other cameras click the camera channel number s then click COPY You can also use the front panel buttons p q t u and SEL buttons to perform these selections Click OK to save your set...

Page 30: ...24 SECTION 3 SYSTEM SETUP 3 4 DEVICE menu Clicking the DEVICE tab opens the DEVICE menu To return to SETUP menu press the ESC button ...

Page 31: ...1 only SENSOR IN Enable alarm out by sensor up to 4 inputs MOTION ON Enable alarm out by camera motion up to 4 cameras can be monitored VIDEO LOSS ON Enable alarm out by camera video loss up to 4 cameras can be monitored ALARM DURATION Set the alarm dwell time 5 60 seconds or infinite continuous ERROR ALARM Set the error type for the alarm activation OFF ALL HDD ERROR VIDEO LOSS ...

Page 32: ...D 0 63 SPOT OUT Enable disable display of the channel when an event is active SPOT ON EVENT Enable disable display of the channel when an event is active SPOT EVENT DWELL TIME Set the dwell time for the event activated channel 1 10 sec SEQUENCE Enable disable sequential display of spot channel s in full screen If ON is selected the spot channel is displayed SEQUENCE DWELL TIME Set the dwell time f...

Page 33: ...n To disable motion sensing on a selected block click on it To return to the Device menu right click on the screen or press the ESC button on the front panel MOTION SENSITIVITY Set the motion sensitivity for the specified channel 1 9 KEY TONE Enable disable tone when key is pressed REMOTE CONTROL ID Select an ID for the remote control device 1 Select ID number 2 On the remote control press the sam...

Page 34: ...e recording when the drive is full overwriting the oldest information first If disabled record ing will stop when the hard drive is full DISK FORMAT Select YES or NO to format the hard drive disk Caution Formatting the hard drive will erase all information on the disk Archive all data that you may need before formatting the disk ...

Page 35: ...w the performance health of the drives RECORDING LIMIT Enable disable a recording limit days RECORDING LIMIT DAYS Set the recording limit in days 1 90 days If set to 1 day data older than 24 hours will be removed S M A R T Click the submenu button to view hard drive S M A R T data for each hard drive Select the options on the S M A R T menu as needed ...

Page 36: ...use You can also navigate the menus with the p q t and u buttons and press SEL to select options Table 11 Menu Items in SYSTEM Setup Screen Item Description DVR ID Select the submenu button to open the virtual keyboard then click your way to a new name for your DVR The DVR ID can have a most 10 characters Click OK when finished ...

Page 37: ...d select the current value from the drop down list In the DAYLIGHT SAVINGS list select OFF USA EU European union or OTHERS Click OK to commit the settings CLIENT ACCESS Enable ON or Disable OFF remote access through network client software NTP Click the NTP field and select ON then click the submenu button to open the NTP setup menu Use this feature to synchronize the clocks of computer systems ov...

Page 38: ... OPTION Select security method NONE SSL or TLS MAIL TO Use the virtual keyboard to enter the email address of the recipient MAIL SERVER Use the virtual keyboard to enter the mail server information ID Use the virtual keyboard to specify the user ID for the mail server PASSWORD Use the virtual keyboard to specify the connection password for the mail server MAIL FROM Use the virtual keyboard to spec...

Page 39: ...permissions to different users for access to areas of the system In the PASSWORD CHECK row check or uncheck the box to select for all users or check or uncheck the individual settings for each user Press ESC to return to the SECURITY menu Options are defined as SETUP Access to the SETUP menus PB Control video Playback PTZ Control and configure PTZ Pan Tilt Zoom device settings R OFF Control manual...

Page 40: ...playback rights to users for viewing video clips of cameras channels NOTE Forimprovedsystemsecurity itisstronglyrecommendedthatyouchangethefactorydefaultpasswordsduringtheinitial setupofyour system 3 8 NETWORK menu Clicking the NETWORK tab opens the setup menu Navigate through the menu items using mouse You can also navigate the menus with the p q t and u buttons and press SEL to select options NO...

Page 41: ...E Depending on the type selected the options in the network menu will change appropriately DHCP If selected the DVR automatically acquires its network settings from a DHCP server This address may change without notice STATIC If selected you must configure the network settings manually These settings remain in effect until manually changed IP Enter the IP address assigned to the DVR GATEWAY Enter t...

Page 42: ... open network stream setup submenu This menu is used to configure the resolution frame rate and quality at which live video from each camera can stream across the network The total data rate permissible is dependent on the model of your DVR Refer to the Specifications section for more information CSet the preferred options using the drop down lists then select OK 3 8 1 Network ports When you conne...

Page 43: ...he system configuration menu Navigate through the menu items using mouse You can also navigate the menus with the p q t and u buttons and press SEL to select options Table 14 CONFIG menu items Item Description SAVE SETUP TO A USB Click the submenu icon To save the current system configuration to the USB flash drive plug the flash drive into the USB port on the front panel click OK to confirm the o...

Page 44: ...d the system default settings NOTE The following items are not reset language DVR ID Security User Authentication Security User P W date format DLS settings network settings HDD overwrite limit recording HDD serial number and HDD ERROR time LOAD FACTORY DEFAULT Click the submenu icon Select YES to reset the system to the factory default settings SOFTWARE UPGRADE Click the submenu icon Select SCAN ...

Page 45: ...f the system click this icon then follow the on screen instructions Lock Unlock SETUP button Setup button Click this button to open the SETUP menu Audio button Click this button to set the audio reception type audio mute single audio channel or 4 audio channels To set a single audio channel first select a specific channel on the live screen Search button Click this button to open the search menu B...

Page 46: ...ingle channel for the selected channel only press the Audio button on the front panel To mix audio channels press the Audio button on the left side Alarm indicator When an alarm is activated sensor or motion alarm in the video channel this icon will be highlighted bright red Indicates that a network client is connected to the DVR Indicates that sequencing mode is enabled The current date and time ...

Page 47: ...y the icons in the tray at the bottom of the screen See Table 15 Status Indicator Icons in Live Viewing Screen on page 39 for a description of these icons 4 1 SEARCH menu To open the SEARCH menu press the SEARCH button on the front panel or click the SEARCH icon on the Live screen Recorded data can be searched in the following ways TIMELINE EVENT GO TO FIRST TIME GO TO LAST TIME GO TO SPECIFIC TIM...

Page 48: ...corded at that time The day selected is highlighted blue Select the day of interest then select NEXT Marker In the TIME LINE window the highlighted bars show the time of day when data was recorded Drag the marker to the time when you want to begin playing a recording click the channel number of interest then click NEXT to play the video To expand the timeline click the icon in the upper right corn...

Page 49: ...submenu button in the upper right corner opens a channel selection window where you can select the specific channel you want to play Select the channel the press the ESC button to return to the event list window 4 1 3 GO TO FIRST TIME search You can access from the oldest recorded data on the DVR by selecting GO TO FIRST TIME on the SEARCH window Press the ESC to return to the SEARCH window 4 1 4 ...

Page 50: ... the DVR NOTE Before youcansearchforanArchivedvideoclip clipsmustfirstbebackedup See Backupvideoclip below To perform an Archive search search of backed up recorded video or photo select ARCHIVE in the SEARCH window A calendar window will open The highlighted days in the calendar window indicate that data was backed up on those days The data backed up may be recorded timestamped on a different day...

Page 51: ...tamp of the recorded is shown in the Backup frame Select the image and MEDIA location then click BACKUP To close the ARCHIVE IMAGE window press ESC or click CLOSE 4 3 PLAY mode Playing a recorded event changes the DVR mode from SEARCH to PLAY While in PLAY mode you can return to the SEARCH screen by pressing the front panel ESC button or clicking the Ticon Playback controls are located at the bott...

Page 52: ...pause a recording u Jump step forward Playback position moves 60 seconds ahead u u Select to fast forward the recording Select again to increase the fast forward speed u Slow playback Select to backup video clip 4 4 Backup video clip You can archive the video clip by clicking the Backup button in Play mode see the screen above The system adds all backed up video clips to the Archive search list Th...

Page 53: ...t the device you want to backup archive to All archive devices are listed in the media window 3 Click NEXT 4 In the window that opens select the duration of the video clip from the drop down list then click START Allow the backup operation to complete before continuing ...

Page 54: ...Left UP Down Select Far REW KEY and Near FF KEY Press the ESC button to return to the previous menu Press the PTZ button to close the OSD menu AUTOSCAN Press the right key u to start auto scan Press the left key t to stop auto scan PRESET Select PRESET then press the left key t A number input window will appear Set the number 3 digits using the number key then press the SEL to confirm the preset n...

Page 55: ... Select the media you want to save the image on If you want to backup the image to a USB flash drive insert the drive into the USB port on the back or front of the DVR If you want to backup to a CD or DVD place a blank CD R W or DVD R W disk into the DVD drive If no DVD RW drive is installed in the DVR the only backup option is USB 3 Click START When the backup is complete a message will appear Wh...

Page 56: ...it will create a directory on the flash drive with a date coded name in the format YYYYMMDD ex 20120327 and write the file there 6 3 BACKUP still images or video from the ARCHIVE list Video clips and images stored in the ARCHIVE list on your hard drive can be copied to a USB flash drive or a CD DVD To perform the copy 1 Use the mouse or the p q t u and SEL buttons to open the SEARCH window and sel...

Page 57: ... or DVD place a CD R W or DVD R W disk into the DVD drive 5 Select BACKUP to copy the file to the media drive 6 When the backup is complete select CLOSE button to return to the LOG list window 6 4 Playing backed up video clips Video clips are backed up from the DVR in AVI or NSF format AVI files can be played in Microsoft Windows with Window Media Player and other players compatible with AVI forma...

Page 58: ...7 1 PC Requirements For the Remote Client software the minimum PC requirements are CPU Intel Pentium IV 1 4 GHz or higher Memory 512MB 1GB or larger is recommended VGA memory 16 MB 64 MB or larger is recommended Resolution 1024 x 768 Supported operating systems Microsoft Windows 2000 Windows XP Professional Windows XP Home Windows 7 DirectX DirectX 8 1 or higher 7 2 Installing the Remote Client 1 ...

Page 59: ...tatus screen will open 4 Select a Program Folder then click Next The Remote Client will be installed and a Remote Client icon will appear on the desktop 5 Close the InstallShield window 7 3 Remote Client initial display To open the Remote Client double click the icon on the desktop or open it through the Windows Start menu ...

Page 60: ... window DATE TIME Displays the current date and time CONNECT DISCONNECT Connect disconnect a DVR SEARCH LIVE Switches from Live mode to Search mode KEYPAD Select a channel Click the channel button or double click the channel on the Live view screen SPLIT SCREEN MODE Select a split screen mode 4 9 or 16 channel display PAN TILT ZOOM FOCUS Control the PAN TILT and ZOOM FOCUS features on the remote c...

Page 61: ...set SETUP Open the setup menus ALARM The ON OFF button of the alarm output of the DVR When an alarm is active this button is red HDD USAGE DVR HDD space used Indicator NETWORK BANDWIDTH Shows the transferred frames and network bandwidth AUDIO Adjust the volume Click the speaker icon on the left to mute the volume LOG WINDOW 7 4 Setup The Remote Client includes several setup options including prese...

Page 62: ...on If a user selects this function the client will automatically try to connect to the previously connected IP address if the network connection is lost Time Format Select the format for displaying the time After entering all fields in the Site Additions window click OK to save your entries and exit the Setup menus 7 4 2 Site Setup To open the Site menu click the Site entry in the left frame of th...

Page 63: ...ogin ID login name PASSWORD Enter the password associated with the login ID The default login ID and password are Admin and 1111 Channels Enter the number of channels supported by your DVR 4 8 or 16 After entering all fields in the Site Additions menu click OK to save your entries and exit the Setup menus 7 4 3 Event Setup To open the Event menu click the Event entry in the left frame of the Setup...

Page 64: ...live video Event List For each event type select the checkbox to show the event in the Event List in live mode After entering all fields in the Site Additions menu click OK to save your entries and exit the Setup menus 7 4 4 Event Search Setup The Event Search window is used to display a list of the logged events that occurred during a specified time period Use the dropdown lists to choose the Fro...

Page 65: ... Record Condition Select Always or Event then Auto record Event If Event was selected as the Record Condition select the type of event and the duration of the recording Channels Select the channels to be recorded during the conditions selected above After entering all fields in the Record menu click OK to save your entries and exit the Setup menus 7 4 6 Record Disk Setup To open the Record Disk me...

Page 66: ...n multi monitor systems to correct the image on a secondary monitor Use of this feature may degrade the performance of the DVR 7 4 8 Language Setup To open the Language menu click the Language entry in the left frame of the Setup window Choose the preferred on screen language from the dropdown list then click OK to save the selection and close the Setup menu 7 5 Connecting to a DVR To connect to a...

Page 67: ... OK A Live view window from your DVR will be displayed 7 5 1 Bidirectional Audio The Remote Client supports bidirectional audio between the client PC and a DVR To use bidirectional audio the client PC must have a microphone and speakers At the DVR connect a microphone to the audio in connectors and a pair of amplified speakers to the audio out connectors ...

Page 68: ...nts Button Function Description WINDOW CONTROL Buttons for expanding the image to full screen press ESC to return to normal viewing minimizing the window expanding window to full screen and closing the window DATE TIME Displays the current date and time CONNECT DISCONNECT Connect disconnect network connection LIVE SEARCH Switches from search mode to live mode KEYPAD Select a channel Click the chan...

Page 69: ...s a timeline for the date selected in the calendar frame Time spans when video is recorded are marked in blue To expand the display for an hour when video was recorded drag the marker to the hour you want to expand then click the 0 60 button located below the time line PLAYBACK BUTTONS Use the playback buttons to control video playback The playback buttons are labeled with the standard icons used ...

Page 70: ... Drag the marker on the timeline to the time at which you want to play recorded video Marker To expand the hour within which the marker lies click the 0 60 button below the time line 5 Play the video to determine the time where you want to start backing up a clip then pause the playback and click the MARK IN button 6 Continue playing the video to determine the time where you want to end the clip t...

Page 71: ...the BACKUP button The Backup menu window will open 9 In the Backup menu select the options you want then click OK 10 A pop up window will appear when the backup operation is complete Click OK to close the backup operation NOTE Videobackupcantakeseveralminutes tocomplete dependingonthenumberofchannelsselectedandthedurationoftheclip ...

Page 72: ...ptured in either Live mode or Search mode then saved as a BMP or JPEG file To capture a still image of the screen click the Capture button A Capture menu will open In the Capture menu select the options you want then click OK An image of the screen will be saved at the location you specified ...

Page 73: ...time 8 1 PC Requirements For the Multi Client software the minimum PC requirements are CPU Intel Pentium IV 2GHz or faster Memory 512MB 1GB or larger is recommended VGA memory 16MB 64MB or larger is recommended Resolution 1024 x 768 Disk space 1GB Supported operating systems Microsoft Windows 2000 Windows XP Professional Windows XP Home Windows 7 Network 10 100BASE T network DirectX DirectX 8 1 or...

Page 74: ...elect a Program Folder for the Start menu then click Next The Multi Client will be installed and a Multi Client icon will be displayed on the desktop 5 Close the InstallShield window 8 3 Multi Client initial display To open the Multi Client double click the icon on the desktop or open it through the Windows Start menu ...

Page 75: ...VR SITE CONTROLS Refresh Site Addition Site Delete Net Finder Icons in the upper right corner of the screen Applies control to sites selected in the site list below These icons link to refresh thumbnail site addition site delete net finder site modify SITE LIST List of sites added to the DVR The site list appears in the pane beneath the site controls icons CONNECT Click to connect to sites selecte...

Page 76: ...etween the PT and ZF dials click the button in the center CHANNEL SPLIT Use to select the number of channels 1 4 9 16 shown on the screen SITE SPLIT Use to select the number of DVRs 1 4 9 16 shown on the screen 8 3 1 Using Net Finder The Net Finder feature discovers BLK DH20xx DVRs on the subnet and can be used to quickly add it to Multi Client To use Net Finder 1 Click the Net Finder icon in the ...

Page 77: ...te Name and an administrative ID and Password In the screen above the site name entered is Desk 4 Click OK to save your settings The site you added will appear in the left frame of the Net Finder window and the site list frame on the left side of the Multi Client window 8 3 2 Event List Clicking the Event List icon opens the Event List window for the current Multi Client session ...

Page 78: ...cation backup and still image captures are saved Automatic Reconnection If a user selects this function the client will automatically try to reconnect to the previously connected IP address if the network connection is lost Time Format Select the format for displaying the time After entering all fields in the Site Additions window click OK to save your entries and exit the Setup menus 8 4 2 Event ...

Page 79: ...pe select the checkbox to show the event in the Event List in live mode After entering all fields in the Site Additions menu click OK to save your entries and exit the Setup menus 8 4 3 Event Search Setup The Event Search window is used to display a list of the logged events that occurred during a specified time period Use the drop down lists to choose the From and To times then browse to the loca...

Page 80: ...ft frame of the Setup window The Record menu allows you to select the conditions with which live video from the cameras is recorded In the Record menu set the following Record Condition Select Always or Event then Auto record Event If Event was selected as the Record Condition select the type of event and the duration of the recording Channels Select the channels to be recorded during the conditio...

Page 81: ... space on the disk to allocate for recordings In the Disk menu select the storage drive from the dropdown list then enter the size of the storage buffer in megabytes Choose either Replace oldest files or Stop recording when the disk is full Click OK to save your entries and exit the Setup menus 8 4 6 Display Setup To open the Display menu click the Display entry in the left frame of the Setup wind...

Page 82: ...e your entries and exit the Setup menus 8 4 7 About Setup The About Setup screen displays the version level of the Multi Client Software The abbreviated copyright statement is also shown 8 5 Connecting to a DVR To connect to a DVR for the first time 1 Click the Site Addition button The Site Addition dialog window will open ...

Page 83: ...port number is 5445 ID Enter your login ID login name The default administrator ID is Admin PASSWORD Enter the password associated with the login name The default administrator password is 1111 3 After entering all fields in the Site Additions menu see above click OK to save your entries An entry for the DVR you added will appear in the site list frame below the Site Addition icon 4 Click the chec...

Page 84: ... speakers to the audio out connectors 8 5 2 Capture A still image of a screen can be captured in either Live mode or Search mode and saved as a BMP or JPEG file To capture a still image of the screen click the Capture button A Capture menu will open In the Capture menu select the options you want then click OK An image of the screen will be saved at the location you specified By default captured i...

Page 85: ...pecified in the Setup General menu 8 6 Remote playback and backup The Multi Client can be used to search for and playback video clips in the DVR Video clips can then be backed up to a local USB drive or disk NOTE TheEventListmayprovidevaluableinformationonwhenalarmsandothereventsoccurred ToopentheEventList clickthe EventsList button 8 6 1 Remote playback To search for and recorded video from the D...

Page 86: ...ind or play Dates colored tan have data recorded The date colored blue is the date selected the timeline shows when data was recorded on that day TIMELINE Bar Displays a timeline for the date selected in the calendar frame Time spans when video is recorded are marked in blue To expand the display for an hour when video was recorded drag the marker to the hour you want to expand then click the 0 60...

Page 87: ...the Multi Client connect to the DVR 2 Click the Remote playback button The client will change from Live mode to the Search mode 3 Select the DVR checkbox of the unit you want to see video from 4 In the calendar frame click the date when the video of interest was recorded 5 Drag the marker on the timeline to the time at which you want to play recorded video Marker To expand the hour within which th...

Page 88: ...n Mark Out 8 To backup the video clip click the BACKUP button The Backup menu window will open 9 In the Backup menu select the options you want then click OK 10 A pop up window will appear when the backup operation is complete Click OK to close the Backup operation NOTE Videobackupcantakeseveralminutestocomplete dependingonthenumberofchannelsselectedandthedurationoftheclip 8 7 Local playback Use t...

Page 89: ...e s you want to play recordings of The calendar will indicate which days have recorded video files on the local PC 3 Click the day of the recording you want to play then drag the marker to the time when video was recorded Click the 0 60 button above the timeline to expand the time scale 4 Use the video play control buttons above the timeline to play the video ...

Page 90: ...at See Local playback above 2 Play the video to determine the time where you want to start backing up a clip then stop the playback and click the MARK IN button 3 Continue playing the video to determine the time where you want to end the clip then stop the playback and click the MARK OUT button The time span between the MARK IN and MARK OUT times will be highlighted in dark green Mark In Mark Out ...

Page 91: ...op up window will appear when the backup operation is complete Click OK to close the Backup operation NOTE Videobackupcantakeseveralminutestocomplete dependingonthenumberofchannelsselectedandthedurationoftheclip NOTE Ifyour mediaplayercannotplaythefilebacked upinAVIfileformat itprobablydoesn tusethecorrectCODEC Updateyour H 264CODECandretryplayingthefile ...

Page 92: ... across the internet your DVR may be addressed through a port forwarded by a router or a device that connects the network with the DVR to the Internet or through a connection to a DDNS web service such as ddnscenter com preferred To use this service for accessing your DVR across the internet refer to ddnscenter com for more information 9 1 Connecting to the DVR with IE After your DVR is setup on a...

Page 93: ...ck the Custom Level button In the Settings list change the following settings from Disable to Prompt Download unsigned ActiveX controls Initialize and script ActiveX controls not marked as safe for scripting Click OK then click YES in the Warning window ...

Page 94: ...pentheControlPanel UserAccount UserAccountwindow clearthe UseUserAccountControl UAC tohelpprotectyourcomputer checkbox thenclick OK Acomputerrestartmay berequired 4 In the IE URL field enter the IP address assigned to your DVR Using the example shown above enter 192 168 5 60 5 If a message appears to load the SCTechnologies Client click Install Follow the prompts to Install the program After the W...

Page 95: ... time When Web Client is connected and showing live video it indicates the DVR timestamp When Web Client is playing video it is the timestamp of the video frame CONNECT DISCONNECT Used to initiate a connection to a DVR or disconnect from a DVR SEARCH LIVE Used to switch between the search window and the live mode window CHANNEL SELECT Used to select and display one channel SPLIT SCREEN SELECT Used...

Page 96: ... AutoScan chanes the dial control to play stop the autoscan feature and select the camera channel to autoscan Tour displays channels sequentially in full screen mode OSD Setup opens the Web Client on screen display controls menus Mic On Off Audio On Off Volume Control Use these features to control the audio system When the Mic and Audio icons are gray those components are disabled Capture Pause Pr...

Page 97: ...to connect to your DVR After connecting to the DVR the connection status will appear in the Status frame and the DVR camera views will appear in the view screen 9 2 Setup The Setup feature enables you to configure your DVR through Web Client The Setup menu system includes the following submenus Display Record Device Storage System Network and Upgrade Components in these submenus are similar to tho...

Page 98: ...uring the previous APPLY click RELOAD To exit the Setup menus click the T icon in the upper right corner to close the window 9 2 1 Setup DISPLAY Use the Display submenu to setup the sequential viewing of the channel and adjust the video quality of the display 9 2 2 Setup RECORD Use the Record submenu to setup the recording mode for each camera channel ...

Page 99: ...93 H 264 DVR User Manual SECTION 9 WEB CLIENT 9 2 3 Setup DEVICE Use the Device submenu to setup the Device Alarm out PTZ and Spot Out configuration ...

Page 100: ...94 SECTION 9 WEB CLIENT 9 2 4 Setup STORAGE Use the Storage submenu to setup the recording configuration of the DVR HDD ...

Page 101: ...9 2 5 Setup SYSTEM Use the System submenu to setup the system ID and access control Date Time Send Email configuration and NTP server access credentials 9 2 6 Setup SECURITY Use the Security submenu to configure system permissions for each user ID ...

Page 102: ...up the Network IP address subnet DNS DDNS configuration and ports assigned to the DVR The screen shown below includes the setup options for DHCP networks The screen for configuring static ethernet settings for your DVR is similar it includes fields for the static IP addresses ...

Page 103: ... INFORMATION Use the Information screen to show useful information about the DVR Information shown here cannot be changed from this display 9 3 DVR Search In Search mode you can watch video recorded by your DVR backup video clips and capture still images from recorded video To switch to Search mode click the Search button on the Live mode display ...

Page 104: ... PC time When Web Client is connected and showing live video it indicates the DVR timestamp When Web Client is in search mode or playing video it shows the timestamp of the video frame DISCONNECT Used to initiate a connection to a DVR or disconnect from a DVR LIVE SEARCH Used to switch from the search mode window and the live mode window CHANNEL SELECT Used to select and display one channel ...

Page 105: ...e day selected is marked in dark blue 9 3 1 Playing recorded video 1 Connect to the DVR see above 2 If the Web Client is in Live mode click Search to open the Search window 3 In the calendar frame click the day when the video you want to play was recorded Sections of the timeline highlighted in blue indicate that live video was recorded on that channel at that time Channel Select Play Pause Normal...

Page 106: ... Out button The timeline will be green for the section of the video that is marked 4 Click Backup to open the backup menu In the Backup window edit the From starting timestamp To ending timestamp and File save to location fields as needed Select the Channel of the video from the dropdown list then click Ok to begin the backup operation A progress bar will appear showing the status of the backup Al...

Page 107: ...101 H 264 DVR User Manual SECTION 9 WEB CLIENT 2 Click Ok A snapshot of the screen image will be saved in BMP format ...

Page 108: ...sor motion and video loss Record Compression H 264 Multi Operation QUADPLEX Playback Record Network Backup Resolution D1 120 fps D1 120 fps D1 120 fps Half D1 120 fps Half D1 240 fps Half D1 240 fps CIF 120 fps CIF 240 fps CIF 480 fps Recording Quality Grade ECONOMY STANDARD HIGH SUPERIOR ULTRA Recording Mode Continuous Schedule Motion Sensor Manual Motion Detection Motion detection setup by grid ...

Page 109: ...NS Network Interface 10 100BASE T Ethernet RJ 45 Dual Encoding for Network Streaming Yes CIF 120 100 fps Network Access Single site monitoring software 1 1 Live Search Backup PTZF camera control remote setup 3G Mobile Viewer 1 1 Live Search PTZF Web Viewer 1 1 Live Search Backup PTZF camera control Multi sites monitoring software 1 n Live Search Backup PTZF camera control remote setup Features DLS...

Page 110: ...TB 7200 RPM 32 MB ST31000322CS 1 TB 5900 RPM 8 MB ST31000524AS 1 TB 7200 RPM 32 MB ST3500411SV Surveillance 500 GB 7200 RPM 16 MB ST3500413AS Barracuda 500 GB 7200 RPM 16 MB ST3500830SCE 500 GB 7200 RPM 8 MB ST3500418AS Barracuda 500 GB 7200 RPM 16 MB ST3500410AS Barracuda 500 GB 7200 RPM 16 MB ST3500312CS 500 GB 5900 RPM 8 MB ST500DM002 500 GB 7200 RPM 16 MB ST3250410AS Barracuda 250 GB 7200 RPM ...

Page 111: ...1025SLA380 250 GB 7200 RPM 8 MB HDP725025GLA380 250 GB 7200 RPM 8 MB Western Digital WD20EADS 2 TB 7200 RPM 32 MB WD20EURS 2 TB 7200 RPM 64 MB WD10EVVS 1 TB 7200 RPM 8 MB WD10EACS 1 TB 7200 RPM 16 MB WD10EURS 630AB1 1 TB 7200 RPM 64 MB WD10EALX 009BA0 1 TB 7200 RPM 32 MB WD5000AACS 500 GB 7200 RPM 16 MB WD5000AAKX 001CA0 500 GB 7200 RPM 16 MB WD2500AAKX 250 GB 7200 RPM 16 MB WD2500AVVS 250 GB 7200...

Page 112: ...rding configurations schedules and triggers The following tables are provided as examples with which the storage capacity of your system can be estimated through interpolation or extrapolation Recording Condition 4 channels D1 30 fps Continuous HDD Capacity Level 5 H Level 4 Level 3 Level 2 Level 1 L day s day s day s day s day s 250GB 2 3 5 7 11 500GB 5 7 11 15 22 1TB 11 15 22 30 45 2TB 22 30 45 ...

Page 113: ...VICE LOG APPENDIX C Device Log The following table is provided as an aid to setting up and logging the analog devices on your system Analog Camera Device Summary Channel Camera Model Audio Y N Location 1 2 3 4 5 6 7 8 9 10 11 12 13 14 15 16 ...

Page 114: ...PLAY OSD OSD CONTRAST SEQUENCE SEQUENCE DWELL TIME CHANNEL NAME COVERT BRIGHTNESS CONTRAST HUE SATURATION VIDEO OUTPUT RECORD CHANNEL RESOLUTION FRAME RATE QUALITY RECORDING SENSOR RECORDING PRE RECORD POST EVENT RECORD AUDIO SCHEDULE DEVICE ALARM OUT CONTROLLER PTZ SPOT OUT CHANNEL MOTION ON MOTION SENSITIVITY KEY TONE REMOTE CONTROLLER ID SENSOR TYPE ...

Page 115: ...AGE DATE FORMAT SET DATE TIME CLIENT ACCESS NTP SEND EMAIL SECURITY USER AUTHENTICATION ADMIN NETWORK USER1 USER2 USER3 USER PASSOWRD PLAYBACK AUTHORITY NETWORK PORT NETWORK AUDIO PORT WEB PORT NETWORK TYPE DHCP LAN IP SUBNET MASK GATEWAY DNS PRIMARY DNS SECONDARY DDNS NETWORK STREAM CONFIG SAVE SETUP TO A USB LOAD SETUP FROM A USB LOAD DEFAULT LOAD FACTORY DEFAULT ...

Page 116: ...110 APPENDIX D DVR SETUP MENU COMPONENTS SOFTWARE UPGRADE QUICK SETUP USE QUICK SETUP INPUT DESIRED DAYS CUSTOMER SETTINGS RESOLUTION FRAME RATE QUALITY RECORDING DAYS TO RECORD ...

Reviews: