Black Ridge BRI40 Manual Download Page 5

5

LUBRICATION OF INFLATOR

This inflator is OIL FREE. Therefore there is NO oil 
used for lubrication.
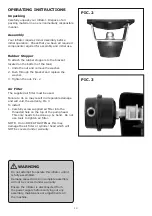
ASSEMBLY

This inflator MUST be fully assembled by you prior 
to use.  Failure to do so will result in the warranty 
being VOID.  Failure to fully assemble this inflator
may also result in personal injury.

SAFETY

Before attempting to operate this inflator the 
following basic safety precautions should be 
taken to reduce the risk of fire, electric shock 
and personal injury.  It is important to read the 
instruction manual and to understand applications, 
limitations and potential hazards associated with 
the inflator.  This inflator is not intended for use 
by persons (including children) with reduced 
physical, sensory or mental capabilities, or lack of 
experience and knowledge, unless they have been 
given supervision or instruction concerning the use 
of the appliance by a person responsible for their 
safety.

BEWARE OF CHILDREN 

AND PETS

Children and pets should be kept out of the work 
area.  Children should not be allowed to touch or 
operate the inflator, tools or extension cords.  This 
inflator is not designed for use by young children 
or infirm persons without supervision.  The inflator
and tools should be kept out of reach of children, 
preferably stored or locked in a secure cabinet or 
room when not in use.

WORK AREA

Work areas and benches should be kept tidy.  
Cluttered benches and work areas can cause 
accidents.  Floors should be kept clean and free 
from rubbish.  Special care should be taken 
when the floor is slippery due to sawdust or wax.  
Always leave sufficient distance, at least 5 metres 
between the inflator and the work area, especially 
when using tools designed for sanding or spraying 
liquids.

WORK ENVIRONMENT

Do not expose your inflator to rain or use in damp 
or wet conditions.  Keep the work area well lit. 

GUARD AGAINST ELECTRIC 

SHOCK

Avoid body contact with earthed or grounded 
surfaces (e.g. pipes and refrigerators).

DO NOT FORCE INFLATORS

The inflator will do a better, safer job and give you 
much better service if it’s used at the duty cycle 
for which it was designed.  The duty cycle will 
only take effect after the initial (1st ) tank fill for 
the day.  This inflators duty cycle is 50%.  Duty 
cycle is the proportion of time during which the 
inflator is operating compared with not operating.  
For example a 50% duty cycle could mean after 
30 seconds of operation, motor pumping, the 
inflator must be left for 30 seconds resting, motor 
not pumping.  When the motor is pumping the 
attached air tool can not be used.  Only use the 
attached air tool while the inflator is not pumping.  
Stop using the attached tool as soon as the 
inflator starts pumping.

USE THE RIGHT TOOL

Select the right tool for the job.  Do not use a tool 
for a job for which it was not designed.  Do not 
force a small inflator to do the job of a heavy–duty 
inflator.  Do not use the inflator for purposes not 
intended.

Summary of Contents for BRI40

Page 1: ...02808 08 11 For service spare parts or product information please contact Smart Marketing Group Pty Ltd AUST 1300 660 457 N Z 0800 474 876 ...

Page 2: ... Nailer This inflator is NOT recommended for use with a spray gun or medium duty air tools Section Page Contents 2 Suggested Applications 2 Introduction 3 Guarantee 3 4 General Safety Instructions 5 7 Electrical Information 8 Components and Controls 9 Operating Instructions 10 14 Maintenance 14 Trouble Shooting 15 Technical Information 15 Parts Diagram 16 Contact Information 16 CONTENTS ...

Page 3: ...terms and conditions below What is covered Manufacturing fault or defect How to claim under this warranty Call customer service phone number at the top Ensure you have the following Original purchase receipt Model of inflator Serial number of inflator Discuss the issue Customer service will advise which authorised service agent to take the inflator to provided the issue is a warranty one Take infl...

Page 4: ...lable if the request is made to our customer service team on the contact numbers listed below and proof of purchase is provided This is a repair only warranty you will need to take the inflator to the authorised service agent after contacting our customer service centre Damage caused by third party accessories is not covered under this warranty Damage caused to attached equipment or third party ac...

Page 5: ...hould be kept tidy Cluttered benches and work areas can cause accidents Floors should be kept clean and free from rubbish Special care should be taken when the floor is slippery due to sawdust or wax Always leave sufficient distance at least 5 metres between the inflator and the work area especially when using tools designed for sanding or spraying liquids WORK ENVIRONMENT Do not expose your infla...

Page 6: ...vice facility Keep handles clean dry and free from oil and grease Ensure that ventilation slots are kept clean and free from dust at all times Blocked ventilation slots or air filter can cause overheating and damage to the motor and this will not be covered under warranty DISCONNECT INFLATOR Ensure that the inflator is disconnected from the mains supply when not in use before servicing making adju...

Page 7: ...mage your ears Respiratory Protection When operating any machinery that creates dust or when spray painting an approved dust filter mask must be worn When machining concrete man made fibres especially MDF Medium Density Fibre board the resin used in these materials can be hazardous to your health Use an approved face mask with replaceable filter Do Not Over Reach Do not over reach Keep a proper fo...

Page 8: ... operation to be carried out Never use the inflator if any part of the unit is damaged Always have the inflator serviced by an authorised service agent Always wear safety eye ear and respiratory protection when operating the inflator Allow the tank to completely fill before using the inflator If the inflator makes an unfamiliar sound or vibrates excessively switch the inflator OFF immediately and ...

Page 9: ...sure switch 2 On Off button red colour 3 Handle 4 Motor cover 5 Pump 6 Tank 7 Rubber feet 8 Tank drain tap 9 Tank pressure gauge 10 Air filter metal 11 Nitto style outlet socket fitting 12 Safety valve PIC 1 7 8 6 5 4 3 2 1 9 10 11 2 9 12 1 ...

Page 10: ... The supplied air filter must be used Failure to do so may result in irreparable damage and will void the warranty Pic 3 To install 1 Carefully screw supplied air filter into the threaded hole on the top of the pump head This only needs to be done up by hand Do not use tools to tighten air filter NOTE Do not OVER TIGHTEN as this may damage the air filter or cylinder head which will NOT be covered ...

Page 11: ...n on the Pressure Switch Pic 1 Item 1 and 2 as well as Pic 4 Damage caused by not using this button will not be covered by warranty To turn your inflator ON Lift up the red ON OFF button on top of the pressure switch To turn your inflator OFF Push down the red ON OFF button on top of the pressure switch RUNNING IN YOUR NEW INFLATOR Your inflator does not require running in Before use ensure you ha...

Page 12: ...hese pressure settings are factory set and should not be changed Pumping starts at minimum 85PSI and stops at maximum 115PSI Once the initial pump up stage has finished you can use the inflator Remember air pressure is not regulated If low pressure is required buy a regulator TOOL CONFIGURATION The configuration of tools and accessories can be varied to suit your particular requirements A basic re...

Page 13: ...e a lower pressure for your air tool please buy an adjustable regulator and gauge from your stockist PIC 6 PIC 7 Tank pressure gauge Pull to check operation Nitto style outlet socket SAFETY VALVE Pic 7 NOTE When checking the safety valve ALWAYS wear safety glasses To check the operation of the safety valve the air tank will need to be full Gently pull the ring outwards This should release air unde...

Page 14: ...re to match your air tool Different air tools require different operating pressures Always check with the tool manufacturer if unsure Drain Tap Sealed OR To close and seal push lever up Right or left To open and drain pull lever down Drain tap opened unsealed P P P P P P P P P P P P P P P P P P P P P P P P P P P P P P P PIC IC IC IC IC IC IC IC IC IC IC C IC IC IC IC C C C C C C C C IC C C C IC IC...

Page 15: ...ave turned the inflator ON OFF switch ON The air tank may be full Use your air tool and the inflator should start when the pressure decreases to 85PSI Inflator does not build up pressure Check that the tank drain tap is sealed Check that the air fitting is not leaking If leaking replace Inflator smells like burnt oil Using beyond the 50 duty cycle allow to cool for 30 minutes before reusing this i...

Page 16: ... 8 30am 5 30pm AEST Do not return to place of purchase Keep your purchase receipt this will be required to make any claims under the 12 month warranty TECHNICAL INFORMATION Specifications Inflator BRI40 Voltage 240V AC 50Hz Motor 1 HP Wattage 750W Oil free No Load Speed 2800 RPM Free Air Delivery 40L per minute Tank Size 8L ...

Reviews: