


10
OPERATING INSTRUCTIONS
Unpacking
Carefully unpack your inflator. Dispose of all
packing material in an environmentally responsible
manner.
Assembly
Your inflator requires minor assembly before
initial operation. Check that you have all required
components required for assembly and initial use.
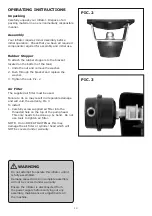
Rubber Stopper
To attach the rubber stoppers to the bracket
located on the bottom of the tank;
1. Undo the nut and remove the washer.
2. Push through the bracket and replace the
washer.
3. Tighten the nut, Pic. 2
Air Filter
The supplied air filter must be used.
Failure to do so may result in irreparable damage
and will void the warranty, Pic. 3
To install;
1. Carefully screw supplied air filter into the
threaded hole on the top of the pump head.
This only needs to be done up by hand. Do not
use tools to tighten air filter.
NOTE: Do not OVER TIGHTEN as this may
damage the air filter or cylinder head which will
NOT be covered under warranty.
PIC. 2
PIC. 3
WARNING
Do not attempt to operate this inflator until it
is fully assembled.
Damage caused due to incomplete assembly
will not be covered under warranty.
Ensure the inflator is disconnected from
the power supply before carrying out any
assembly, maintenance or adjustments on
the machine.


