background image

3-Channel DVI Extender  -  Installation and Operation Manual

     11

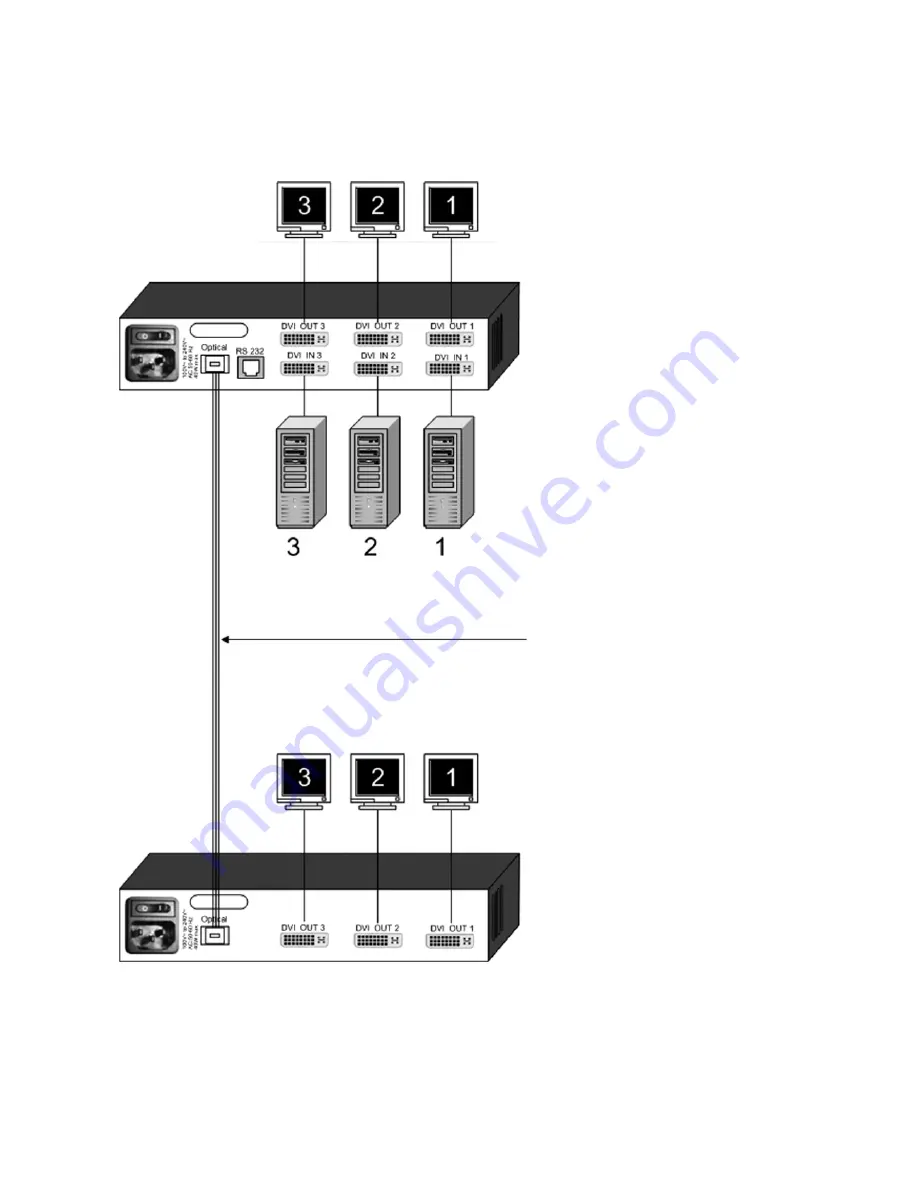
INSTALLATION PLAN

Local video output devices         
(optional)

3-Channel DVI Extender TX 
transmitter unit

Computer / video sources

MTP®/MPO 12-

fi

 ber multimode 

fi

 beroptic cable

Remote video output devices

3-Channel DVI Extender RX 
receiver unit

Summary of Contents for 3-Channel DVI Extender

Page 1: ...C1070A 3 Channel DVI Extender Triple DVI Extender using a fiberoptic cable Installation and Operation Manual Black Box Corporation 1000 Park Drive Lawrence PA 15055 1018 Phone 724 746 5500 Web www bla...

Page 2: ...2005 TRADEMARKS USED IN THIS MANUAL BLACK BOX and the Double Diamond logo are registered trademarks and 3 Channel DVI Extender is a trademark of BB Technologies Inc Any other trademarks mentioned in...

Page 3: ...DVI I interfaces digital analog in real time to remote monitors displays video projectors and other output devices with digital interfaces While both digital and analog video signals can be supplied...

Page 4: ...used not only in heavy duty industrial environments but also in the media sector the television and entertainment industries training and education centers and many other application areas in the visu...

Page 5: ...STALLATION 12 SETTINGS 13 CONFIGURATION 14 PROGRAM START 14 NAVIGATION 15 CONFIGURATION OVERVIEW 16 VIDEO VIDEO INPUT 17 BRIGHTNESS AND CONTRAST 19 HORIZONTAL AND VERTICAL POSITION 20 SCREEN WIDTH AND...

Page 6: ...mitter and the 3 Channel DVI Extender RX receiver are connected to the power supply system Please observe the usual safety regulations for handling devices connected to a power supply system Both devi...

Page 7: ...iver unit 2 power cables 2 DVI DVI video cables 2 0 meters for the transmitter unit 1 VGA DVI video cable 2 0 meters for the transmitter unit 1 serial RJ45 RS232 cable 1 installation CD for Windows 1...

Page 8: ...ration Manual DEVICE CONNECTIONS 3 Channel DVI Extender TX transmitter unit Front panel 3 Channel DVI Extender TX transmitter unit Rear panel 3 Channel DVI Extender RX receiver unit Front panel 3 Chan...

Page 9: ...he TX transmitter unit 7 Air intake Ventilation duct for air intake in on both sides Please do not cover 8 Power connector For connecting the supplied power cable 9 Optical MTP MPO port for connecting...

Page 10: ...o your 3 Channel DVI Extender RX receiver unit via the MTP MPO plug labeled Optical using an MTP MPO 12 fiber multimode fiberoptic cable Please make sure that both connectors lock in place The necessa...

Page 11: ...ion Manual 11 INSTALLATION PLAN Local video output devices optional 3 Channel DVI Extender TX transmitter unit Computer video sources MTP MPO 12 fiber multimode fiberoptic cable Remote video output de...

Page 12: ...le included in deliverables Please comply with the following installation steps 1 Use the serial cable to connect the COM port on your computer to the RJ45 port on the 3 Channel DVI Extender TX 2 Swit...

Page 13: ...nder TX to a different COM port please adjust this setting accordingly Log parameters You can select custom settings here BLACK BOX recommends using the default settings Start configuration Start the...

Page 14: ...s 12 and 13 2 Start the device configuration program by clicking on the CONFDEV icon 3 Click on the green arrow icon see figure on the bottom of page 12 in the device configuration program window to c...

Page 15: ...ation program with the help of the following keys or entries Cursor down move down in the menu Cursor up move up in the menu Right cursor edit value increase Left cursor edit value decrease Return Ent...

Page 16: ...ssible settings VIDEO VIDEO INPUT Display of video input resolution DVI VGA or VGA DVI setting BRIGHTNESS Adjustment for analog input signal CONTRAST Adjustment for analog input signal HORIZ POSITION...

Page 17: ...ync The video signal transmitted can be selected in the bottom section of the window VGA Analog signal DVI Digital signal VGA DVI Automatic selection if both an analog and a digital signal are availab...

Page 18: ...40 x 350 85 CGA 640 x 400 85 EGA 720 x 400 70 EGA 720 x 400 85 VGA 640 x 480 60 VGA 640 x 480 72 VGA 640 x 480 75 VGA 640 x 480 85 SVGA 800 x 600 56 SVGA 800 x 600 60 SVGA 800 x 600 72 SVGA 800 x 600...

Page 19: ...BRIGHTNESS For analog signal input you can adjust the brightness within a range 0 to 100 in this section The factory default value is 58 2 CONTRAST For analog signal input you can adjust the contrast...

Page 20: ...your output device responds very slowly to the changes select Force monitor adjust to ensure that any change to the image position briefly interrupts the video signal VERTICAL POSITION Use the cursor...

Page 21: ...determined by the VESA standard If your image appears blurred you can improve image quality by adjusting it within a range of 16 to 16 PHASE Unfavorable analog phasing pixel scanning time may lead to...

Page 22: ...can use this menu item to set the menu language As the OSD menu screenshot shows you can choose between English the default language or German Please select your preferred language Confirm your select...

Page 23: ...nge from user settings back to factory default settings The EDID see pages 24 25 will not be reset The following message appears when you reset the factory default settings Setting default settings Th...

Page 24: ...I Extender TX The graphics cards receive the required EDID parameters from an EEPROM containing the default settings for each DVI IN input on your 3 Channel DVI Extender TX BLACK BOX recommends workin...

Page 25: ...nel DVI Extender Once you have repeated this procedure individually or simultaneously for all three channels the original EDID of the output device will be available at each channel The EXTERNAL funct...

Page 26: ...on about the firmware CONTACT information about the manu facturer of your 3 Channel DVI Extender The ABOUT window in the HELP menu shows the current hardware and software revisions of your 3 Channel D...

Page 27: ...2 Switch on the power supply of your 3 Channel DVI Extender TX 3 Insert the update CD Open the updateEn exe program 4 Configure the selected interface to your computer under COM port default COM 1 5...

Page 28: ...28 3 Channel DVI Extender Installation and Operation Manual...

Page 29: ...x DVI D output ports digital receiver 1 x MTP MPO 12 fold fiberoptic input cable 4 x LED Transmission medium Fiberoptic patch cable MTP MPO with 12 fold multimode fiber G50 125 m uncrossed female fem...

Page 30: ...the precise length in meters Plug connector system MTP MPO 12 fold multimode uncrossed female female Extension box Order at request If a video output device is more than five meters away from your 3...

Page 31: ...iption including the nature and duration of the problem when the problem occurs the components involved in the problem any particular application that when used appears to create the problem or make i...

Page 32: ...France www blackbox fr 33 820 07 09 11 33 820 05 07 09 tech blackbox fr Germany www black box de 49 811 5541 110 49 811 5541 499 techsupp black box de Ireland www blackbox co uk 353 1 662 2466 353 1...

Page 33: ...rvicio deber ser referido a personal de servicio calificado 9 El aparato el ctrico debe ser situado de tal manera que su posici n no interfiera su uso La colocaci n del aparato el ctrico sobre una cam...

Page 34: ...s liquidos no sean derramados sobre la cubierta u orificios de ventilaci n 18 Servicio por personal calificado deber ser provisto cuando A El cable de poder o el contacto ha sido da ado u B Objectos h...

Page 35: ...t B of Part 15 of FCC rules which are designed to provide reasonable protection against such interference when the equipment is operated in a commercial environment Operation of this equipment in a re...

Page 36: ...Black Box Corporation 1000 Park Drive Lawrence PA 15055 1018 Phone 724 746 5500 Web www blackbox com...

Reviews: