


10
繁體中文
請勿將充電器暴露在水中。
請勿打開充電器。
請勿刺破充電器。
充電時,必須將器具 / 工具 / 電池放在通風良好
的區域。
電氣安全
您的充電器設計用於特定電壓。請務必檢查主電壓
是否與銘牌一致。切勿嘗試使用一般的電源插頭取
代充電器裝置。
充電器上的符號
ENGLISH
(Original instructions)
Symbols on the charger
Read all of this manual carefully
before using the appliance.
#
This tool is double insulated;
therefore no earth wire is
required. Always check that the
power supply corresponds to
the voltage on the rating plate.
$
The charging base is intended
for indoor use only.
Labels on appliance
The following symbols appear on this appliance along with the
date code:
S003AQ 15
Only use with charger S003AQ 15
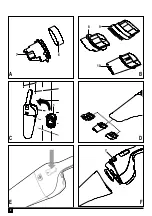
Features
This tool includes some or all of the following features.
1. On/off switch (press and hold)
2. Bowl release button
3. Dust bowl
4. Charger
5. Charging bracket
Fig. A
6. Wet/Dry foam insert
7. W
Fig. B
8. Squeegee
9. Brush tool
10. Crevice tool
Installation
The product can be attached to a wall to provide a convenient
storage and charging point for the appliance.
u
Fix the mounting bracket to the wall using appropriate
screws and plugs for the type of wall and weight of the
appliance.
u
Hang the appliance on the wall by placing the opening
on the base of the vac over the hooks in the wall mount
charging bracket.
Assembly
These models may be supplied with some of the following
accessories:
u
A squeege tool (8) for wet use on hard surfaces.
u
A brush tool (9) for furniture and stairs.
u
Fitting (Fig. D)
u
Insert the appropriate accessory into the front of the appli-
ance. Make sure that the accessory is pushed fully in.
Use
u
10 hours.
u
Place the appliance on the charging bracket whenever it is
not in use.
Warning!
Before charging, be sure to empty all liquid contents
and dry thoroughly, to avoid damage to your appliance.
Charging the battery (Fig. C)
u
Make sure that the appliance is switched off. The battery
will not be charged with the on/off switch (1) pressed.
u
Place the appliance on the charging bracket (5).
u
Plug in the charger. Switch on at the mains.
u
Leave the appliance to charge for at least 21 hours.
While charging, the charger may become warm. This is
normal and does not indicate a problem. The appliance can
Warning!
Do not charge the battery at ambient temperatures
below 10 °C or above 40 °C.
u
To switch the appliance on, press and hold the on/off
switch (1).
u
To switch the appliance off, release on/off switch (1).
Wet and dry pick up
10
使用工具前,請仔細閱讀本手冊全部內容。
ENGLISH
(Original instructions)
Symbols on the charger
Read all of this manual carefully
before using the appliance.
#
This tool is double insulated;
therefore no earth wire is
required. Always check that the
power supply corresponds to
the voltage on the rating plate.
$
The charging base is intended
for indoor use only.
Labels on appliance
The following symbols appear on this appliance along with the
date code:
S003AQ 15
Only use with charger S003AQ 15
Features
This tool includes some or all of the following features.
1. On/off switch (press and hold)
2. Bowl release button
3. Dust bowl
4. Charger
5. Charging bracket
Fig. A
6. Wet/Dry foam insert
7. W
Fig. B
8. Squeegee
9. Brush tool
10. Crevice tool
Installation
The product can be attached to a wall to provide a convenient
storage and charging point for the appliance.
suitable for the wall type and is appropriate to the weight of
the appliance.
u
Fix the mounting bracket to the wall using appropriate
screws and plugs for the type of wall and weight of the
appliance.
u
Hang the appliance on the wall by placing the opening
on the base of the vac over the hooks in the wall mount
charging bracket.
Assembly
These models may be supplied with some of the following
accessories:
u
A squeege tool (8) for wet use on hard surfaces.
u
A brush tool (9) for furniture and stairs.
u
Fitting (Fig. D)
u
Insert the appropriate accessory into the front of the appli-
ance. Make sure that the accessory is pushed fully in.
Use
u
10 hours.
u
Place the appliance on the charging bracket whenever it is
not in use.
Warning!
Before charging, be sure to empty all liquid contents
and dry thoroughly, to avoid damage to your appliance.
Charging the battery (Fig. C)
u
Make sure that the appliance is switched off. The battery
will not be charged with the on/off switch (1) pressed.
u
Place the appliance on the charging bracket (5).
u
Plug in the charger. Switch on at the mains.
u
Leave the appliance to charge for at least 21 hours.
While charging, the charger may become warm. This is
normal and does not indicate a problem. The appliance can
Warning!
Do not charge the battery at ambient temperatures
below 10 °C or above 40 °C.
u
To switch the appliance on, press and hold the on/off
switch (1).
u
To switch the appliance off, release on/off switch (1).
Wet and dry pick up
u
For everyday spills of dry material, use your appliance
without the squeegee accessory.
10
本工具採用雙重絕緣,因此無需接地線。
請務必檢查電源電壓是否與銘牌一致。
ENGLISH
(Original instructions)
Symbols on the charger
Read all of this manual carefully
before using the appliance.
#
This tool is double insulated;
therefore no earth wire is
required. Always check that the
power supply corresponds to
the voltage on the rating plate.
$
The charging base is intended
for indoor use only.
Labels on appliance
The following symbols appear on this appliance along with the
date code:
S003AQ 15
Only use with charger S003AQ 15
Features
This tool includes some or all of the following features.
1. On/off switch (press and hold)
2. Bowl release button
3. Dust bowl
4. Charger
5. Charging bracket
Fig. A
6. Wet/Dry foam insert
7. W
Fig. B
8. Squeegee
9. Brush tool
10. Crevice tool
Installation
The product can be attached to a wall to provide a convenient
storage and charging point for the appliance.
suitable for the wall type and is appropriate to the weight of
the appliance.
u
Mark the location of the screw holes (within reach of an
electrical outlet for charging the vac while it is on the wall
u
Fix the mounting bracket to the wall using appropriate
screws and plugs for the type of wall and weight of the
appliance.
u
Hang the appliance on the wall by placing the opening
on the base of the vac over the hooks in the wall mount
charging bracket.
Assembly
These models may be supplied with some of the following
accessories:
u
A squeege tool (8) for wet use on hard surfaces.
u
A brush tool (9) for furniture and stairs.
u
Fitting (Fig. D)
u
Insert the appropriate accessory into the front of the appli-
ance. Make sure that the accessory is pushed fully in.
Use
u
10 hours.
u
Place the appliance on the charging bracket whenever it is
not in use.
Warning!
Before charging, be sure to empty all liquid contents
and dry thoroughly, to avoid damage to your appliance.
Charging the battery (Fig. C)
u
Make sure that the appliance is switched off. The battery
will not be charged with the on/off switch (1) pressed.
u
Place the appliance on the charging bracket (5).
u
Plug in the charger. Switch on at the mains.
u
Leave the appliance to charge for at least 21 hours.
While charging, the charger may become warm. This is
normal and does not indicate a problem. The appliance can
Warning!
Do not charge the battery at ambient temperatures
below 10 °C or above 40 °C.
u
To switch the appliance on, press and hold the on/off
switch (1).
u
To switch the appliance off, release on/off switch (1).
Wet and dry pick up
u
For everyday spills of dry material, use your appliance
without the squeegee accessory.
10
充電底座僅供室內使用。
器具上的標籤
本器具上具有以下圖示與日期代碼:
ENGLISH
(Original instructions)
Symbols on the charger
Read all of this manual carefully
before using the appliance.
#
This tool is double insulated;
therefore no earth wire is
required. Always check that the
power supply corresponds to
the voltage on the rating plate.
$
The charging base is intended
for indoor use only.
Labels on appliance
The following symbols appear on this appliance along with the
date code:
Only use with charger S003AQ 15
Features
This tool includes some or all of the following features.
1. On/off switch (press and hold)
2. Bowl release button
3. Dust bowl
4. Charger
5. Charging bracket
Fig. A
6. Wet/Dry foam insert
7. W
Fig. B
8. Squeegee
9. Brush tool
10. Crevice tool
Installation
The product can be attached to a wall to provide a convenient
storage and charging point for the appliance.
suitable for the wall type and is appropriate to the weight of
the appliance.
u
Mark the location of the screw holes (within reach of an
electrical outlet for charging the vac while it is on the wall
u
Fix the mounting bracket to the wall using appropriate
screws and plugs for the type of wall and weight of the
appliance.
u
Hang the appliance on the wall by placing the opening
on the base of the vac over the hooks in the wall mount
charging bracket.
Assembly
These models may be supplied with some of the following
accessories:
u
A squeege tool (8) for wet use on hard surfaces.
u
A brush tool (9) for furniture and stairs.
u
Fitting (Fig. D)
u
Insert the appropriate accessory into the front of the appli-
ance. Make sure that the accessory is pushed fully in.
Use
u
10 hours.
u
Place the appliance on the charging bracket whenever it is
not in use.
Warning!
Before charging, be sure to empty all liquid contents
and dry thoroughly, to avoid damage to your appliance.
Charging the battery (Fig. C)
u
Make sure that the appliance is switched off. The battery
will not be charged with the on/off switch (1) pressed.
u
Place the appliance on the charging bracket (5).
u
Plug in the charger. Switch on at the mains.
u
Leave the appliance to charge for at least 21 hours.
While charging, the charger may become warm. This is
normal and does not indicate a problem. The appliance can
Warning!
Do not charge the battery at ambient temperatures
below 10 °C or above 40 °C.
u
To switch the appliance on, press and hold the on/off
switch (1).
u
To switch the appliance off, release on/off switch (1).
Wet and dry pick up
u
For everyday spills of dry material, use your appliance
without the squeegee accessory.
10
使用工具前,請仔細閱讀本手冊
全部內容。
功能部件
本工具包括以下部分或全部功能部件。
1
. 電源開關(按住)
2
. 集塵筒釋放按鈕
3
. 集塵筒
4
. 充電器
5
. 充電托架
圖
A
6
. 濕 / 乾海棉濾心
7
. 濕 / 乾偏導器
圖
B
8
. 橡膠清潔器 ( 液體用 )
9
. 刷頭工具
10
. 細縫吸嘴
安裝
牆面安裝(圖
C
)
本產品可以安裝於牆面,方便儲存以及為器具充電。
安裝於牆面時,請確保安裝方式適合牆面類型,適
合器具重量。
標記螺絲洞的位置(確保將器具置放在牆面支架
上時,附近有電源插座可充電)
請使用符合牆面類型與器具重量的螺絲和插頭,
將固定托架安裝於牆面。
將器具底部的開口掛在牆面固定充電托架的鉤
上,從而將器具掛在牆上。
裝配
配件(圖
B
)
這些型號可能會隨附以下一些配件:
橡膠清潔器工具 (
8
),用於在硬質表面上清理液體。
毛刷工具 (
9
),用於清潔傢俱與樓梯。
細縫吸嘴工具 (
10
),用於清潔狹窄的空間。
安裝(圖
D
)
將適當的配件插入器具前端。確保配件已完全安
裝於器具內。
使用
第一次使用之前,必須將電池充電至少
10
小時。
不使用時,請將器具置放在充電托架上。
警告!
充電前,請確保將器具裡的所有液體倒空並
徹底晾乾,以避免損壞器具。
為電池充電(圖
C
)
確保器具電源已關閉。按下電源開關 (
1
) 時,電
池無法充電。
將器具置放在充電托架 (
5
) 上。
插入充電器。打開電源。
將器具充電至少
10
小時。
充電器在充電時可能會變熱,這是正常現象,不代
表工具故障。器具可以一直與充電器保持連接。
警告!
在電池用完電量後,建議馬上充電,鋰電池
請勿過度放電 , 電力過度耗竭會導致鋰電池損壞。
若長時間未使用電池 (
1
年以上 ), 請每
6
個月為電池
充電一次 , 以確保電池壽命。請勿在環境溫度低於
10°C
或高於
40°C
的狀況下為電池充電。
開啟與關閉(圖
E
)
若要開啟本器具電源,請按住電源開關 (
1
)。
若要關閉本器具電源,請鬆開電源開關 (
1
)。
乾濕吸取
若要用器具清理日常散落的乾性物質,請勿使用
橡膠清潔器配件。
警告!
本產品的設計僅用於清理輕量的散落物質。
本器具也可用於吸取日常的溢漏液體。在較硬、
不吸收液體的表面上,請使用橡膠清潔器進行清
潔。在能吸收液體的表面上,如地毯,若不使用
橡膠清潔器,吸取液體的效果會更佳。
若要在硬質表面上吸取液體時取得最佳效能,請
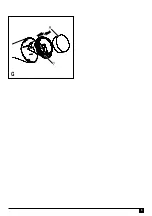
製造年份及號碼(範例)
2016 23 BM
西元年份 週數 機號
Summary of Contents for WD7201
Page 2: ...2 2 C E B A D F 6 7 8 9 10 ...
Page 3: ...3 3 G ...
Page 30: ......
Page 31: ......
Page 32: ...N527430 04 2017 ...


