How to Use
This appliance is for household use only.
GETTING STARTED
Remove any labels, stickers or tags attached to the body or soleplate of the iron.
Note:
Use ordinary tap water for ironing. Do not use water processed through a home
softening system.
Important: For optimum performance, let the iron stand for 90 seconds before beginning
to iron.
TO FILL THE WATER TANK
1. Grip the sides of the water-fill cover and pull open
(A)
.
2. Tilt the iron and using a clean measuring cup, pour water into
opening until the water reaches the MAX level mark on the water
tank
(B)
. Do not overfill.
3. Close the water-fill cover by pushing down until it snaps into place.
4. Plug in the iron. The temperature-ready light comes on
(C)
.
Tip:
If unsure of a garment’s fiber, test a small area (on an inside seam
or hem) before ironing.
FOR STEAM IRONING
1. Move the dry/steam selector to the desired steam level
(D)
.
2. Turn the fabric-select dial to appropriate setting (between 4 and 6)
for your fabric
(E)
. Read garment’s label to help you determine fabric
type.
• The temperature-ready light glows until it reaches the appropriate
temperature.
• The light cycles glows on and off during ironing.
3. When finished ironing, turn the fabric-select dial to lowest heat setting, move the
dry/steam selector to
and unplug the iron.
FOR DRY IRONING
1. Make sure dry/steam selector is set to
. You may want to empty the water (see
“Emptying Water Tank After Ironing - Optional”).
2. Turn the fabric-select dial to the appropriate setting for your fabric. Read garment’s label
to help you determine fabric type.
4
3
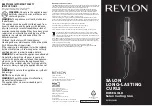
Product may vary slightly from what is illustrated.
1. Spray nozzle
2. Water-fill cover
3. Dry/steam and self-cleaning selector
4. Spray button
5. Steam button
6. Comfort Grip™ handle (Model AS685)
7. Heel rest
8. Temperature-ready light
9. Auto off light
10. Fabric-select dial
11. Water tank
12. Chrome metal skirt
13. Soleplate
CLEAN
MAX
MIN
Self-cleaning
CLEAN
MAX
MIN
CLEAN
MAX
MIN
Dry
Steam/Surge of
Steam
Spray
Symbols
A
B
C
D
E