background image

8

ENGLISH

(Original instructions)

Features

This tool includes some or all of the following features.

  1. On/off switch

  2. Spindle lock

  3. Guard

  4. Side handle

Assembly

Warning!

 Before assembly, make sure that the tool is

switched off and unplugged.

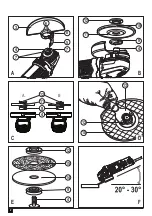
Fitting and removing the guard (fig. A)

The tool is supplied with a guard intended for grinding

purposes only (type 27). If the unit is intended to perform 

cutting off operations, a guard specific for this operation (type 

41) must be fitted. A suitable guard part numbers N551980 

(for 115mm cutting wheel) and N542445 (for 125mm cutting 

wheel) are available and can be obtained from Stanley Fat 

Max service centres. 

u

  Place the tool on a table, with the spindle (4) facing up.

u

  Release the clamping lock (5) and hold the guard (3) over

  the tool as shown.

u

  Align the lugs (6) with the notches (7).

u

  Press the guard down and rotate it counterclockwise to

  the required position.

u

  Fasten the clamping lock (5) to secure the guard to the

 tool.

u

  If required, tighten the screw (8) to increase the clamping

 force.

Removing

u

  Release the clamping lock (5).

u

  Rotate the guard clockwise to align the lugs (6) with the

  notches (7).

u

  Remove the guard from the tool.

Warning!

 Never use the tool without the guard.

Fitting the side handle

u

  Screw the side handle (4) into one of the mounting holes

  in the tool.

Warning!

 Always use the side handle.

Fitting and removing grinding discs  

(fig. B - D)

Always use the correct type of disc for your application.

Always use discs with the correct diameter and bore size (see

technical data).

Fitting

u

  Fit the guard as described above.

u

  Place the inner flange (9) onto the spindle (4) as shown

  (fig. B). Make sure that the flange is correctly located on

  the flat sides of the spindle.

u

  Place the disc (10) onto the spindle (4) as shown (fig. B).

  If the disc has a raised centre (11), make sure that the

  raised centre faces the inner flange.

u

  Make sure that the disc locates correctly on the inner

  flange.

u

  Place the outer flange (12) onto the spindle. When fitting

  a grinding disc, the raised centre on the outer flange must

  face towards the disc (A in fig. C). When fitting a cutting

  disc, the raised centre on the outer flange must face away

  from the disc (B in fig. C).

u

  Keep the spindle lock (2) depressed and tighten the outer

  flange using the two-pin spanner (13) (fig. D).

Removing

u

  Keep the spindle lock (2) depressed and loosen the outer

  flange (12) using the two-pin spanner (13) (fig. D).

u

  Remove the outer flange (12) and the disc (10).

Surface grinding with grinding discs

u

  Allow the tool to reach full speed before touching the tool 

to the work surface.

u

  Apply minimum pressure to the work surface, allowing the 

tool to operate at high speed. Grinding rate is greatest 

when the tool operates at high speed.

u

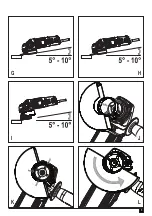
  Maintain a 20˚ to 30˚ angle between the tool and work 

surface as shown in figure F.

u

  Continuously move the tool in a forward and back motion 

to avoid creating gouges in the work surface.

u

  Remove the tool from work surface before turning tool off. 

Allow the tool to stop rotating before laying it down.

Edge grinding with grinding discs

Wheels used for cutting and edge grinding may break or kick 

back if they bend or twist while the tool is being used to do 

cutoff work or deep grinding. Edge grinding/ cutting with a 

Type 27 wheel must be limited to shallow cutting and notching, 

less than 13 mm in depth when the wheel is new. Reduce the 

depth of cutting/notching equal to the reduction of the wheel 

radius as it wears down. Refer to the 'Grinding and cutting 

accessory chart' at the end of ths manual for more 

information. Edge grinding/cutting with a Type 41 wheel 

requires usage of a Type 41 guard.

u

  Allow the tool to reach full speed before touching the tool 

to the work surface.

u

  Apply minimum pressure to the work surface, allowing the 

tool to operate at high speed. Grinding rate is greatest 

when the tool operates at high speed.

u

  Position yourself so that the openunderside of the wheel is 

facing away from you.

u

  Once a cut is begun and a notch is established in the 

workpiece, do not change the angle of the cut. Changing 

the angle will cause the wheel to bend and may cause 

Summary of Contents for KFBEG110

Page 1: ...www blackanddecker co uk 1 4 2 3 KFBEG110 KFBEG125 ...

Page 2: ...2 13 12 10 3 4 7 5 8 7 6 12 15 14 9 4 4 9 11 12 A B 4 9 10 12 11 A E B C D F ...

Page 3: ...3 G H I J K L ...

Page 4: ...f an RCD reduces the risk of electric shock 3 Personal safety a Stay alert watch what you are doing and use common sense when operating a power tool Do not use a power tool while you are tired or under the influence of drugs alcohol or medication A moment of inattention while operating power tools may result in serious personal injury b Use personal protective equipment Always wear eye protection ...

Page 5: ...balance vibrate excessively and may cause loss of control u Do not use a damaged accessory Before each use inspect the accessory such as abrasive wheels for chips and cracks backing pad for cracks tear or excess wear wire brush for loose or cracked wires If power tool or accessory is dropped inspect for damage or install an undamaged accessory After inspecting and installing an accessory and run t...

Page 6: ...rded and are unsafe u The grinding surface of centre depressed wheels must be mounted below the plane of the guard lip An improperly mounted wheel that projects through the plane of the guard lip cannot be adequately protected u The guard must be securely attached to the power tool and positioned for maximum safety so the least amount of wheel is exposed towards the operator The guard helps to pro...

Page 7: ...juries caused by prolonged use of a tool When using any tool for prolonged periods ensure you take regular breaks u Impairment of hearing u Health hazards caused by breathing dust developed when using your tool example working with wood especially oak beech and MDF Vibration The declared vibration emission values stated in the technical data and the declaration of conformity have been measured in ...

Page 8: ...onto the spindle When fitting a grinding disc the raised centre on the outer flange must face towards the disc A in fig C When fitting a cutting disc the raised centre on the outer flange must face away from the disc B in fig C u Keep the spindle lock 2 depressed and tighten the outer flange using the two pin spanner 13 fig D Removing u Keep the spindle lock 2 depressed and loosen the outer flange...

Page 9: ...Begin with coarse grit discs for fast rough material removal Move to a medium grit paper and finish with a fine grit disc for optimal finish u Coarse 16 30 grit u Medium 36 80 grit u Fine Finishing 100 120 grit u Very Fine Finishing 150 180 grit u Allow the tool to reach full speed before touching tool to the work surface u Apply minimum pressure to work surface allowing the tool to operate at hig...

Page 10: ... off Allow the tool to stop rotating before setting it down Warning Use extra care when working over an edge as a sudden sharp movement of grinder may be experienced Mounting and using cutting type 41 wheels Cutting wheels include diamond wheels and abrasive discs Abrasive cutting wheels for metal and concrete use are available Diamond blades for concrete cutting can also be used NOTE A closed 2 s...

Page 11: ...ming any maintenance on corded cordless power tools u Switch off and unplug the appliance tool u Or switch off and remove the battery from the appliance tool if the appliance tool has a separate battery pack u Or run the battery down completely if it is integral and then switch off u Unplug the charger before cleaning it Your charger does not require any maintenance apart from regular cleaning u R...

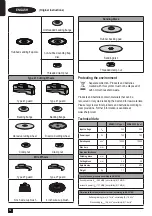
Page 12: ...atteries contain materials that can be recovered or recycled reducing the demand for raw materials Please recycle electrical products and batteries according to local provisions Further information is available at www 2helpU com Technical data KFBEG110 Type 1 KFBEG125 Type 1 Input voltage VAC 230 230 Power input W 750 750 Rated speed min 1 12000 12000 Disc bore mm 22 22 Max disc thickness Grinding...

Page 13: ...arantee Black Decker is confident of the quality of its products and offers consumers a 24 month guarantee from the date of purchase This guarantee is in addition to and in no way prejudices your statutory rights The guarantee is valid within the territories of the Member States of the European Union and the European Free Trade Area To claim on the guarantee the claim must be in accordance with Bl...

Page 14: ...14 ...

Page 15: ...15 ...

Page 16: ...rk Fax 03 9727 5940 Victoria 3138 New Zealand Black Decker Tel 64 9 259 1133 5 Te Apunga Place Fax 64 9 259 1122 Mt Wellington Aukland 1060 United Kingdom Black Decker Tel 01753 511234 Republic Of Ireland 210 Bath Road Fax 01753 512365 www blackanddecker co uk Slough Berkshire SL1 3YD emeaservice sbdinc com ...

Reviews: