


7
u
Leave the tool connected to the charger for 3-6 hours.
The charger may hum and become warm while charging;
this is normal and does not indicate a problem.
Generally, a charging time of 3 hours will enable the tool to
operate at an effective power level for most tasks. However,
further charging for up to 6 hours could significantly increase
the run time, depending on the battery and charging conditions.
u
Before using the tool, unplug the charger and disconnect
the tool from the charger.
Warning!
Do not use the tool while it is connected to the charger.
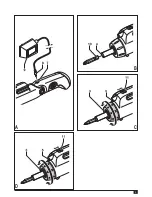
Adjusting the handle (fig. C)
For optimum versatility, the handle can be set to 3 different
positions.
u
Press the handle adjustment button (2).
u
Swivel the handle into the desired position. The button will
automatically lock itself into position.
Spindle lock (fig. D)
This tool is fitted with a collar (3) to lock the spindle. With the
spindle lock engaged, the tool can be used as a normal
screwdriver. Use the tool this way to loosen very tight screws
or to firmly tighten screws.
- To lock the spindle, turn the collar (3) counterclockwise.
- To unlock the spindle, turn the collar clockwise.
Screwdriving
For tightening screws, use forward (clockwise) rotation.
For loosening screws, use reverse (counterclockwise) rotation.
u
To switch the tool on in forward rotation, press the upper
button on the forward/reverse switch (1).
u
To switch the tool on in reverse rotation, press the lower
button on the forward/reverse switch (1).
u
To switch the tool off, release the switch.
Hints for optimum use
u
Always use the correct type and size of screwdriver bit.
u
If screws are difficult to tighten, try applying a small
amount of washing liquid or soap as a lubricant.
u
Use the spindle lock to loosen very tight screws or to
firmly tighten screws.
u
Always hold the tool and screwdriver bit in a straight line
with the screw.
u
When screwing in wood, it is recommended to drill a pilot
hole with a depth equal to the length of the screw. A pilot
hole guides the screw and prevents splintering or
distortion of the wood. For the optimum size of the pilot
hole, refer to the table below.
u
When screwing in hardwood, also drill a clearance hole
with a depth equal to half the length of the screw. For the
optimum size of the clearance hole, refer to the table below.
Screw size
Pilot hole ø
Pilot hole ø
Clearance
(softwood)
(hardwood)
hole
No. 6 (3.5 mm)
2.0 mm
2.5 mm
4 mm
No. 8 (4 mm)
3.2 mm
3.5 mm
5.0 mm
No. 10 (5 mm)
3.5 mm
4.0 mm
5.7 mm
Using the LED (fig. D)
The LED (5) provides additional lighting in narrow and hard-to-
reach places.
u
To switch on the LED, slide the switch (11) forward.
u
To switch off the LED, slide the switch backward.
Warning!
Do not use the LED as the only light source.
Accessories
The performance of your tool depends on the accessory used.
Black & Decker and Piranha accessories are engineered to
high quality standards and designed to enhance the
performance of your tool.
By using these accessories you will get the very best from
your tool.
This tool uses screwdriver bits with a 1/4" (6.35 mm)
hexagonal shank. Piranha Super-lok accessories are
designed for use with this tool.
Maintenance
Your Black & Decker tool has been designed to operate over
a long period of time with a minimum of maintenance.
Continuous satisfactory operation depends upon proper tool
care and regular cleaning.
Your charger does not require any maintenance apart from
regular cleaning.
Warning!
Before performing any maintenance on the tool,
remove the battery from the tool. Unplug the charger before
cleaning it.
u
Regularly clean the ventilation slots in your tool and
charger using a soft brush or dry cloth.
u
Regularly clean the motor housing using a damp cloth.
Do not use any abrasive or solvent-based cleaner.
Protecting the environment
Separate collection. This product must not be
disposed of with normal household waste.
Should you find one day that your Black & Decker product
needs replacement, or if it is of no further use to you, do not
dispose of it with household waste. Make this product
available for separate collection.
Summary of Contents for KC1036
Page 1: ...KC1036 ...
Page 2: ...2 English Original instructions 4 ...
Page 3: ...3 C D B A ...
Page 10: ...10 ...


