background image

5

stop rotating. Twist the Food Chute/Cover 

toward UNLOCK

to remove the Cover.

8. Carefully pull the Slice/Shred Disc (and in the case of the FP1400, the Discharge Disc) off the
Stem, remove the Stem, unlock the Bowl by turning it away from its Base, and lift the Bowl off.

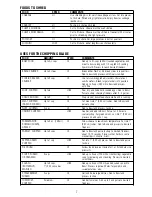
How To Use The Chopping Blade

The Chopping Blade speeds up many everyday tasks and is designed to chop, crumb, grind,
mince and mix quickly.
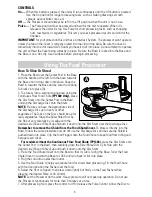
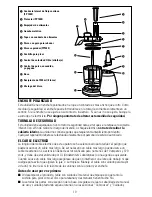
1. Place the Bowl over the Center Post in the Base with the handle at the left. Turn the Bowl
towards the Base until it drops down into place. Snap the Bowl in towards the base and be sure
the Locking Tabs locks into place (see A).
2. Grasp the Chopping Blade by its center shaft
and slide it down onto the Center Post. (B)
3. Place the Food Chute/Cover onto the Bowl so
that its Tab is facing the Base. Twist the Food
Chute/Cover in toward the Base to LOCK until you
hear it click into place.
4. Plug the cord into an electrical outlet.
5. Use the Food Guide to help you prepare food for
chopping/mincing/mixing and crumbing. Fill the
Bowl with food.
6. Select the Hi or Lo Speed, then press the
desired Pulse or On Control. When pulsing, hold
the Pulse position for about 2-3 seconds: check
results; repeat for desired consistency. It is better
to use several short operations rather than a single long one unless mixing ingredients that
require longer processing times.
7. After processing food, press the control to Off or release the Pulse button. Allow the Chopping
Blade to stop rotating. Twist the Food Chute/Cover toward UNLOCK to remove the Cover.
8. Grasp the Chopping Blade by its shaft and remove. Unlock the Bowl by turning it away from its
Base, and lift it off. Empty the processed food.

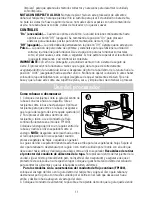
Care and Cleaning

NOTE:

Do not attempt to sharpen the cutting edges of the Chopping Blade or the Reversible

Disc. They are permanently sharpened at the factory and will be ruined by attempted sharpening.

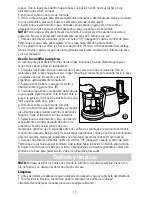
Cleaning

1. Before cleaning, be sure the unit is Off and the cord is unplugged.
2. Whenever possible, rinse parts immediately after processing for easy cleanup.
3. Wipe the Base and feet with a damp cloth and dry thoroughly. Stubborn spots can be removed
by rubbing with a damp cloth and a mild, non-abrasive cleaner. Do not immerse the Base in liquid.
4. All removable parts can be washed by hand or in a dishwasher. To remove the Food Fingers,
simply pull up on the clip portion.

If washing by hand, wash in hot, sudsy water, rinse, and dry thoroughly.  If necessary, use a
small nylon bristle brush to thoroughly clean the Bowl and Food Chute/Cover; this type of
brush will also help prevent cutting yourself on the Chopping Blade and Slice/Shred Disc.

If washing in a dishwasher, place removable parts on the top rack only — not in or near the
utensil basket.

Some staining of parts may occur. Use a paste of 2 tablespoons baking soda/1 tablespoon
water — apply to stains and let stand overnight. Rinse and dry.

5. Do not use rough scouring pads or cleansers on any plastic or metal parts. 

B

Summary of Contents for FP1300

Page 1: ...ATION U S A CANADA 1 800 231 9786 MEXICO 01 800 714 2503 http www householdproductsinc com Quick N Easy Food Processors English page 2 Procesador de alimentos Quick N Easy Español página 9 Robots culinaires Quick N Easy mc Français à la page 16 Household Products Limited de México S de R L de C V 350W MAX 120V 60 Hz FP1400 Shown Ilustrada Illustré ...

Page 2: ...ng blades or Discs while processing food to prevent the possibility of severe personal injury or damage to the food processor A scraper may be used but it must be used only when the food processor is not running Blades are sharp Handle carefully Be sure to insert or remove Chopping Blade and Slice Shred Disc by using hubs to avoid injury To avoid injury never place Chopping Blade or Slice Shred Di...

Page 3: ...20 Volts and have Underwriters Laboratories or appropriate agency approved listing When using a longer cord be sure it does not drape over a working area or dangle where it could be pulled on or tripped over Handle cord carefully for longer life avoid jerking or straining it at outlet and appliance connections Before First Use When unpacking the product and removing packing material handle the Cho...

Page 4: ...the Base to LOCK until you hear it click into place 4 Plug the cord into an electrical outlet 5 Use the Food Guide to help you prepare food for slice shred processing Fill the Food Chute with food and position the Pusher over the food 6 Select the Hi or Lo Speed then press down lightly but firmly on the Food Pusher while pressing the desired Pulse or On Control NOTE Let the Processor do the work H...

Page 5: ...ng food press the control to Off or release the Pulse button Allow the Chopping Blade to stop rotating Twist the Food Chute Cover toward UNLOCK to remove the Cover 8 Grasp the Chopping Blade by its shaft and remove Unlock the Bowl by turning it away from its Base and lift it off Empty the processed food Care and Cleaning NOTE Do not attempt to sharpen the cutting edges of the Chopping Blade or the...

Page 6: ... sliced or shredded food may clog in the Side Chute Follow these tips to avoid clogging Be sure the Shield is removed entirely when using the Continuous Flow Side Chute It is normal for some pieces to fall into the processor bowl Use a large serving bowl to help catch spatter from the Side Chute and turn the bowl as it fills to prevent food buildup in the exit chute Be sure to use the correct side...

Page 7: ...sired GRATED fineness PARSLEY CHOPPED Up to 2 cups HI Add to Bowl and pulse to chop to desired fineness about 10 15 seconds Process other herbs in same manner basil cilantro mint PEPPER GREEN Up to 1 cup LOW Cut into 1 2 54 cm pieces Add to Bowl and pulse CHOPPED to chop PIE DOUGH HI Follow food processor recipe for 1 or 2 standard size pie crusts SOUPS PUREED 3 cups LOW Add up to 3 cups 720 ml ho...

Page 8: ... HI Cut to fit chute if necessary MUSHROOMS LOW Cut a thin slice off cap of 2 mushrooms and position lengthwise cut side flat on disc Stack chute with additional mushrooms on their sides for lengthwise slices NUTS HI For coarsely chopped results fill chute with nuts and slice ONIONS HI Quarter and fill chute positioning onions upright for coarsely chopped results PEACHES PEARS LOW Halve or quarter...

Page 9: ...ntemperie No permita que el cable cuelgue del borde de la mesa o del mostrador ni que entre en contacto con superficies calientes Mantenga las manos y los utensilios alejados de las cuchillas o los discos en movimiento mientras procesa los alimentos a fin de prevenir severas lesiones personales o daño al procesador Puede usarse un utensilio siempre y cuando la unidad NO esté en funcionamiento Las ...

Page 10: ... contiene partes que requieren mantenimiento por dentro Cualquier reparación deberá ser efectuada únicamente por personal de servicio autorizado EL CABLE ELECTRICO La longitud del cable eléctrico de este aparato se ha seleccionado para reducir el peligro que puede ocasionar un cable más largo De ser necesario un cable más largo puede usarse un cable de extensión La extensión debe de estar califica...

Page 11: ... el vástago del disco 3 Coloque el conducto de alimentos tapa sobre el recipiente de modo que la guía quede viendo Uso del procesador A limpieza para que aprenda los métodos correctos y necesarios para desarmar la unidad y como limpiarla NOTA CON RESPECTO AL USO No trate de picar hielo en este procesador de alimentos dañará el recipiente y hará que pierda el filo la cuchilla para picar Esta unidad...

Page 12: ...ente Uso de la cuchilla para picar La cuchilla para picar acelera muchas de las tareas rutinarias y ha sido diseñada para picar migar moler partir y mezclar rápidamente 1 Coloque el recipiente en la guía central de la base con el asa hacia la izquierda Gire el recipiente sobre la base hasta caer en su lugar Presione el recipiente para adentro hacia la base y asegúrese de que los seguros de cierre ...

Page 13: ... fin de que esto no suceda por favor siga los siguientes consejos Retírese por completo el protector cuando se use el conducto lateral de flujo continuo Es Consejos para procesar alimentos 13 3 Limpie la base y el inferior con un paño humedecido y séquelos bien Las manchas persistentes pueden eliminarse frotando un paño humedecido con un limpiador suave no abrasivo No sumerja la base en ningún líq...

Page 14: ...a envoltura incomible Rebane aplicando presión firme PAPAS Alta Pele las papas si lo desea Colóquelas en el conducto partiendo las más grandes por mitad o en tres partes FRESAS Baja Retire el tallo y colóquelas de lado para rebanarlas a lo largo TOMATES Alta Para obtener rebanadas enteras use tomates pequeños o pártalos por mitad Aplique presión ligera pero firme NABOS Alta Pele los nabos Use nabo...

Page 15: ... Oprima el control de pulso de 1 2 veces para una contextura gruesa Los cebollinos verdes pártalos en pedazos de 2 54 cm 1 y agregue hasta 1 taza a la vez QUESO PARMESANO Hasta 148 ml 5 oz Alta Permite que el queso alcance una temperatura O ROMANO ambiental Parta en cubos de 2 51 cm 1 RALLADO Agréguelos al recipiente y procese a su gusto PEREJIL PICADO Hasta 2 tazas Alta Agregue al recipiente y pí...

Page 16: ... la prise Ne jamais tirer sur le cordon Éviter de toucher aux pièces en mouvement Ne pas utiliser un appareil dont la fiche ou le cordon est abîmé qui présente un problème de fonctionnement qui est tombé par terre ou qui est endommagé Le rapporter au centre de service autorisé de la région pour le faire examiner réparer ou régler L utilisation d accessoires non recommandés ni vendus par le fabrica...

Page 17: ...té Si la fiche n entre toujours pas dans la prise il faut communiquer avec un électricien certifié Il ne faut pas neutraliser ce dispositif de sécurité VIS INDESSERRABLE L appareil est doté d une vis indesserrable empêchant l enlèvement du couvercle inférieur Pour réduire les risques d incendie ou de secousses électriques ne pas tenter de retirer le couvercle inférieur L utilisateur ne peut pas re...

Page 18: ...rtinades onctueuses le beurre d arachide et les trempettes Arrêt OFF Le robot devrait toujours se trouver dans cette position lorsqu il ne sert pas Marche intermittente PULSE Il faut enfoncer le bouton poussoir dans cette position PULSE et le maintenir enfoncé pour que le robot fonctionne dans ce mode Lorsqu on relâche le bouton poussoir l appareil s arrête Utiliser cette commande pour les prépara...

Page 19: ...nt par son arête en plaçant la face voulue éminçage ou déchiquetage vers le haut Puis enfoncer le disque sur la tige 3 Placer l entonnoir couvercle sur le bol de sorte que l ergot soit face au socle Faire tourner l entonnoir couvercle vers la mention LOCK du socle jusqu à ce qu il s enclenche en place 4 Brancher la fiche 5 Consulter le tableau d utilisation afin de faciliter le traitement des alim...

Page 20: ...isation afin d en faciliter le nettoyage 3 Essuyer le socle et les pattes à l aide d un chiffon humide et bien les assécher On peut enlever les taches tenaces en les frottant avec un chiffon humide et un produit nettoyant doux et non abrasif Éviter d immerger le socle 4 Toutes les pièces amovibles vont au lave vaisselle ou on peut les laver à la main Pour retirer les doigts de retenue des aliments...

Page 21: ...ins morceaux tombent dans le bol du robot Utiliser un grand bol de service pour ramasser les aliments qui sont éjectés de l orifice latéral et faire tourner le bol à mesure qu il se remplit afin de prévenir les accumulations d aliments dans l orifice d écoulement S assurer d utiliser le côté approprié du disque de décharge pour les légumes en feuille laitue chou entre autres et pour déchiqueter de...

Page 22: ...aux de 2 54 cm 1 po traiter 240 ml 1 t à la fois PARMESAN OU Jusqu à 148 ml ÉLEVÉE Le fromage doit être à la température ambiante ROMANO RÂPÉ 5 oz Couper en cubes de 2 54 cm 1 po Déposer le fromage dans le bol et traiter jusqu à l obtention de la consistance voulue PERSIL HACHÉ Jusqu à 480 ml ÉLEVÉE Déposer dans le bol et utiliser la marche 2 t intermittente pendant environ 10 à 15 secondes jusqu ...

Page 23: ...ent sur le poussoir PEPPERONI ÉLEVÉE Couper en morceaux d une longueur de 7 6 cm 3 po et retirer l enveloppe non comestible Trancher un morceau à la fois en appuyant fermement sur le poussoir POMMES DE TERRE ÉLEVÉE Peler les pommes de terre au goût Couper les grosses pommes de terre en deux ou en trois FRAISES BASSE Équeuter les fraises et les placer sur le coté dans l entonnoir afin d obtenir des...

Page 24: ...questions regarding warranty or service locations may be obtained by calling Consumer Assistance and Information toll free 1 800 231 9786 UN AÑO COMPLETO DE GARANTIA Household Products garantiza este producto contra cualquier defecto originado por fallas en los materiales o en la mano de obra por un período de un año a partir de la fecha original de compra Esta garantía no incluye daños al product...

Reviews: