background image

4

POLARIZED PLUG (120V models only)

This appliance has a polarized plug 

(one blade is wider than the other). To 

reduce the risk of electric shock, this 

plug is intended to fit into a polarized 

outlet only one way. If the plug does not 

fit fully into the outlet, reverse the plug. 

If it still does not fit, contact a qualified 

electrician. Do not attempt to modify the 

plug in any way.

TAMPER-RESISTANT SCREW

Warning:

 This appliance is equipped 

with a tamper-resistant screw to prevent 

removal of the outer cover. To reduce 

the risk of fire or electric shock, do not 

attempt to remove the outer cover. 

There are no user-serviceable parts 

inside. Repair should be done only by 

authorized service personnel. 

ELECTRICAL CORD

1. A short power-supply cord is provided 

to reduce the risk resulting from 

becoming entangled in or tripping over a 

longer cord.

2. Extension cords may be used if care 

is exercised in their use.

3. If a detachable extension cord is used:
   a) The marked electrical rating of the 

extension cord should be at least as 

great as the electrical rating of the 

appliance.

   b) If the appliance is of the grounded 

type, the extension cord should be a 

grounding-type 3-wire cord.

   c) The cord should be arranged so that 

it will not drape over the countertop or 

tabletop where it can be pulled on by 

children or tripped over. 

Note: 

If the power cord is damaged, 

please contact the warranty department 

listed in these instructions. 

•  Read all instructions.
•  Do not touch hot surfaces. Use handles or knobs.
•  To protect against fire, electric shock and injury to 

persons do not immerse cord, plugs or appliance in 
water or other liquid.

•  Close supervision is necessary when any appliance 

is used by or near children.

•  Unplug from outlet when the appliance and display 

clock are not in use, and before cleaning. Allow 
to cool before putting on or taking off parts, and 
before cleaning the appliance.

•  Do not operate any appliance with a damaged cord 

or plug, or after the appliance malfunctions or has 
been damaged in any manner. Contact Consumer 
Support at the number listed in this manual.

•  The use of accessory attachments not 

recommended by the appliance manufacturer may 
result in fire, electric shock or injury to persons.

•  Do not use outdoors.
•  Do not let cord hang over edge of table or counter, 

or touch hot surfaces.

•  Do not place on or near a hot gas or electric 

burner, or in a heated oven.

•  To disconnect, make sure the light ring around the 

Brew Now button is off by pressing the Brew Now 
button. Then remove plug from wall outlet.

•  Do not use this appliance for other than  

intended use.

•  Keep lid on the carafe when in use.
•  Scalding may occur if the lid is removed during the 

brewing cycles.

•  The carafe is designed for use with this appliance. 

It must never be used on a range top.

•  Do not set a hot carafe on a wet or cold surface.
•  Do not use a cracked carafe or a carafe having a 

loose or weakened handle.

•  Do not clean carafe with cleansers, steel wool pads 

or other abrasive material.

•  This appliance is not intended for use by persons 

(including children) with reduced physical, sensory 
or mental capabilities, or lack of experience 
and knowledge, unless they have been given 
supervision or instruction concerning use of the 
appliance by a person responsible for their safety.

•  Children should be supervised to ensure that they 

do not play with the appliance. 

Please Read and Save this Use and Care Book. 

IMPORTANT SAFEGUARDS.

 When using electrical appliances, basic safety precautions should always be followed to 

reduce the risk of fire, electric shock, and/or injury, including the following:

SAVE THESE INSTRUCTIONS.

This product is for household use only.

Summary of Contents for CM4200 Series

Page 1: ...CM4200 Series ...

Page 2: ...ve any questions or concerns with your new product please call our Customer Service Line at 1 800 465 6070 US and Canada Please do not return to the store Thank you for your purchase www prodprotect com blackanddecker ...

Page 3: ...AFEGUARDS 4 GETTING TO KNOW YOUR COFFEEMAKER 5 GETTING STARTED 6 SETTING THE CLOCK 6 BREWING COFFEE 7 SNEAK A CUPTM FEATURE 7 BREW LATER 7 CARE AND CLEANING 8 AUTO CLEAN SYSTEM 9 TROUBLESHOOTING 10 WARRANTY AND CUSTOMER SERVICE INFORMATION 11 WARNING RISK OF FIRE OR ELECTRIC SHOCK DO NOT OPEN The lightning symbol refers to dangerous voltage the exclamation symbol refers to maintenance instructions...

Page 4: ...let when the appliance and display clock are not in use and before cleaning Allow to cool before putting on or taking off parts and before cleaning the appliance Do not operate any appliance with a damaged cord or plug or after the appliance malfunctions or has been damaged in any manner Contact Consumer Support at the number listed in this manual The use of accessory attachments not recommended b...

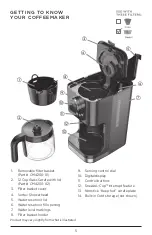
Page 5: ...lass Carafe with lid Part CM4200 02 3 Filter basket cover 4 Vortex Showerhead 5 Water reservoir lid 6 Water reservoir fill opening 7 Water level markings 8 Filter basket holder 9 Serving control dial 10 Digital display 11 Control buttons 12 Sneak A Cup interrupt feature 13 Nonstick Keep hot carafe plate 14 Built in Cord storage not shown ...

Page 6: ...cal outlet Turn the serving control dial to the cup position Brew water through appliance without adding coffee grounds Discard water from the carafe and paper filter from filter basket Turn off appliance unplug and allow to cool down SETTING THE CLOCK 1 Plug appliance into standard electrical outlet 2 The digital clock display flashes 12 00 3 To change the time Press HR hour button until the corr...

Page 7: ...coffee 11 If strong coffee is desired press the STRONG button once to select the strong brew The word STRONG is displayed 12 Press Brew Now button and brewing begins 13 Once coffee grounds have cooled carefully open cover and discard used grounds Close cover 14 The coffeemaker will keep brewed coffee hot for 2 hours and then automatically turn off This can be adjusted by using the KEEP WARM button...

Page 8: ...ND CLEANING This product contains no user serviceable parts Refer service to qualified service personnel CLEANING Be sure the unit is unplugged and has cooled Open the cover To remove the filter basket grip the handles and lift straight up Discard the paper filter if used and the coffee grounds Wash the filter basket and carafe in the top rack of the dishwasher or wash by hand with hot water and d...

Page 9: ...u may do so by following the steps below How do I use Auto Clean Follow the simple steps below Your coffeemaker will take care of the rest 1 In the carafe combine by filling to the icon with white vinegar then adding to the icon with cold water 2 Pour into water reservoir 3 Place an 8 to 12 cup basket style paper filter in the filter basket Place basket into filter basket holder Close filter baske...

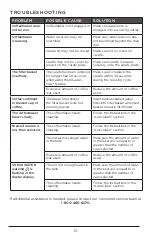
Page 10: ...he paper filter and or the filter basket were not properly placed Insert basket shaped paper filter into filter basket and insert basket properly into holder The coffeemaker brews slowly The coffeemaker needs cleaning Follow the instructions in the Auto Clean section Brewed volume is less than selected The coffeemaker needs cleaning Follow the instructions in the Auto Clean section There was not e...

Page 11: ...new or factory refurbished How do you get service Save your receipt as proof of date of sale Visit the online service website at www prodprotect com blackanddecker or call toll free 1 800 465 6070 for general warranty service If you need parts or accessories please call 1 800 738 0245 What does your warranty not cover Damage from commercial use Damage from misuse abuse or neglect Products that hav...

Page 12: ...ogos and product names are trademarks of The Black Decker Corporation used under license All rights reserved All other marks are Trademarks of Spectrum Brands Inc Made in China 2018 The Black Decker Corporation and Spectrum Brands Inc Middleton WI 53562 T22 5004116 B 22880 ...

Reviews: