background image

6

ENGLISH

X

Push the hose connector (19) over the end of the blower 
connector (7) and make sure that it is a good fit. 

X

To disconnect the hose pull the hose connector (19) 
from the blower connector (7).

Storing the appliance
Warning! 

 When storing the appliance, switch the appliance 

off and unplug it.

X

Place the appliance in an upright position.

X

Store the appliance in a dry location. The appliance can 
be carried by the handle (6).

Maintenance

Your Black & Decker appliance has been designed to 
operate over a long period of time with a minimum of 
maintenance. Continuous satisfactory operation depends 
upon proper tool care and regular cleaning.

Warning! 

Before performing any maintenance or cleaning 

on the appliance, unplug the appliance.

X

From time to time wipe the appliance with a damp cloth. 
Do not use any abrasive or solvent-based cleaner. Do 
not immerse the appliance in water.

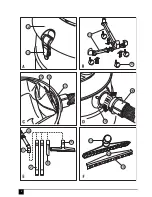
Replacing the paper dust bag (fig. C)

The paper dust bag (15) must be replaced regularly.

X

Remove the lid (12) as previously described.

X

Carefully pull the cardboard flange (16) of the paper 
dust bag (15) from the hose inlet (17).

X

Dispose of the paper dust bag (15) in normal household 
waste.

X

Wipe the inside of the container with a damp cloth. Do 
not use any abrasive or solvent-based cleaner.

X

Fit a replacement dust bag as previously described.

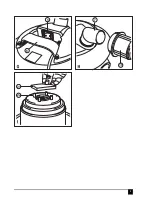
Cleaning the motor filter (fig. I)

The motor filter (21) prevents particles and larger objects 
from entering the motor housing.
The motor filter (21) is re-usable and should be cleaned 
regularly.

X

Remove the lid (12) as previously described.

X

Carefully slide the motor filter (21) from the four locating 
pins (22).

X

Brush any loose dust off the filter.

X

Replace the motor filter (21) onto the four locating 
pins (22).

X

Replace the lid (12).

Mains plug replacement (U.K. & Ireland only)

If a new mains plug needs to be fitted: 

X

Safely dispose of the old plug. 

X

Connect the brown lead to the live terminal in the new 
plug. 

X

Connect the blue lead to the neutral terminal. 

Warning! 

No connection is to be made to the earth terminal. 

Follow the fitting instructions supplied with good quality 
plugs. Recommended fuse: 13A.

Protecting the environment

Should you find one day that your Black & Decker product 
needs replacement, or if it is of no further use to you, do not 
dispose of it with household waste. Make this product 
available for separate collection.

Separate collection of used products and packaging 
allows materials to be recycled and used again. Re-
use of recycled materials helps prevent 
environmental pollution and reduces the demand 
for raw materials. 

Local regulations may provide for separate collection of 
electrical products from the household, at municipal waste 
sites or by the retailer when you purchase a new product.
Black & Decker provides a facility for the collection and 
recycling of Black & Decker products once they have 
reached the end of their working life. To take advantage of 
this service please return your product to any authorised 
repair agent who will collect them on our behalf.
You can check the location of your nearest authorised repair 
agent by contacting your local Black & Decker office at the 
address indicated in this manual. Alternatively, a list of 
authorised Black & Decker repair agents and full details of 
our after-sales service and contacts are available on the 
Internet at: 

www.2helpU.com.

Separate collection. This product must not be 
disposed of with normal household waste.

Summary of Contents for BV1400

Page 1: ...5 10 3 4 2 8 9 11 1 7 6 ENGLISH 4 ITALIANO 8 ΕΛΛΗΝΙΚΑ 12 ...

Page 2: ...2 13 16 15 17 3 2 8 11 19 18 11 10 20 9 14 4 12 ...

Page 3: ...3 5 6 7 19 21 22 ...

Page 4: ... of the appliance X When not in use the appliance should be stored in a dry place Children should not have access to stored appliances Inspection and repairs X Before use check the appliance for damaged or defective parts Check for breakage of parts damage to switches and any other conditions that may affect its operation X Do not use the appliance if any part is damaged or defective X Have any da...

Page 5: ...unter clockwise and pull out the hose Fitting the handle adaptor fig E X Push the handle adaptor 3 into the end of the hose 4 until the flange is flush with the end of the hose Mounting the extension tube fig E X Firmly push one of the extension tubes 2 into the handle adaptor 3 X If required attach the other extension tube 2 to the end Mounting accessories fig E and F The crevice tool 8 allows fo...

Page 6: ...ocating pins 22 X Brush any loose dust off the filter X Replace the motor filter 21 onto the four locating pins 22 X Replace the lid 12 Mains plug replacement U K Ireland only If a new mains plug needs to be fitted X Safely dispose of the old plug X Connect the brown lead to the live terminal in the new plug X Connect the blue lead to the neutral terminal Warning No connection is to be made to the...

Page 7: ...uch products to make sure of the minimum inconvenience to the customer unless X The product has been used for trade professional or hire purposes X The product has been subjected to misuse or neglect X The product has sustained damage through foreign objects substances or accidents X Repairs have been attempted by persons other than authorised repair agents or Black Decker service staff To claim o...

Page 8: ...trodomestico in un luogo asciutto Gli elettrodomestici non devono essere riposti alla portata dei bambini Ispezione e riparazioni X Prima dell impiego controllare che l elettrodomestico non sia danneggiato e non presenti parti difettose Controllare che non vi siano parti rotte che gli interruttori non siano danneggiati e che non vi siano altre condizioni che potrebbero avere ripercussioni sulle pr...

Page 9: ... del tubo flessibile 19 nella presa 18 dell elettrodomestico X Allineare le linguette sulla ghiera del tubo flessibile alle fessure nella presa X Ruotare la ghiera del tubo flessibile 19 in senso orario fino a quando si aggancia in sede Scollegamento del tubo flessibile X Ruotare la ghiera del tubo flessibile 19 in senso antiorario ed estrarre il tubo flessibile Montaggio dell adattatore dell impu...

Page 10: ...n usare materiali abrasivi o detergenti a base di solventi X Montare il sacco raccoglipolvere di carta di ricambio come descritto in precedenza Pulitura del filtro del motore fig I Il filtro del motore 21 impedisce l ingresso di particelle e di oggetti di una certa dimensione nel vano motore Il filtro del motore 21 è riutilizzabile e deve essere pulito regolarmente X Togliere il coperchio 12 come ...

Page 11: ...e la sostituzione delle parti difettose provvede alla riparazione dei prodotti se ragionevolmente usurati oppure alla loro sostituzione in modo da ridurre al minimo il disagio del cliente a meno che X Il prodotto non sia stato destinato ad usi commerciali professionali o al noleggio X Il prodotto non sia stato usato in modo improprio o scorretto X Il prodotto non abbia subito danni causati da ogge...

Page 12: ...ανότητες ή άτομα χωρίς εμπειρία ή γνώσεις παρά μόνο εφόσον επιτηρούνται ή τους έχουν δοθεί οδηγίες σχετικά με τη χρήση της συσκευής από άτομο υπεύθυνο για την ασφάλειά τους X Τα παιδιά πρέπει να επιτηρούνται για να είστε σίγουροι ότι δεν παίζουν με τη συσκευή Μετά τη χρήση X Πριν αφήσετε τη συσκευή χωρίς επιτήρηση και πριν αλλάξετε καθαρίσετε επιθεωρήσετε οποιαδήποτε τμήματά της πρέπει πρώτα να τη...

Page 13: ...δοχή φυσητήρα 8 Εργαλείο για χαραμάδες 9 Ρόδες 10 Διπλή κεφαλή βούρτσας 11 Κεφαλή παρκέ Συναρμολόγηση Αφαίρεση του καπακιού εικ A X Απελευθερώστε τα δύο κλιπ 13 που συγκρατούν το καπάκι 12 στη θέση του X Aφαιρέστε προσεκτικά το καπάκι από τη συσκευή Τοποθέτηση του καπακιού εικ A X Τοποθετήστε το καπάκι 12 στον περιέκτη 1 διασφαλίζοντας ότι η υποδοχή φυσητήρα 7 είναι δίπλα στην υποδοχή του σωλήνα 1...

Page 14: ...πατήστε το διακόπτη on off 5 στη θέση I X Για να απενεργοποιήσετε τη συσκευή πατήστε το διακόπτη on off 5 στη θέση 0 Ηλεκτρικό σκούπισμα X Όταν χρησιμοποιείτε τη συσκευή να βεβαιώνεστε ότι ο ελαστικός σωλήνας δεν έχει μαγκώσει στρίψει ή μπλοκαριστεί X Σε περίπτωση υπερθέρμανσης θα λειτουργήσει ένας διακόπτης και η συσκευή θα σταματήσει αυτόματα X Εάν η συσκευή σταματήσει να λειτουργεί βγάλτε την α...

Page 15: ...οδέκτη γείωσης Ακολουθήστε τις οδηγίες τοποθέτησης που παρέχονται με τους καλής ποιότητας ρευματολήπτες φις Προτεινόμενη ασφάλεια τήξης 13A Προστασία του περιβάλλοντος Εάν κάποια μέρα διαπιστώσετε ότι το προϊόν σας Black Decker χρειάζεται αντικατάσταση ή ότι δεν το χρειάζεστε άλλο μην το απορρίψετε μαζί με τα κοινά οικιακά απορρίμματα αλλά κάντε αυτό το προϊόν διαθέσιμο για ανεξάρτητη αποκομιδή Η ...

Page 16: ...αλίσει την ελάχιστη ενόχληση στους πελάτες της εκτός εάν X Το προϊόν έχει χρησιμοποιηθεί σε εργασιακό επαγγελματικό περιβάλλον ή αν έχει ενοικιαστεί X Έχει γίνει εσφαλμένη χρήση του προϊόντος ή έχει παραμεληθεί X Το προϊόν έχει υποστεί βλάβη από άλλα αντικείμενα από ουσίες ή λόγω ατυχήματος X Έχει γίνει προσπάθεια επισκευής από μη εξουσιοδοτημένα κέντρα επισκευών ή από προσωπικό που δεν ανήκει στο...

Page 17: ...17 ...

Page 18: ......

Page 19: ...ODFN HFNHU 7HO DWK 5RDG D 6ORXJK HUNVKLUH 6 HOSOLQH WDOLD ODFN HFNHU WDOLD 6S 7HO 9LDOH OYH LD D 0RQ D 0 1XPHUR YHUGH ǽȝȝȑİį ODFN HFNHU ǼȜȜȐȢ ǹ ȉȘȜ ȈIJȡȐȕȦȞȠȢ ȁİȦij ǺȠȣȜȚĮȖȝȑȞȘȢ ĭĮȟ ȽȜȣijȐįĮ ǹșȒȞĮ ZZZ EODFNDQGGHFNHU HX ...

Page 20: ...tto www blackanddecker it productregistration Registrate il prodotto online su www blackanddecker it productregistration o inviate nome cognome e codice del prodotto al centro Black Decker del vostro paese ȃșȟ ȠıȥȑIJıijı ȟį ȜįijįȥȧȢȔIJıijı ijȡ ʍȢȡȨȪȟ IJįȣ www blackanddecker gr productregistration ȀĮIJĮȤȦȡȓıIJİ IJȠ ʌȡȠȧȩȞ ıĮȢ ıİ ıȪȞįİıȘ ıIJȘ ıİȜȓįĮ www blackanddecker gr productregistration Ȓ ıIJİȓȜIJİ IJȠ ȩȞȠȝĮ ...

Reviews: