background image

12 • ENGLISH

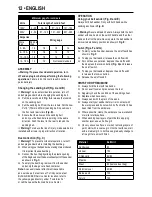
Minimum gage for cord sets

Volts

Total length of cord in feet

120V

0 - 25

26 - 50

51 - 100

101 - 150

220V

0 - 50

51 - 100

101 - 200 201 - 300

Amperios

Wire gauge

More

than

No more 

than

0 - 6 A

18

16

16

14

6 - 10 A

18

16

14

12

10 - 12 A

16

16

14

12

12 - 16 A

14

12

Not recommended

ASSEMBLY

 Warning! To prevent accidental operation, turn 

off and unplug tool before performing the following 

operations. Failure to do this could result in serious 

personal injury.

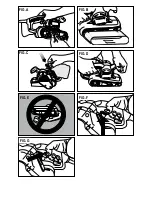
Changing the sanding belt (Fig. A and B)

 Warning! To prevent accidental operation, turn off 

and unplug sander before changing the sanding belt.


f

Pull the lever shown in Fig. A to release the tension  


on the sanding belt. 


f

Pull the sanding belt from the two rollers. Put the new  


3”x18” (75mm x 457mm) sanding belt in position on  


the front and rear rollers (Fig. B). 


f

Ensure that the arrows on the sanding belt    


and on your belt sander are pointing in the same  


direction. Push the lever to the rear to tension the  


sanding belt. 

 Warning! To reduce the risk of injury, make sure belt is 

installed with arrows in proper direction of rotation.

Dust collection (Fig. C)

 Warning! TTo prevent accidental operation, turn off 

and unplug sander before installing the dust bag.


f

When using your belt sander, dust and grit are produced.  


It is important to use a dust bag.


f

Connect the dust bag by sliding the plastic opening  


of the bag down over the dust exhaust port of the sander  


as shown in Fig. C


f

To empty the dust bag, remove it from the sander  


and unzip the bag over a trash container.

Note: A vacuum cleaner attachment is available 

as a service part at extra cost. To find your nearest 

BLACK+DECKER Service Center location, refer to 

the yellow pages directory under “Tools-Electric” 

or call the neaest Authorized Service Center.

OPERATION

Using your belt sander (Fig. D and E)

Always hold belt sander firmly with both hands while 

sanding as shown in Fig. D.

 Warning! Severe abrasion hazard. Always hold the belt 

sander with one hand on the switch handle and the other 

hand on the front handle. Never operate the belt sander in 

an inverted stationary position as shown in Fig. E.

Switch 

(Figs. F and G)


f

To start your belt sander, depress the on/off switch as  


shown in Fig. F. 


f

To stop your belt sander release the on/off switch. 


f

For continuous operation, depress the on/off switch  


then depress the lock-on button (Fig. G) and release  


the on/off switch. 


f

To stop your belt sander, depress the on/off switch  


to release the lock-on button. 


f

Release the on/off switch.

HINTS FOR OPTIMUM USE


f

Always hold the tool with two hands.


f

Do not exert too much pressure on the tool.


f

Regularly check the condition of the sanding sheet.


f

Replace when necessary.


f

Always sand with the grain of the wood.


f

Always start your sander before it is in contact with 


the workpiece and do not switch it off until after it has


been lifted from the workpiece.


f

Where possible, clamp the workpiece to a workbench 


or similar sturdy surface.


f

When sanding new layers of paint before applying 


another layer, use extra fine grit.


f

On very uneven surfaces, or when removing layers of 


paint, start with a coarse grit. On other surfaces, start  


with a medium grit. In both cases, gradually change to  


a fine grit for a smooth finish.

Material

Belt Grit

Solid wood

80

Veneer

150

Chipboard

60/80

Plastics

100

Steel

80 (remove dust bag)

Paint removal

40/60

Balsa wood

100

Acrylic

100

Summary of Contents for BR318

Page 1: ...ES INSTRUCTION MANUAL ADVERTENCIA LEASE ESTE INSTRUCTIVO ANTES DE USAR EL PRODUCTO WARNING READ INSTRUCTION MANUAL BEFORE USING PRODUCT Español 3 English 15 Lijadora de Banda de 3 x 18 75mm x 457mm 3 x 18 75mm x 457mm Belt Sander ...

Page 2: ...FIG A FIG C FIG B FIG E FIG D FIG G FIG F ...

Page 3: ...ra c No exponga las herramientas eléctricas a la lluvia y evite que penetren líquidos en su interior Existe el peligro de recibir una descarga eléctrica si penetran ciertos líquidos en la herramienta eléctrica d Cuide el cable eléctrico No utilice el cable eléctrico para transportar o colgar la herramienta eléctrica ni tire de él para sacar el enchufe de la toma de corriente Mantenga el cable eléc...

Page 4: ...enimiento deficiente f Mantenga las herramientas de corte limpias y afiladas Las herramientas de corte mantenidas correctamente se dejan guiar y controlar mejor g Utilice la herramienta eléctrica los accesorios los útiles de la herramienta etc de acuerdo con estas instrucciones y tenga en cuenta las condiciones de trabajo y la tarea a realizar El uso de herramientas eléctricas para trabajos difere...

Page 5: ... recolectora de polvo f f Cuando trabaje con piezas metálicas use guantes OTRAS ADVERTENCIAS E INSTRUCCIONES DE SEGURIDAD IMPORTANTES LIJADO DE PINTURAS CON BASE DE PLOMO NO SE RECOMIENDA el lijado de pinturas con base de plomo debido a la dificultad para controlar el polvo contaminado El mayor peligro de envenenamiento por plomo es para niños y mujeres embarazadas Ya que es difícil identificar si...

Page 6: ...e mayor será éste Calibre mínimo para cables de extensión Voltios Longitud del cable en metros 120V 0 7 6 7 6 15 2 15 2 30 4 30 4 45 7 220V 0 15 2 15 2 30 4 30 4 60 9 60 9 91 4 Amperios Calibre del cable Más de No más de 0 6 A 18 16 16 14 6 10 A 18 16 14 12 10 12 A 16 16 14 12 12 16 A 14 12 No recomendado ENSAMBLAJE Advertencia Para evitar el funcionamiento accidental apague y desenchufe la herram...

Page 7: ... de polvo Para quitar pintura 40 60 Madera de balsa 100 Acrílico 100 RECOLECCIÓN DE POLVO Advertencia Riesgo de incendio El polvo acumulado que se produce al lijar los revestimientos de las superficies poliuretano aceite de linaza etc puede iniciar una combustión espontánea y causar un incendio Para reducir el riesgo siga estrictamente las instrucciones del manual de la lijadora y del fabricante d...

Page 8: ...ación de herramientas eléctricas Para mayor información acerca de nuestros centros de servicio autorizados y si necesita consejo técnico reparaciones o piezas de repuesto originales de fábrica comuniquese a su oficina local o visitenos en www blackanddecker la com Advertencia El uso de accesorios no recomendados para utilizar con esta herramienta puede resultar peligroso PROTECCIÓN DEL MEDIO AMBIE...

Page 9: ...f electric shock f If operating a power tool in a damp location is unavoidable use a residual current device RCD protected supply Use of an RCD reduces the risk of electric shock Note The term Residual Curent Device RCD can be replaced by Ground Fault Circuit Interrupter GFCI or by Earth Leakage Circuit Breaker ELCB 3 Personal Safety a Stay alert watch what you are doing and use common sense when ...

Page 10: ...iring or its own cord Contact with a live wire will make exposed metal parts of the tool live and shock the operator f f Use clamps or another practical way to secure and support the work piece to a stable platform Holding the work by hand or against your body leaves it unstable and may lead to loss of control Warning ALWAYS USE SAFETY GLASSES Everyday eyeglasses are NOT safety glasses Also use fa...

Page 11: ...ing and disposal f f All surfaces in the work area should be vacuumed and thoroughly cleaned daily for the duration of the sanding project Vacuum filter bags should be changed frequently f f Plastic drop cloths should be gathered up and disposed of along with any dust chips or other removal debris They should be placed in sealed refuse receptacles and disposed of through regular trash pick up proc...

Page 12: ...cost To find your nearest BLACK DECKER Service Center location refer to the yellow pages directory under Tools Electric or call the neaest Authorized Service Center OPERATION Using your belt sander Fig D and E Always hold belt sander firmly with both hands while sanding as shown in Fig D Warning Severe abrasion hazard Always hold the belt sander with one hand on the switch handle and the other han...

Page 13: ...SAFETY and RELIABILITY repairs maintenance and adjustment other than those listed in this manual should be performed by authorized service centers or other qualified service personnel always using identical replacement parts ACCESSORIES Recommended accessories for use with your tool are available at extra cost from your local dealer or authorized service center If you need assistance in locating a...

Page 14: ...0626 1W7 Black Decker del Perú S A Av Enrique Meiggs N 227 Z I Pque Intern de Industria y Comercio Callao Telf Directo 511 614 4242 RUC 20266596805 TROUBLESHOOTING PROBLEM POSSIBLE CAUSE POSSIBLE SOLUTION Unit will not start Cord not plugged in Plug tool into a working outlet Circuit fuse is blown Replace circuit fuse If the product repeatedly causes the circuit fuse to blow discontinue use immedi...

Reviews: