background image

4

ENGLISH

(Original instructions)

5

ENGLISH

(Original instructions)

u


Do not operate the appliance in explosive atmospheres, 

such as in the presence of flammable liquids, gases or 

dust.

After use

u


When not in use, the appliance should be stored in a dry, 

well ventilated place out of the reach of children.

u


Children should not have access to stored appliances.

u


When the appliance is stored or transported in a vehicle it 

should be placed in the boot or restrained to prevent 

movement following sudden changes in speed or 

direction.

Inspection and repairs

u


Before use, check the appliance for damaged or defective 

parts. Check for breakage of parts, damage to switches 

and any other conditions that may affect its operation.

u


Do not use the appliance if any part is damaged or 

defective.

u


Have any damaged or defective parts repaired or replaced 

by an authorised repair agent.

u


Never attempt to remove or replace any parts other than 

those specified in this manual.

u


In case of any missing parts, do not assemble the stand 

until the missing parts are obtained and are correctly 

installed.

Additional safety instructions for mitre saw stand

u


Fully assemble and tighten all the fasteners required for 

this stand. Also occasionally check the stand and make 

sure the mitre saw is still tight. An unstable loose stand 

may shift in use and result in serious injury.

u


Before operating, make sure the entire unit has been 

placed on a flat and solid level surface. If tool with stand is 

unstable and tips, serious injury may occur. 

u


Never STAND on tool or its stand or use them as a ladder 

or scaffolding. Serious injury could occur if the tool is 

tipped or the cutting tool is contacted accidentally. Do not 

store materials in a position on or near the tool where it is 

necessary to stand on the tool or its stand to reach them.

u


Use only our replacement parts. Any others may cause a 

hazard. The mitre saw should be mounted to the stand 

firmly according to the instruction manual. Properly align, 

position and balance the mitre saw according to the 

instruction manual after mounting the mitre saw to the 

stand.

u


Never modify the stand in any manner or use the stand for 

any purpose other than is stated in the instructions.

u


Cutting material may cause the stand to become 

unbalanced, always make sure the material is properly 

supported. If the piece being cut is placed far beyond the 

Work Support, the stand legs on the opposite side may be 

lifted up suddenly due to weight imbalance. 

  Firmly Hold the opposite side before cutting to prevent this 

situation.

Warning! For your safety, never connect to power source until 

all assembly steps are complete and you have read and 

understood the entire owner’s manual.

Residual risks.

Additional residual risks may arise when using the tool which 

may not be included in the enclosed safety warnings. These 

risks can arise from misuse, prolonged use etc.

Even with the application of the relevant safety regulations 

and the implementation of safety devices, certain residual 

risks can not be avoided. These include:

u


Injuries caused by touching any rotating/moving parts.

u


Injuries caused when changing any parts, blades or 

accessories.

u


Injuries caused by prolonged use of a tool. When using 

any tool for prolonged periods ensure you take regular 

breaks.

u


Impairment of hearing.

u


Health hazards caused by breathing dust developed when 

using your tool (example:- working with wood, especially 

oak, beech and MDF.)

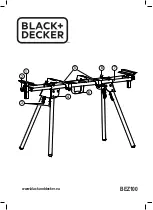
Features

This tool includes some or all of the following features.


1. Support bracket

  2. Support bracket adjusting screw

  3. Leg locking handle

  4. Leg locking pin

  5. Mounting brackets

  6. Carrying handle

  7. Side extensions

  8. Side extensions lock screws

Use

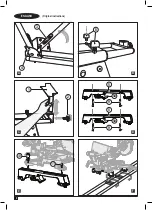
Preparing the stand (Fig. A)

u


Lay down the stand’s top surface on the floor with the 

folded legs on top.

u


push in leg locking handle (3) to retract locking pin (4) and 

rotate that leg until the locking pin clicks into place.

u


Repeat with the remaining three legs.


u


Lift the stand

.

u


Check to ensure the stand is stable and all locking pins 

are in position.

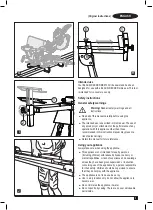
Assembling the support brackets (Fig. B &C)

The support brackets help balance the workpiece during 

cutting operations.

To assemble the support brackets:

u


Screw in the locking screws (8) through the locking screw 

holes at both ends of the stand, as shown in Figure B.

Summary of Contents for BEZ100

Page 1: ...BEZ100 1 7 8 2 3 5 4 6 www blackanddecker eu ...

Page 2: ...2 ENGLISH Original instructions 2 3 4 A 8 B 1 2 C 5 5 9 9 5a 5a D 10 11 E F ...

Page 3: ...truction manual may present a risk of personal injury u Retain this manual for future reference Using your appliance Always take care when using the appliance u This appliance is not intended for use by persons including children with reduced physical sensory or mental capabilities or lack of experience and knowledge unless they have been given supervision or instruction concerning use of the appl...

Page 4: ... mounting the mitre saw to the stand u Never modify the stand in any manner or use the stand for any purpose other than is stated in the instructions u Cutting material may cause the stand to become unbalanced always make sure the material is properly supported If the piece being cut is placed far beyond the Work Support the stand legs on the opposite side may be lifted up suddenly due to weight i...

Page 5: ...trol of the saw mounting assembly u Lower the bracket assembly allowing its rear edge to fully seat over the rear rail Figure G Note Use one hand to hold the mounting bracket assembly until both levers are securely locked u Check position and adjust if necessary to make sure the weight of the saw is evenly balanced over the rails as shown in Figure G u Ensure the saw is fully seated and locked in ...

Page 6: ...ed reducing the demand for raw materials Please recycle electrical products and batteries according to local provisions Further information is available at www 2helpU com Guarantee Black Decker is confident of the quality of its products and offers consumers a 24 month guarantee from the date of purchase This guarantee is in addition to and in no way prejudices your statutory rights The guarantee ...

Page 7: ... избежание перемещения в результате резкого изменения скорости или направления движения Проверка и ремонт u Перед началом использования проверьте устройство на наличие поврежденных или неисправных компонентов Проверьте наличие сломанных деталей поврежденных переключателей а также прочих условий способных повлиять на его работу u Не используйте устройство если какой либо его компонент поврежден или...

Page 8: ...кронштейна 3 Зажимная рукоятка ножек стола 4 Стопорный штифт ножек стола 5 Монтажные кронштейны 6 Ручка для переноски 7 Боковые выдвижные опоры 8 Фиксирующие винты боковых выдвижных опор Использование Подготовка рабочего стола Рис A u Положите рабочий стол верхней поверхностью на пол сложенными ножками вверх u Надавите на зажимную рукоятку 3 чтобы втянуть стопорный штифт 4 и поворачивайте ножку по...

Page 9: ... 5a u Слегка наклоните узел к себе поднимите переднюю часть узла чтобы отсоединить его от передней перекладины рабочего стола см Рисунок F Проверка совместимости рабочего стола С пилой установленной на рабочем столе u Проверьте установку и работоспособность Не должно быть никаких помех для торцовочной пилы в процессе распила со скосом наклоном и комбинированного распила u Опора для заготовки может...

Page 10: ...ходном сырье Пожалуйста утилизируйте электрические изделия и аккумуляторные батареи в соответствии с местными нормами Дополнительная информация доступна по адресу www 2helpU com Гарантия Компания Black Decker с уверенностью в качестве своей продукции предлагает клиентам гарантию на 24 месяцев с момента покупки Данная гарантия является дополнительной и ни в коей мере не направлена на ущемление Ваши...

Page 11: ...ия ТОВАР СЕРТИФИЦИРОВАН Орган по сертификации РОСТЕСТ Москва Адрес 119049 г Москва улица Житная д 14 стр 1 117418 Москва Нахимовский просп 31 фактический Телефон 499 1292311 495 6682893 Факс 495 6682893 E mail office rostest ru Изготовитель Изготовитель Блэк энд Деккер Холдингс ГмбХ Германия 65510 Идштайн ул Блэк энд Деккер 40 тел 496126212790 Хранение Необходимо хранить в сухом месте вдали от ист...

Page 12: ...12 перевод с оригинала инструкции PУССКИЙ ...

Page 13: ...13 перевод с оригинала инструкции PУССКИЙ ...

Page 14: ...талей Перевірте на наявність зламаних деталей пошкоджених перемикачів та інших умов що можуть вплинути на роботу u Не використовуйте пристрій якщо виявлено пошкодження або дефекти якоїсь деталі u Пошкоджені або дефектні деталі необхідно відремонтувати або замінити звернувшись до авторизованого центру з ремонту u Ніколи не намагайтеся знімати або замінювати деталі за винятком тих що вказані в цьому...

Page 15: ...тифти знаходяться в потрібному положенні Збірка опорних кронштейнів рис В і С Опорні кронштейни допомагають збалансовувати заготовку під час різання Збірка опорних кронштейнів u Закрутіть стопорні гвинти 8 в отвори для стопорних гвинтів з обох кінців стійки як показано на рис В u Вставте опорні кронштейни 1 у квадратні отвори з обох кінців стійки рис С u Встановіть і затягніть гвинти регулювання 2...

Page 16: ...вки торцювальної пилки Використання бокових розширювачів рис H і I u Використовуйте бокові розширювачі для підтримки більш довгих дерев яних деталей Висування рейок u Відпустіть стопорний гвинт 8 u Витягніть бокові розширювачі у необхідне положення u Затягніть стопорні гвинти бокових розширювачів u Подальше висування бокового розширювача з положення попередження не допускається Регулювання висоти ...

Page 17: ...ти покупки Ця гарантія доповнює і жодним чином не обмежує ваші законні права Ця гарантія є чинною на території країн членів Європейського Союзу та в європейській зоні вільної торгівлі Позив за гарантією повинен відповідати умовам компанії Black Decker при цьому вам необхідно буде надати доказ покупки продавцю або спеціалісту офіційного сервісного центру Про умови дворічної гарантії компанії Black ...

Page 18: ...18 переклад з оригінальної інструкції УКРАЇНСЬКА ...

Page 19: ...19 переклад з оригінальної інструкції УКРАЇНСЬКА ...

Page 20: ...XXXXXXXX RUS UA 02 2020 ...

Reviews: