background image

4

Grounded Indoor Digital Outlet Timer 

FUNCTIONS

1. The Mini Digital Timer (hereinafter referred to as “timer”) can preset specific on/off time for   

    your home electrical appliances [i.e. lamps, fans, etc.]. It can help promote energy   

    savings and home security.

2. Its large LCD shows program setting status and real time.

3. It has a maximum of 140 on/off programs per week to provide programming flexibility.

DIAGRAM & DESCRIPTIONS

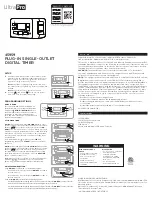
See Image 1 for general overview of the mini digital timer.

No.

Button 

description

Functions

1

LCD Display

Shows time and program setting.

2

Week

  In program setting mode, press to set week pattern

  In real time setting, press CLOCK + WEEK to set date of week

3

RST/RCL

Cancel or resume the power ON/OFF set time under Program 
setting

4

R

Press and hold to reset all the programs permanently

5

CLOCK

Return to real time display when in program setting
Press CLOCK + WEEK/HOUR/WEEK, to set real time

6

ON/OFF

Change the setting mode to ON, AUTO or OFF.
When you press the button each time, the horizontal line in the LCD 
moves to ON

←→

AUTO

←→

OFF which were silk printed on to the 

Timer

7

PROGRAM

Press to enter program setting

8

HOUR

  In program setting mode, press to set hour

  In real time setting, press CLOCK + HOUR to set hour

9

MINUTE

  In program setting mode, press to set minute

  In real time setting, press CLOCK + MINUTE to set minute

TIME DISPLAY

There are two different kinds of time displays:

1. 12-hour display: the digital number is from 11:59 to 12:00 with AM or PM shown on the 

LCD

    WARNING

1. This timer uses a rechargeable battery. To power back on, press the reset button when    

    the timer is plugged into outlet.

2. Risk of electric shock:

   -Keep away from children

   -Clean only with a dry cloth. Do not immerse in any liquids.

   -Ensure that the plug for the powered device is fully inserted into the timer

   -Do not use in wet locations, the timer is for indoor use only

3. Risk of fire:

   -Do not use to control appliances that contain heating elements (cooking appliances,   

    fan, irons, etc.)

   -Do not exceed electrical rating

4. Specifications

   •125V~ 50-60Hz, 15A for Resistive

   •125V~ 50-60Hz, 10A for Tungsten

    Any changes or modifications to this unit not expressly approved by the party responsible       

    for compliance could void the user’s authority to operate the equipment.

    Use of an extension cord with this product is not recommended.

Summary of Contents for BDXPA0023

Page 1: ...rchase go to http www blackanddeckerelectrical com If you can t find the answer or do not have access to the Internet call 1 844 746 6688 from 9 a m to 5 p m EST Mon Fri to speak with an agent Please have the catalog number available when you call INSTRUCTION MANUAL CATALOG NUMBERS Grounded Indoor Digital Outlet Timer BDXPA0023 S SAVE THI MANUAL FOR FUTURE REFERENCE ...

Page 2: ...2 ENGLISH English original instructions 3 Español traducido de las instrucciones originales 9 ...

Page 3: ...potentially hazardous situation which if not avoided may result in minor or moderate injury Used without word Indicates a safety related message NOTICE Indicates a practice not related to personal injury which if not avoided may result in property damage WARNING PLEASE READ THIS INSTRUCTION MANUAL THOROUGHLY AND COMPLETELY BEFORE INSTALLATION USE FAILURE TO DO SO COULD CAUSE DAMAGE TO PROPERTY SER...

Page 4: ...ere silk printed on to the Timer 7 PROGRAM Press to enter program setting 8 HOUR In program setting mode press to set hour In real time setting press CLOCK HOUR to set hour 9 MINUTE In program setting mode press to set minute In real time setting press CLOCK MINUTE to set minute TIME DISPLAY There are two different kinds of time displays 1 12 hour display the digital number is from 11 59 to 12 00 ...

Page 5: ...FR SA SU 3 2 MO WE FR 3 3 TU TH SA 3 4 SA SU 3 5 MO TU WE TH FR SA TH FR SA MO TU WE TH FR and MO TU WE TH FR SA MO TU WE TH FR SA SU 2 24 hour display the digital number is from 00 00 to 23 59 no AM or PM is shown on the LCD 3 To change from 12 hour to 24 hour display or vice versa press CLOCK button and hold it till LCD shows 12H or 24H Then press HOUR to set the desired display mode Press CLOCK...

Page 6: ...the equipment off and on The user is encouraged to try to correct the interference by one or more of the following measures Reorient or relocate the receiving antenna Increase the separation between the equipment and the receiver Connect the equipment into an outlet on a circuit different from that to which the receiver is connected Consult the dealer or an experienced radio TV technician for help...

Page 7: ...e plug connected to the timer if it will not fit the outlet have a proper outlet installed by a qualified electrician FOR GROUNDED CORD CONNECTED TIMER RATED LESS THAN 15A AND INTENDED FOR USE ON A NOMINAL 125V SUPPLY CIRCUIT The timer is for use on a nominal 125V circuit and should be connected to a grounding outlet that looks like that illustrated in sketch a A temporary adaptor which looks like...

Page 8: ...ries are not covered by this warranty Repair service adjustment and calibration due to misuse abuse or negligence are not covered by this warranty Unautho rized service or modification to this product or of any furnished components will void this warranty in its entirety This warranty does not include reimbursement for inconvenience installation set up time loss of use postage unauthorized service...

Page 9: ...CUALQUIER RAZÓN CONSERVE ESTE MANUAL PARA REFERENCIA FUTURA Si tiene alguna pregunta o problema con su compra de BLACK DECKER diríjase a http www blackanddeckerelectrical com Si no puede encontrar la respuesta o no tiene acceso a internet llame al 1 844 746 6688 de 9 a m a 5 p m EST de lunes a viernes para hablar con un agente Tenga a mano el número de catálogo cuando llame ...

Page 10: ...10 3 9 Español traducido de las instrucciones originales English original instructions ESPAÑOL ...

Page 11: ...o se evita resultará en la muerte o en una lesión grave ADVERTENCIA Indica una situación peligrosa potencial que si no se evita podría resultar en la muerte o en una lesión grave PRECAUCIÓN Indica una situación peligrosa potencial que si no se evita es posible que resulte una lesión menor o moderada Utilizado sin palabra Indica un mensaje relacionado con la seguridad AVISO Indica una práctica no r...

Page 12: ...a LCD se mueve a ON encendido AUTO automático OFF apagado que están impresos en seda en el temporizador 7 PROGRAM programa Presione para ingresar a la configuración de PROGRAM programa 8 HOUR hora En el modo de configuración de programa presiónelo para establecer la hora En la configuración de tiempo real presione CLOCK reloj HOUR hora para establecer la hora 9 MINUTE minuto En el modo de configur...

Page 13: ... 3 3 TU MAR TH JUEV SA SAB 3 4 SA SAB SU DOM 3 5 MO LUN TU MAR WE MIER TH JUEV FR VIER SA SAB TH JUEV FR VIER SA SAB MO LUN TU MAR WE MIER TH JUEV FR VIER y MO LUN TU MAR WE MIER TH JUEV FR VIER SA SAB MO LUN TU MAR WE MIER TH JUEV FR VIER SA SAB SU DOM 2 Pantalla de 24 horas el número digital es de 00 00 a 23 59 h no se muestra a m ni p m en la LCD 3 Para cambiar de la pantalla de 12 horas a la d...

Page 14: ...a antena receptora Aumente la separación entre el equipo y el receptor Conecte el equipo a un tomacorriente en un circuito diferente del circuito en el que está conectado el receptor Consulte al distribuidor o a un técnico experto en radio o televisión para obtener ayuda paso n º 2 hasta el paso n º 7 consulte el cuadro DIAGRAMA Y DESCRIPCIONES en la página 4 e ingrese los nuevos datos para reempl...

Page 15: ...MENOS DE 15 A Y QUE ESTÁ DESTINADO AL USO EN UN CIRCUITO DE ALIMENTACIÓN NOMINAL DE 125 V El temporizador es para el uso en un circuito de voltaje nominal de 125 v y debe conectarse a un tomacorriente de conexión a tierra que luce como la imagen ilustrada a Se puede utilizar un adaptador temporal que luce como el adaptador que se muestra en la imagen ilustrada b para conectar dicho enchufe a un re...

Page 16: ...de reparación ajuste y calibración debido al mal uso al abuso o a la negligencia La reparación o modificación no autorizada de este producto o de cualquier componente suministrado dejará completamente sin efecto esta garantía Esta garantía no incluye reembolso por inconvenientes instalación tiempo de armado pérdida de uso envío reparación no autorizada u otros productos utilizados junto con los pr...

Reviews: