Black & Decker BDL310S Instruction Manual Download Page 3

3

Installing the Battery

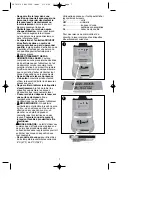
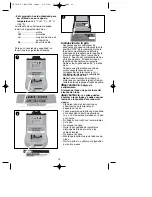
Ensure laser on/off switch is in the left
“OFF” position. Remove the battery
compartment cover by pressing the tab of
the cover in towards the center of the laser
and out as shown in

figure 4

.  A rubber

plug is located inside the compartment.
The plug is used to protect the laser from
transportation damage.
Remove the plug by rotating it 90° and
pulling it straight out. 
Connect a fresh 9 volt alkaline battery
making sure to match (+) and (-) terminals
correctly. Replace the battery
compartment cover. 

Note:

When transporting the laser or storing

it for extended periods of time, remove the
battery and replace the rubber plug.

WARNING: Choking hazard. Store

rubber plug out of the reach of
children.

WARNING: Batteries can explode, or

leak, and can cause injury or fire.

To

reduce this risk:

• Carefully follow all instructions and warnings

on the battery label and package. 

• Always insert battery correctly with regard

to polarity (+ and -), marked on 

the battery and the equipment.

•  Do not short battery terminals.
•  Do not charge batteries.
•  Remove dead battery immediately and

dispose of per local codes.

•  Do not dispose of batteries in fire.
• Keep batteries out of reach of children.
• Remove battery if the device will not be

used for several months.

3

Rubber Plug

Assembly / Set-up

Vertical Mounting

The wall / tabletop mounting bracket uses
push pins or a screw hole to secure it to a
vertical surface. 

CAUTION:

Pins are sharp and should

be handled with care

NOTE:

The pins

are only for use when hanging the bracket
on drywall, NOT other surfaces including
plaster. For surfaces other than drywall,
the key hole can be used with a standard
screw or nail in a predrilled hole.
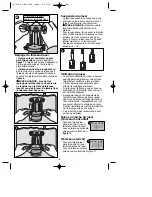
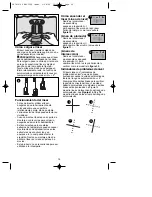
The pins stay retracted until you are ready
to mount the bracket. To release the pins,
twist the black knobs shown in 

figure 5

clockwise until they stop. 

Position the bracket on a vertical surface.
Hold the bracket as shown in 

figure 6,

keeping your fingers on the front, and
push in with even pressure on both knobs.
Make sure it is seated firmly and that the
unit is secure on the wall. 

IMPORTANT:  

When attaching or

removing the bracket, be sure to 

push in

or pull out with even pressure on both
push pins

4

Pins retracted
in this position

Pins released
in this position

Keyhole

5

6

Push in with even 
force on both pins.

 587012-00 BDL310S laser  5/26/04  10:28 AM  Page 3

Summary of Contents for BDL310S

Page 1: ...i i i in n n ng g g g L L L La a a as s s se e e er r r r OFF Catalog No BDL310S BEFORE RETURNING THIS PRODUCT FOR ANY REASON PLEASE CALL 1 800 54 HOW TO 544 6986 IF YOU SHOULD EXPERIENCE A PROBLEM WITH YOUR BLACK DECKER PRODUCT CALL 1 800 54 HOW TO 544 6986 BEFORE YOU CALL HAVE THE FOLLOWING INFORMATIONAVAILABLE CATALOG No TYPE No AND DATE CODE IN MOST CASES ABLACK DECKER REPRESENTATIVE CAN RESOL...

Page 2: ...and other untrained persons Lasers are dangerous in the hands of untrained users Use only accessories that are recommended by the manufacturer for your model Accessories that may be suitable for one laser may create a risk of injury when used on another laser Repairs and servicing MUST be performed by a qualified repair facility Repairs performed by unqualified personnel could result in serious in...

Page 3: ...iately and dispose of per local codes Do not dispose of batteries in fire Keep batteries out of reach of children Remove battery if the device will not be used for several months 3 Rubber Plug Assembly Set up Vertical Mounting The wall tabletop mounting bracket uses push pins or a screw hole to secure it to a vertical surface CAUTION Pins are sharp and should be handled with care NOTE The pins are...

Page 4: ...pensate for any minor error 5 Laser operation Before attempting to use the laser make sure the tool is positioned on a relatively smooth flat and stable surface Brightness of area may effect line visibility When attaching to a mounting bracket or using the hanging strap mount the laser securely Be aware that extreme temperature changes can cause movement or shifting of building structures equipmen...

Page 5: ...rees of vertical one of the laser lines will project on wall as a dashed line Dashed line is not turned on Be sure that the unit is as straight up and down as possible Laser lines are projected as a dashed lines The self leveling range of the unit is 5 degrees If the unit is not set within 5 degrees of vertical one of the laser lines will project on wall as a dashed line Be sure that the unit is a...

Page 6: ...ager of your nearest Black Decker Service Center This product is not intended for commercial use FREE WARNING LABEL REPLACEMENT If your warning labels become illegible or are missing call 1 800 544 6986 for a free replacement AVERTISSEMENT Lire comprendre et suivre toutes les directives précisées ci dessous afin d éviter les risques de choc électrique d incendie ou de blessure grave CONSERVER CES ...

Page 7: ...viter les blessures graves aux yeux Ne pas retirer ni abîmer les étiquettes d avertissement le fait de retirer les étiquettes augmentera les risques d exposition aux rayonnements laser S assurer de bien déposer le laser sur une surface de niveau afin de l empêcher de tomber et de s endommager ou de blesser l utilisateur MISE EN GARDE On doit faire particulièrement attention lorsqu on perce un trou...

Page 8: ... s en défaire conformément à la réglementation locale Ne pas jeter les piles au feu Conserver les piles hors de la portée des enfants Retirer les piles lorsque l appareil n est pas utilisé pendant plusieurs mois Montage et réglage Montage vertical Le dispositif de fixation au mur ou sur une table utilise des tiges rétractables ou un orifice pour le fixer à une surface verticale MISE EN GARDE les t...

Page 9: ... La fonction auto niveleuse compensera pour toute erreur mineure de 5 Utilisation du laser Avant toute utilisation du laser s assurer que l appareil est placé sur une surface relativement uniforme plate et stable L intensité lumineuse ambiante peut affecter la visibilité du faisceau Si le laser est rattaché à une surface ou suspendu par la bretelle s assurer qu il est arrimé solidement Se rappeler...

Page 10: ...neuve Un des faisceaux projeté sur le mur est continu mais pas droit La portée auto niveleuse de l appareil est de 5º Si l appareil n est pas réglé dans les 5º verticalement l un des faisceaux du laser sera projeté sur le mur en pointillé Le faisceau en pointillé n est pas en marche S assurer que l appareil reste de haut en bas aussi droit que possible Le faisceau est projeté en pointillé La porté...

Page 11: ...e deux ans pour usage résidentiel Black Decker U S Inc garantit ce produit pour une période de deux ans contre tout défaut de matériel ou de fabrication Le produit défectueux sera remplacé ou réparé sans frais suivant l une des deux méthodes suivantes La première méthode consiste en un échange seulement Retourner le produit au détaillant qui l a vendu pourvu qu il s agisse d un détaillant particip...

Page 12: ...E ER R R R E E E ES S S ST T T TE E E E P P P PR R R RO O O OD D D DU U U UC C C CT T T TO O O O P P P PO O O OR R R R C C C CU U U UA A A AL L L LQ Q Q QU U U UI I I IE E E ER R R R R R R RA A A AZ Z Z ZO O O ON N N N L L L LE E E E R R R RO O O OG G G GA A A AM M M MO O O OS S S S L L L LL L L LA A A AM M M ME E E E A A A AL L L L 5 5 5 55 5 5 5 5 5 5 53 3 3 32 2 2 26 6 6 6 7 7 7 71 1 1 10 0 0 0...

Page 13: ...os asegurándose de hacer corresponder las terminales y debidamente Reponga la cubierta del compartimiento de pilas Nota Cuando transporte el láser o lo almacene por períodos largos de tiempo retire la batería y reponga el tapón de goma ADVERTENCIA Peligro de asfixiamiento Almacene el tapón de goma fuera del alcance de niños ADVERTENCIA Las pilas pueden explotar o tener fugas y pueden causar lesion...

Page 14: ...ara tornillos PRECAUCIÓN Las chavetas son puntiagudas y deberían ser manejadas con cuidado NOTA Las chavetas sólo se deberán utilizar cuando monte el soporte en pared de muro seco y NO para paredes fabricadas con otros materiales incluyendo yeso Para otras superficies que no sean de muro seco se podrá utilizar el orificio para tornillos con forma de ojo de cerradura con un tornillo o clavo tradici...

Page 15: ...n Revise su montaje antes de utilizar el láser por si acaso este se ha movido Este producto no se recomienda para ser utilizado a la intemperie 15 Cómo encender el láser Línea de nivel Deslice el conmutador de encendido y apagado a la posición para operar el láser con un rayo láser horizontal simple como lo muestra la figura 10 Línea de plomada Deslice el conmutador de encendido y apagado a la pos...

Page 16: ...a unidad no está configurada dentro de 5 grados de la vertical una de las líneas del láser se proyectará sobre la pared como una línea punteada Asegúrese que la unidad esté lo más recta posible Encienda la segunda línea del láser para verificar su alineamiento Las líneas del láser ser proyectan pero una línea es sólida y la otra punteada El rango de autonivelación de la unidad es de 5 grados Si la...

Page 17: ...ros de Servicio autorizados y Centros de Servicio Black Decker se encuentran en las páginas amarillas bajo Herramientas eléctricas y en nuestro sitio web www blackanddecker com Esta garantía no aplica a los accesorios Esta garantía le da derechos legales específicos además de los cuales puede tener otros los cuales varían entre estados Si tuviese alguna pregunta contacte al gerente de su Centro de...

Page 18: ...18 587012 00 BDL310S laser 5 26 04 10 40 AM Page 18 ...

Reviews: