background image

Setup Guide for UA4104/UA4105 Sony printer

SG48878-1

7/10

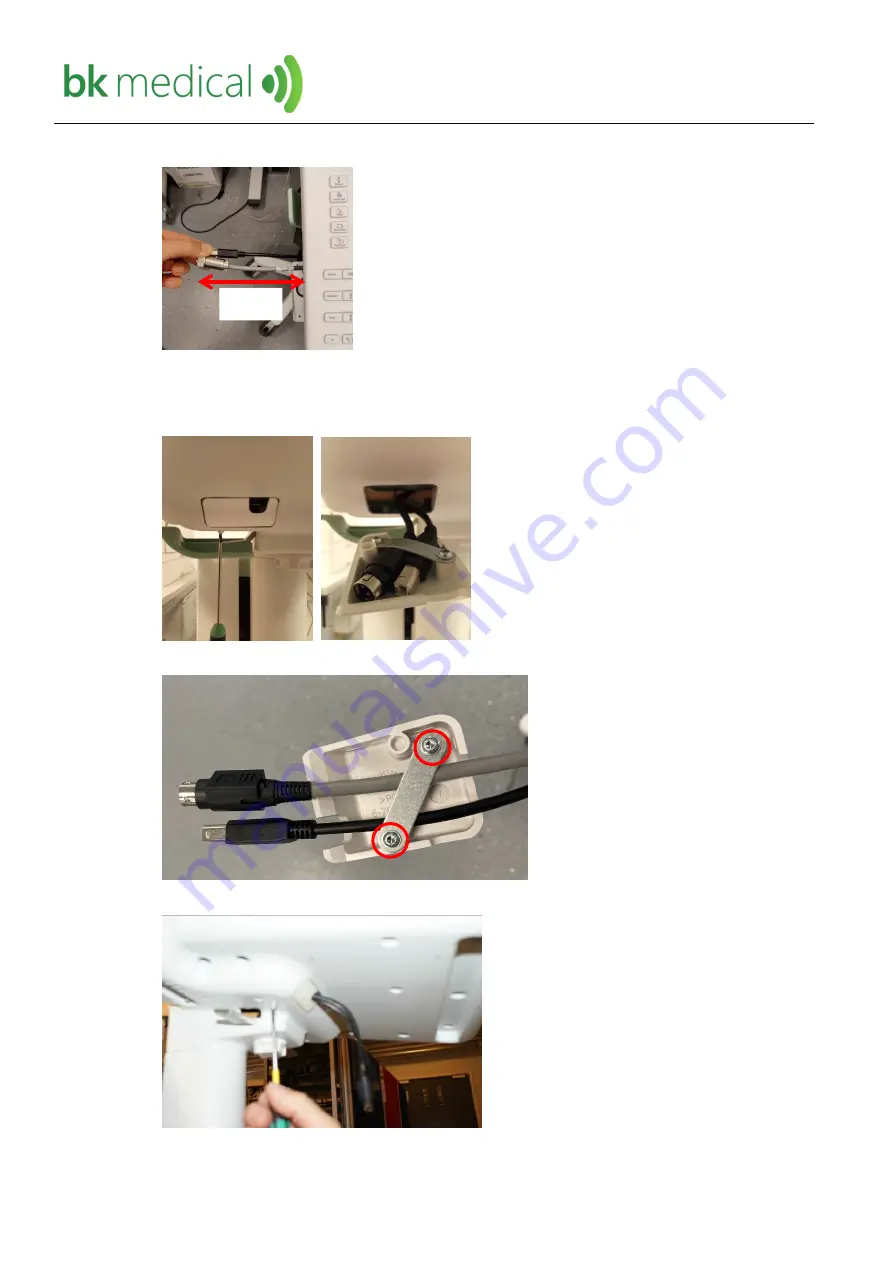
10. Cable connectors shall be possible to pull out 13 cm from keyboard side. 

11. Reassemble the scanner and put the enclosure back on. 

3.4. Instruction to connect printer 

1. Open the cover drawer below the keybaord. 


2. Loosen the two screws holding the cables in place. 

3. Push back the cover drawer and remount screw.

4. Mount the three screws with washer head. Leave some space for the printer holder. 

13 cm

Summary of Contents for UA4104

Page 1: ...cation 4 3 3 Retrofit 5 3 4 Instruction to connect printer 7 3 5 Enable Printing in the Console 9 1 Introduction This document is a setup guide for integrated printers on bk3000 bk5000 with Prism Soft...

Page 2: ...id Note Remember to support the cover while removing the screw Scanner Overview Procedure 2 Cut off the zip tie 3 Gently pull out the USB cable and the power cable CAUTION Do not pull too hard making...

Page 3: ...cables to the printer and gently slide the printer into the holder 7 The printer is fastened from below with four screws to the printer holder 2 3 Enable Printing in the Console 1 Go to Settings 2 Se...

Page 4: ...hanger 8 screws a haxalobular key and printer paper 3 2 Cable identification The printer is connected with two cables A 12V power cable and a USB cable for communication To see what type is installed...

Page 5: ...Retrofit 1 Remove the handles and keyboard overlay 2 Disconnect the flat cables 3 Open the cover drawer below the keybaord 4 Remove the two screws holding the cables in place 5 Remove the left cover...

Page 6: ...p Guide for UA4104 UA4105 Sony printer SG48878 1 6 10 6 Remove the bracket on the engine 7 Remove the goose neck 8 Disconnect the 12V connector on the engine 9 Route the new power cable like the old c...

Page 7: ...side 11 Reassemble the scanner and put the enclosure back on 3 4 Instruction to connect printer 1 Open the cover drawer below the keybaord 2 Loosen the two screws holding the cables in place 3 Push b...

Page 8: ...0 CAUTION If the screws are fastened too much it is not possible to slide on the printer holder 5 Slide the printer holder onto the screws with the washer head 6 Fasten the printer holder using the en...

Page 9: ...to be programmed to use the printer This is a user setting for each user meaning this should be set for all users 1 Login as the Default Sys Admin 2 Select Settings 3 Select Security 4 Select User Man...

Page 10: ...4104 UA4105 Sony printer SG48878 1 10 10 10 Find Print on the list 11 Click on the drop down list 12 Select Print 13 A dialog appears Select the printer Sony UP D898MD X898MD 14 Select OK 15 Test the...

Reviews: