BITEL FLEX 5100 User Manual Download Page 13


IC5100 Manual 

13/60 

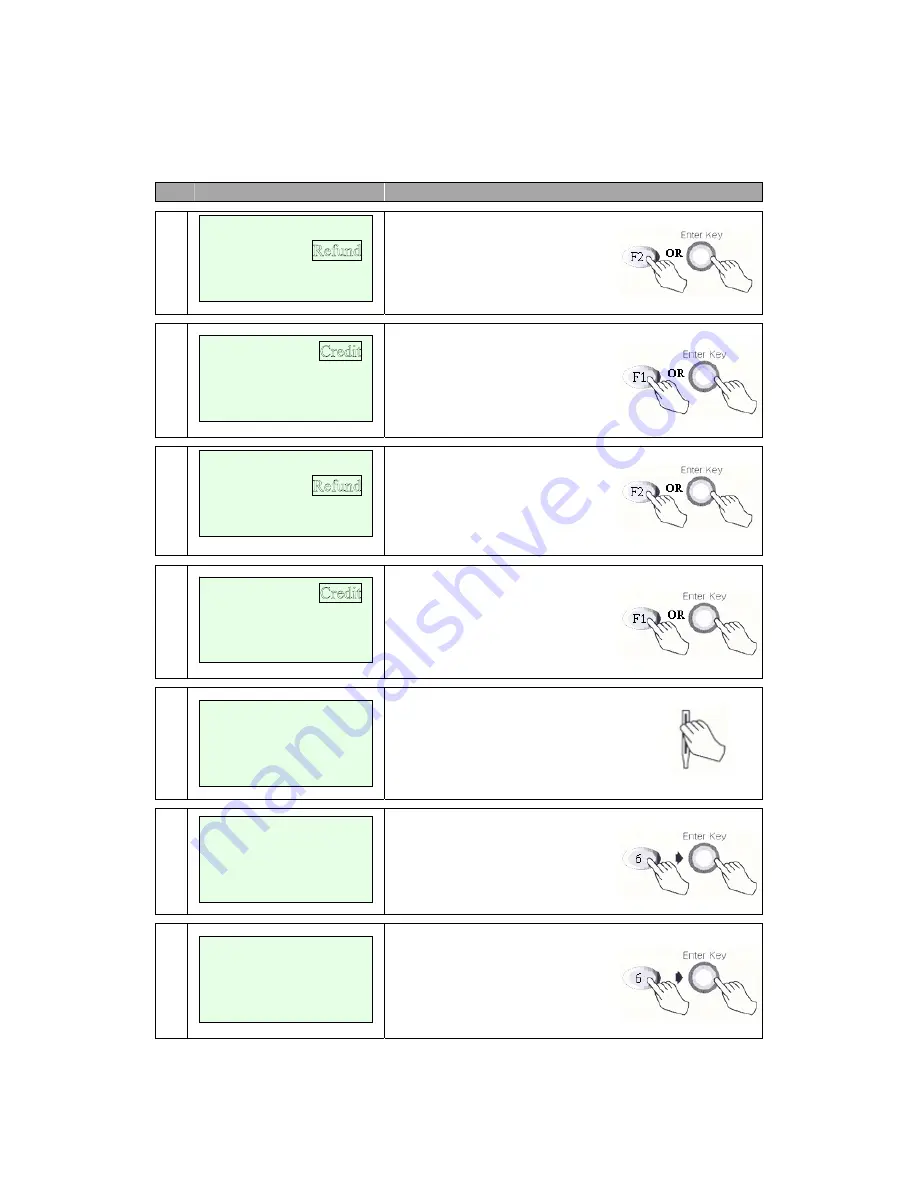
Refund Credit Card MENU 

Terminal Screen 

Descriptions for Key Operation and Summary 


Press F2 or Enter key to begin 
Refund transaction. 


Press F1 for Credit Refund or  
Press Enter key.   


Press F2 or Enter key to begin 
Refund transaction. 


Press F1 for Credit Refund or  
Press Enter key.   


Swipe Card or Input Account Number. 


Manual Entry:  Enter expiration  
date and press enter. 


Amount is enter.   
Press Enter key. 


Debit 

EBT   

<-    ->


Sale


Void   

<-    ->     Off-line Sale 

Swipe Card 

Or 

Key Account Number 

Enter  
Expiration Date 

[ MM/YY]  

/


Enter Amount  


                         $00.00 

Sale


Void   

<-    ->      Ticket Only 

Debit 


<-    ->


Summary of Contents for FLEX 5100

Page 1: ...IC5100 Manual 1 60 MODEL IC5100 User s Manual Bitel Co Ltd...

Page 2: ...etup 15 IC5100 EMV approval New Transaction 16 IC5100 EMV approval Credit Sale 17 IC5100 EMV approval Balance Inquiry 18 IC5100 EMV approval Cash Advance 19 IC5100 EMV approval Refund 20 IC5100 EMV ap...

Page 3: ...IC5100 Manual 3 60 User s Warning Bitel co Ltd...

Page 4: ...ox Receipt Out Magnetic card opening Display screen device Paper forward key IC card opening Serial port Power plug Battery charge LED Battery charge LED Power plug Serial port USB port Magnetic card...

Page 5: ...ll menu 1 line New Transaction MENU Terminal Screen Descriptions for Key Operation and Summary 1 Press any key 0 9 to Activate Main Menu Press Enter Key to select New transaction function 2 New Transa...

Page 6: ...saction B 2 Press F1 for Credit Sale or Press Enter key 3 Swipe Card or Input Account Number 4a Manual Entry Enter expiration Date and press enter 4b Display only when CVV2 pro cessing option is ON Pr...

Page 7: ...Enter Amount Press Enter key 7 Enter Tip Amount Press Enter key 8 Enter Server ID Press Enter key 9 No key operation 10 Line Connected No key operation Enter Last 4 Num From Account Number LINE CONNE...

Page 8: ...IC5100 Manual 8 60 11 Data Sending No key operation 12 Data Receiving No key operation 13 Display and Print Out Sales and Authorization Code APPROVAL 123456 DATA SENDING DATA RECEIVING...

Page 9: ...n press the Enter key B 1 Press F1 or Enter key to begin Sale transaction B 2 Press F2 for Debit Sale or Press scroll key to highlight Debit Function then press the Enter key 3 Swipe Card 4 Enter Amou...

Page 10: ...Pad is used 8 Line Connected No key operation 9 Data Sending No key operation 10 Data Receiving No key operation 11 Display and Print Out Sales and Authorization Code LINE CONNECTED DATA SENDING DATA...

Page 11: ...scroll key to highlight Check function then press the Enter key 3 Press F1 for paper check or press Enter key 4 Micr Number may be required for entry such as Drivers License Number Check Number 5 Ent...

Page 12: ...IC5100 Manual 12 60 8 Data Sending No key operation 9 Data Receiving No key operation 10 Display and Print Out Sales and Authorization Code DATA SENDING DATA RECEIVING APPROVAL 123456...

Page 13: ...or Press Enter key B 1 Press F2 or Enter key to begin Refund transaction B 2 Press F1 for Credit Refund or Press Enter key 3 Swipe Card or Input Account Number 4 Manual Entry Enter expiration date and...

Page 14: ...IC5100 Manual 14 60 6 Display and Print Out Sales and Authorization Code APPROVAL 123456...

Page 15: ...or Press Enter key B 1 Press F2 or Enter key to begin Refund transaction B 2 Press F2 for Debit Refund or Press Enter key 3 Swipe Card 4 Amount is enter Press Enter key 5 Display on PINPad Display Wa...

Page 16: ...IC5100 Manual 16 60 6 Display and Print Out Sales and Authorization Code APPROVAL 123456...

Page 17: ...1 Press F3 or Enter key to begin Void transaction A 2 Enter Invoice Number B 2 Enter Item Number 3 Confirm the Transaction 4 Select Yes Void or No Return Main Menu Sale Refund Off line Sale Sale Refu...

Page 18: ...r Credit Force Sale or Press Enter key 3 Swipe Card or Input Account Number 4a Manual Entry Enter expiration date and press enter 4b Display only when CVV2 pro cessing option is ON Press F1 F3 F4 and...

Page 19: ...r 4 digits and press Enter key 6 Amount is enter Press Enter key 7 Enter Approval Code 8 Display and Print Out Sales and Authorization Code Enter Last 4 digits from Account Number Enter Approval Code...

Page 20: ...er key B 1 Press F1 or Enter key to begin Auth Only transaction B 2 Press F1 for Auth Only or Press Enter key 3 Swipe Card or Key Account Number 4 Manual Entry Enter expiration date and press enter 5...

Page 21: ...ation 7 Line Connected No key operation 8 Data Sending No key operation 9 Data Receiving No key operation 10 Display and Print Out Sales and Authorization Code PROCESSING NOW LINE CONNECTED DATA SENDI...

Page 22: ...and press enter 4b Display only when CVV2 pro cessing option is ON Press F1 F3 F4 and move to Step 6 Press F2 and move to step 4c 4c Skip to step 6 after CVV2 is entered 5 Note some hosts may only req...

Page 23: ...er key 7 No key operation 8 Line Connected No key operation 9 Data Sending No key operation 10 Data Receiving No key operation 11 Display and Print Out Sales and Authorization Code Enter Zip Code xxxx...

Page 24: ...begin Sale transaction 2 Press F2 for Mail Phone Order 3a Select Food Sale or Food Return Use Scroll Key 3b Select Cash Sale or Cash Only Use Scroll Key 4 Swipe Card or Key Account Number 5 Amount is...

Page 25: ...IN Pad is used 7 Line Connected No key operation 8 Data Sending No key operation 9 Data Receiving No key operation 10 Display and Print Out Sales and Authorization Code Amount 00 00 Waiting for PIN LI...

Page 26: ...Enter key to begin Sale transaction 2 Press F2 for Mail Phone Order 3 Select Food VCHR Sale or Food VCHR Return 4 Swipe Card or Key Account Number 5 Amount is enter Press Enter key 6 Enter Voucher Nu...

Page 27: ...IC5100 Manual 27 60 7 Enter Approval Code 8 Display and Print Out Sales and Authorization Code Enter Approval Code xxxxxx APPROVAL 123456...

Page 28: ...Sale transaction 2 Press F2 for Mail Phone Order 3a Use Scroll Key 3b Select Cash Sale or Cash Only Use Scroll Key 4 Swipe Card or Key Account Number 5 Display on Terminal when External PIN Pad is us...

Page 29: ...60 6 Line Connected No key operation 7 Data Sending No key operation 8 Data Receiving No key operation 9 Display and Print Out Sales and Authorization Code LINE CONNECTED DATA SENDING DATA RECEIVING...

Page 30: ...s F4 key to Reprint Receipt step 5 B 2 Press F1 key to print batch summary report step 5 Press F2 key to print Batch Detail report step 5 Press F3 key to print Server step 3 3 Press F1 key to print se...

Page 31: ...ss F3 key to Tip Adjust Press F4 key to Reprint Receipt 2b Press F1 key to AutoSettle Batch Press F2 key to Batch History 3 Yes F5 key to step 4 No F7 key to Main Menu 4 No key operation 5 Line Connec...

Page 32: ...IC5100 Manual 32 60 7 Data Receiving No key operation 8 Display and Print Out Sales and Batch Code DATA RECEIVING BATCH 00001 OK...

Page 33: ...ons 2 Press F1 key to Close Batch Press F2 key to Deposit Inquiry 3 No key operation 4 Line Connected No key operation 5 Data Sending No key operation 6 Data Receiving No key operation 7 Display and P...

Page 34: ...8 9 10 Available 3a Select 1 This Screen Input Client Number 3b Input Merchant Number 3c Select Industry Type Use Scroll Key 3d Input Restrant Terminal Number 4 Select 2 This Screen Input Telephone Nu...

Page 35: ...een Init Memory Select Yes or No Use Scroll Key 8 Select 6 This Screen Footer Line 1 4 Input the Character 9 Select 7 This Screen Training Mode Select Yes or No Use Scroll Key 10 Select 8 This Screen...

Page 36: ...Contrast 12 Select 10 This Screen Input Old Manager Password 12 a Input New Manager Password 12 b Input New Manager Password SPECIAL FUNC LCD CONTRAST 25 ADMIN Old Manager Password xxxx ADMIN New Mana...

Page 37: ...r 1 2 3 4 5 6 7 8 9 10 Available 3a Select 1 This Screen Input Merchant Number 3b Input Device ID 3c Select Industry Type Use Scroll Key 3d Input Terminal ID 4a Select 2 This Screen PABX Use Select Ye...

Page 38: ...ct 1 Add Server ID Select 2 Del Server ID Select 3 Server ID Use 7 Select 5 This Screen Init Memory Select Yes or No Use Scroll Key 8 Select 6 This Screen Footer Line 1 4 Input the Character ADMIN Ent...

Page 39: ...Screen Control LCD Contrast Use Scroll Key 12 Select 10 This Screen Input Old Manager Password 12 a Input New Manager Password 12 b Input New Manager Password ADMIN 200305010103148 YYYYMMDDhhmmss 20 A...

Page 40: ...2 F6 step3 F7 step4 F1 F2 F3 F4 key select Menu 2 Transaction Menu Credit Balance Cash Refund Void 3 Settlement Menu View Print and Logon Function 4 Setup and Test Menu Terminal Setup and Basic Test 2...

Page 41: ...ter key 3a Swipe card step 4 or Key Input step 3b 3b Input card number 3c Input expiration date 4 Input Amount 5 Dialing and Data Transfer Transaction is successful And print out the receipt 2 Balance...

Page 42: ...er key 3a Swipe card step 4 or Key Input step 3b 3b Input card number 3c Input expiration date 4 Input Amount 5 Dialing and Data Transfer Transaction is successful And print out the receipt 1 Credit S...

Page 43: ...r key 3a Swipe card step 4 or Key Input step 3b 3b Input card number 3c Input expiration date 4 Input Amount 5 Dialing and Data Transfer Transaction is successful And print out the receipt 1 Credit Sa...

Page 44: ...e F4 Enter key 3 Enter Pin Teaching mode 0000 4 Select Refund Menu F1 Enter key 5a Swipe card step 6 or Key Input step 5b 5b Input card number 5c Input expiration date 1 Credit Sale 2 Balance Inq 3 Ca...

Page 45: ...IC5100 Manual 45 60 6 Input Amount 7 Dialing and Data Transfer Transaction is successful And print out the receipt INPUT AMOUNT 0 00 Push Enter Key Refund APPROVED...

Page 46: ...Enter Transaction Menu 2 Select Next page F4 Enter key 3 Enter Pin Teaching mode 0000 4 Select Void Menu F2 Enter key 5 Input Retrieval Number 1 Credit Sale 2 Balance Inq 3 Cash Advance PLEASE ENTER...

Page 47: ...nd Summary 1 Press F6 key Enter Settlement Menu 2 Enter Pin Teaching mode 0000 3 Select Settlement Menu F1 Enter key 4 Dialing and Data Transfer Settlement is successful Oct 14 03 10 55 SWIPE YOUR CAR...

Page 48: ...r Settlement Menu 2 Enter Pin Teaching mode 0000 3 Select View Transaction Menu F2 Enter key 4 1 Line Card Number 2 Line Trade Information 3 Line Date and Time 4 Line Amount Oct 14 03 10 55 SWIPE YOUR...

Page 49: ...criptions for Key Operation and Summary 1 Press F6 key Enter Settlement Menu 2 Enter Pin Teaching mode 0000 3 Select Print Totals Menu F3 Enter key Print out Totals Oct 14 03 10 55 SWIPE YOUR CARD 1 S...

Page 50: ...Operation and Summary 1 Press F6 key Enter Settlement Menu 2 Enter Pin Teaching mode 0000 3 Select Logon Terminal Menu F4 Enter key 4 Logon Terminal Successful Oct 14 03 10 55 SWIPE YOUR CARD 1 Settl...

Page 51: ...r key 4 Select Setup Modem step 5a Select Download FILE step 6a Select Set Date Time step 7a Select Setup Others step 8a 5a NO step 5b YES step 5a1 5a 1 Input PABX ACCESS code 5b Input Telephone Numbe...

Page 52: ...Screen 7a Set Date Time 8a Beep Sount On Off System Font On Off Force Online On Off Teaching Mode Yes or No Modem Speed 3 2400 BPS Com Mode 3 Sync Standard 3 BELL Dialing Mode 3 Blind Mode DownLoading...

Page 53: ...on and Summary 1 Press F7 key Enter Terminal Setup Menu 2 Enter Pin Teaching mode 0000 3 Select Contrast Setting F2 Enter key 3 Adjust LCD Contrast F2 bright F3 Dark Oct 14 03 10 55 SWIPE YOUR CARD 1...

Page 54: ...1 Press F7 key Enter Terminal Setup Menu 2 Enter Pin Teaching mode 0000 3 Select Change PIN F3 Enter key 4 Enter New Pin 5 CONFIRM New Pin Oct 14 03 10 55 SWIPE YOUR CARD 1 Terminal Setup 2 Contrast...

Page 55: ...r key 4 ICC Card Test step 5a MSR Card Test step 6a Modem Test step 7a Print Test step 8a 5a IC Card Searching Screen 6a MSR TEST SWIPE CARD 6b View Card Number MSR test successful Oct 14 03 10 55 SWI...

Page 56: ...7c YES step 7b1 7b 1 Input PABX ACCESS code 7c Input Telephone Number 7d Select Modem Speed 7e Select Com Mode 7f Select Standard Select Func 3 Communication PABX ACCESS 3 YES PABX ACCESS Code 9_ TEL...

Page 57: ...IC5100 Manual 57 60 7g Select Dialing Mode 8a Paper Check or Print Out Dialing Mode 3 Blind Mode Printer Test 3 Printing...

Page 58: ...IC5100 Manual 58 60 Key ICON component of IC5100 Bitel co Ltd Keypad 0 9 Scroll up Scroll down Enter key Power key or Settlement key Cancel key Clear key...

Page 59: ...IC5100 Manual 59 60 SAM SIM RUIM SOCKET Bitel co Ltd SAM 1 SAM 2 SIM RUIM 2 SIM RUIM 1...

Page 60: ...error Open the printer cover and Confirm printer device Request A S Paper keep in dry place When Printer pa per hanging on Printer device Bad paper use Paper Insert error Terminal error Use Up key And...

Page 61: ...which case the user will be required to correct the interference at his own expense FCC WARNING This equipment may generate or use radio frequency energy Changes or modifications to this equipment ma...

Page 62: ...Bitel Co Ltd distributors of the IC5100 please refer to the Bitel Co Ltd Website http www bitel co kr These distributor s represent local contacts for this product CORPORATE HEADQUARTERS Bitel Co Ltd...

Page 63: ...Seoul SouthKorea declare under our sole responsibility that the product s INDUSTRIAL PDA POS IC5100 to which this declaration relate s is in conformance with the following standards EN 301 489 1 V1 8...

Reviews: