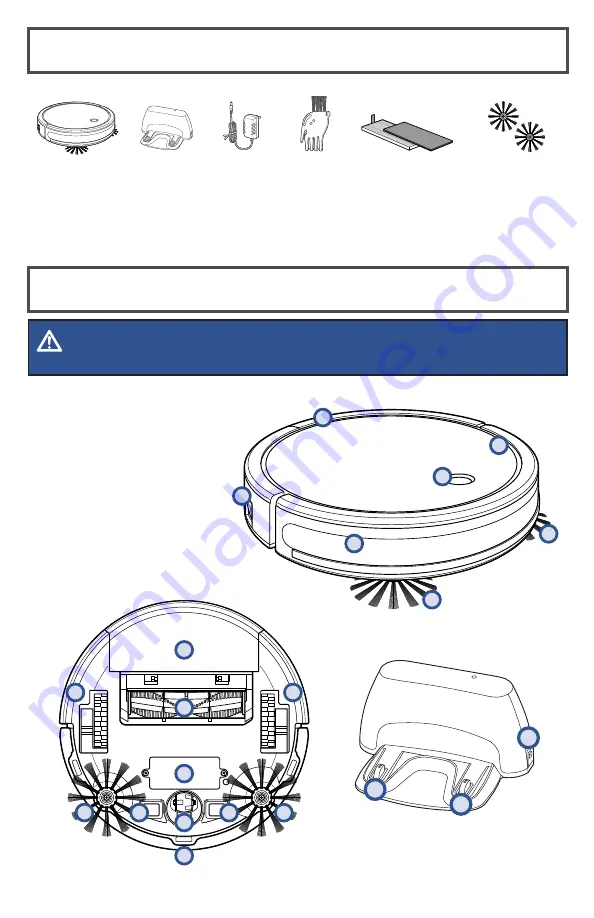
background image

2

BISSELL.eu

What’s in the Box?

Additional 

Pleated and 

Foam Filters

Additional 

Edge Cleaning 

Brushes

BISSELL®  

CleanView® 

Connect

Docking 

Station

Power 

Adapter

(charger)

Cleaning 

Tool

Product View

WARNING

Do not plug in your robot until you are familiar with all instructions and operating procedures.

3

3

12

1.  Power Switch

2.  Start/Pause Button

3.  Contact Points 

(for automatic charging)

4.  Cliff Sensors

5.  Bumper

6.  Edge Cleaning Brushes

7.  Front Wheel

8.  Rear Wheels

9.  Dirt Bin Release Button

10.  Dirt Bin (filters inside)

11.  Brush Roll

12.  DC Port

13.  Removable Battery

14.  LED Light Ring

2

5

6

6

1

9

14

7

3

3

4

4

4

8

8

10

11

13

Summary of Contents for 2908N

Page 1: ...H O M ECLEANINGEXPE R T S EST 1876 U S A CLEANVIEW CONNECT ROBOTIC VACUUM MODEL 2908N Product View 2 Setup 3 4 Operations 4 5 Maintenance Care 5 8 Troubleshooting 8 2 ...

Page 2: ... plug in your robot until you are familiar with all instructions and operating procedures 3 3 12 1 Power Switch 2 Start Pause Button 3 Contact Points for automatic charging 4 Cliff Sensors 5 Bumper 6 Edge Cleaning Brushes 7 Front Wheel 8 Rear Wheels 9 Dirt Bin Release Button 10 Dirt Bin filters inside 11 Brush Roll 12 DC Port 13 Removable Battery 14 LED Light Ring 2 5 6 6 1 9 14 7 3 3 4 4 4 8 8 10...

Page 3: ...download From the app select Add Product Then choose your product from the menu Note Be sure the device is near your WiFi router and the robot is fully charged or in the dock during the pairing process Once downloaded open the app and sign in or create a new login Make sure you re near your WiFi router before turning the robot ON I Downloading the BISSELL Connect App means you can change your robo...

Page 4: ...tart cleaning When finished press the Start Pause Button again to stop the robot You can designate a day and time for your robot to run automatically using the BISSELL Connect App Once the robot is connected to the app go to the Schedule tab and follow the on screen prompts Connecting to the App cont 6 7 The QR code needed for setup can be found by removing the Dirt Bin and turning the robot over ...

Page 5: ...ved rinse the Dirt Bin with tap water Ensure Dirt Bin is completely dry before reinstalling It is not necessary to wash every time Do not machine wash the Dirt Bin Once clean reinstall the filters and filter cover close and push back into the machine Remove the filter cover then the Foam and Pleated Filters Activating Low Power Mode Press and hold the Start Pause Button for 15 seconds until you he...

Page 6: ... Edge Cleaning Brushes can be rinsed or soaked in water Be sure they are completely dry before returning to the machine 3 1 4 2 Clean the Brush Roll with the Cleaning Tool Replace the Brush Roll and brush guard NOTE The Brush Roll has two different end pieces Ensure the square shaped end piece is inserted into the square shaped port Pinch the tabs on the brush guard inward and pull to remove Lift ...

Page 7: ...onnectors Remove the tape by unwrapping then separate the connectors Connect the new battery Wrap the tape to the original location to completely cover the connectors and terminals After repeated use debris can accumulate on the sensors of the robot and the robot s performance could be affected To ensure the best efficiency the sensors should be cleaned off periodically by brushing any debris from...

Page 8: ...om of the robot Front Caster Wheel Sensor is Blocked Flashing Red 3 Beeps Remove Front Caster Wheel assembly clear debris from assembly housing reinstall wheel Left or Right Wheel is Stuck Flashing Red Solid Red 1 Beep Turn robot OFF and remove hair and debris from wheels Edge Cleaning Brushes are Stuck Flashing Red Solid Red 2 Beeps Turn OFF the robot and remove hair and debris from Edge Cleaning...

Reviews: