background image

14

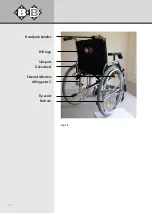
Fig. 1b

Hand push handles

B+B logo

Side part

Drive wheel

External reflectors

Lifting point 2

Tip assist

Push rim

Summary of Contents for Pyro Light

Page 1: ...Enjoy mobility Bischoff Bischoff Instructions for Use Pyro Light Pyro Light XL...

Page 2: ...of the wheelchair 13 7 Assembly Adjustments 15 7 1 Folding and unfolding 7 2 Legrests 7 3 Side parts 7 4 Seat Seat height adjustment 7 5 Brake 7 6 Wheels and tyres 7 7 Quick release axles 8 Options 23...

Page 3: ...26 11 Technical data 28 12 Transport 30 12 1 Transporting the wheelchair 12 2 Seat in disabled vehicle 13 Storage Shipment 36 14 Repair 36 15 Disposal 37 16 Appendices 38 Care hygiene and maintenance...

Page 4: ...schoff Bischoff folding wheelchair from the Pyro Light Series you are getting a top German product that sets new standards with its variability These operating instructions are to help you become more...

Page 5: ...ure that instantaneous quick release axles are posi tioned correctly in the axle holders as otherwise there is a danger of injury Please note that the danger of tipping is increased by shifts in weigh...

Page 6: ...icient profile depth of your tyres Observe the road traffic regulations when on the road The passive lighting reflectors of your wheelchair must always be visible to other road users The locking brake...

Page 7: ...g between wheelchair and bed always ensure that both locking brakes are applied the side part on the side for getting in out is swung backwards the foot plates for getting in out are folded upwards sw...

Page 8: ...f paralysis loss of limbs meromelia limb deformation joint contractures joint damage other ailments The supply with strengthened wheelchairs is indicated if the body weight of the disabled person is 9...

Page 9: ...ncreasing mobility and for the transport of people with impaired mobility in accordance with the above mentioned indications To note We are only able to issue a guarantee if the product is used in acc...

Page 10: ...10 4 Declaration of conformi ty B B declares as manufacturer of the product that the Pyro Light and Pyro Light XL wheelchairs fully comply with the requirements of directive 93 42 EEC...

Page 11: ...ded with the CE mark The B B wheelchairs are supplied folded in a special car ton Supply assembly and instruction in use of the wheelchair is carried out by the qualified medical supplies retailer If...

Page 12: ...presentatives of the transport company making the delivery must be informed about the dama ge in good time Damage or loss visible externally must be recorded on the accompanying paperwork by the deliv...

Page 13: ...wheel Foot plate 6 Overview of the wheelchair To make the use of your B B wheelchair as simple as pos sible we have provided detailed illustrations for the writ ten instructions The following illustr...

Page 14: ...14 Fig 1b Hand push handles B B logo Side part Drive wheel External reflectors Lifting point 2 Tip assist Push rim...

Page 15: ...rest you to unfold the wheelchair Fig 4 When unfolding please ensure that your fingers remain on the seat belt There is otherwise a danger of jamming Folding Position your B B wheelchair next to you...

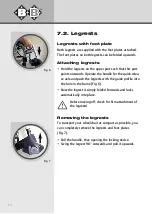
Page 16: ...k relea se axle and push the legrests with the guide profile into the hole in the frame Fig 6 Now the legrest is simply folded forwards and locks automatically into place Before moving off check for f...

Page 17: ...turn to the original position simply swing the legrest forwards until it locks into place When standing up from the wheelchair under no circumstances stand on the foot plates Setting the legrest lengt...

Page 18: ...jam med Before use check for firm attachment of the side parts Combined side parts only Pyro Light The height of the armrest cushions can be adjusted in 6 steps by 70 mm To do so press the button and...

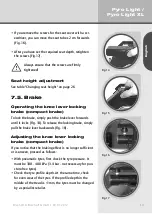
Page 19: ...push the brake lever forwards until it locks Fig 18 To release the locking brake simply pull the brake lever backwards Fig 18 Adjusting the knee lever locking brake compact brake If you notice that t...

Page 20: ...the accompanying person can be fulfilled with the optional drum brake As well as its use as a locking brake for the wheelchair the drum brake can be used for braking while moving As the drum brake us...

Page 21: ...come worn or defective the aut horised specialist retailer should be requested to underta ke the repair To ensure optimum operating safety of the bra kes wheelchair the pneumatic tyres must have a pre...

Page 22: ...back in that the quick release axle is pushed Check after pushing back in that the wheel is firmly attached by pulling it towards you without operating the locking but ton of the quick release axle 7...

Page 23: ...raising or lowering the support tube for the legrest Release the lever The legrest locks automatically 8 2 Drum brake Operating the drum brake for the accompanying person To apply selective braking du...

Page 24: ...required position 75 mm 3 steps of 25 mm Fig 28 When you reach the position required release the lever The locking device operates automatically The height is correct when the upper and lower arm rou...

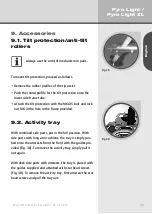
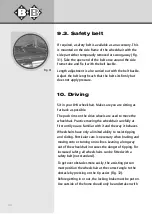
Page 25: ...provided 9 2 Activity tray With combined side parts put in the full position With side parts with long arm cushions the tray is simply pus hed onto the armrests from the front with the guides pro vid...

Page 26: ...e drive wheels are used to move the wheelchair Practice moving the wheelchair carefully at first until you are familiar with it and the way it behaves Wheelchairs have only a limited ability to resist...

Page 27: ...le by driving the drive wheels without shifting the centre of gravity forwards the wheelchair tips over back wards According to STVZO 66 1 German Road Traffic Act of 01 01 1981 hand propelled wheelcha...

Page 28: ...ngle cross frame double cross frame Drive wheels pneumatic or puncture proof PU standard tyres 24 x 13 8 on aluminium wheels other sizes available Steering wheels pneumatic solid or soft rubber standa...

Page 29: ...heel lock compact brake optionally drum brake and brake operation for accompany ing person Drive wheel axles quick release axle as standard Colours metallic silver metallic blue Weight Pyro Light 16 2...

Page 30: ...e tested to ISO 7176 19 2008 The securement points are marked with a symbol Fig A Other attachment points are not authorised by the manufacturer Where possible use a fixed fitted car seat and its seat...

Page 31: ...he user or adequately padded When used as a seat in a disability vehicle a 3 point safety belt must always be worn Other fixation systems and straps may be used in addition If your wheelchair has an a...

Page 32: ...e arranged so that the angle ensures optimum lateral stability D 300mm The hatched area indicates the range within which the straps must be attached to the floor Wheelchair must not be placed in front...

Page 33: ...m Fig F Place mono fitting flat on the base plate and pull over the base plate Detach the mono fittings by pulling down from the base plate Attachment to wheelchair Attachment to the wheelchair may be...

Page 34: ...ints To close the lock insert the tongue into the buckle It clicks into place The lock is opened by pres sing the large button The safety belt should fit firmly but not cut in To tighten the belt pull...

Page 35: ...run across wheelchair attachments such as armrests or wheels Fig L Fig M Fig L Fig M In order to be able to remove the belt quickly in the event of an accident a seat belt cutter like this Fig N shou...

Page 36: ...container It is recommended to retain the original packaging and to store it fo r this purpose so that it is available if required Then your wheelchair is optimally protected against environmental in...

Page 37: ...erial that can be recycled into the industrial process Therefore never throw away your wheelchair for disposal in the household ld waste but have it disposed of professionally in an official waste dis...

Page 38: ...se We have prepared some care tips a hygiene plan and a maintenance table for you below We hope to have provided a good overview of the most important care hygiene and maintenance work for your Bischo...

Page 39: ...ction has been achieved Should the coating be damaged by scratches or similar you can make good the defective area with a paint pen Chrome parts are initially wiped with a dry cloth Dull areas and stu...

Page 40: ...mendment to the medical devices operator ordinance Date 29 04 2005 1 Product Pyro Light Pyro Light XL wheelchair 2 Risk level Non critical medical product Medical product that only comes into contact...

Page 41: ...be treated with disinfection agent 3 Wipe dry treated areas with paper towel Repeat if necessary 4 Dispose of protective gloves and paper towels 7 Special identification Not necessary 8 Sterilisation...

Page 42: ...the brake lever sideways Tightness of all bolts and screws Check of the tyre pressure Standard tyres front max 2 2 5 bar Standard tyres rear max 3 4 bar Smooth running tyres max 6 7 5 bar Check of th...

Page 43: ...ist workshop Check to be carried out by the user or an assistant Use a tyre pressure gauge Caution Tyre pressures that are too low have a negative effect on braking behaviour Visual check by the user...

Page 44: ...44 Maintenance table Every 6 months depending on frequency of use Checks Cleanliness General condition When What...

Page 45: ...nd hygiene information In the event of any defects have the necessary repair work car ried out only by authorised specialist workshops as only these are trained in the necessary work and generally hav...

Page 46: ...fol ding back for our folding wheelchairs in the Pyro Light series whereas we assume a warranty of 2 years on all other mounting parts In case of queries please contact the B B Customer Service at ph...

Page 47: ...yro Light XL Model No Serial number to be filled in by the specialist retailer Specialist retailer Date and stamp Information plates can be found on the side frame Pyro Light Pyro Light XL Warranty ce...

Page 48: ...Bischoff Bischoff GmbH Becker Goering Strasse 13 D 76307 Karlsbad Tel 49 700 6000 7070 Fax 49 700 6000 8080 www bischoff bischoff com info bischoff bischoff de...

Reviews: