Bioness BITS Clinicians Manual Download Page 104

93

Chapter 19 - Reports

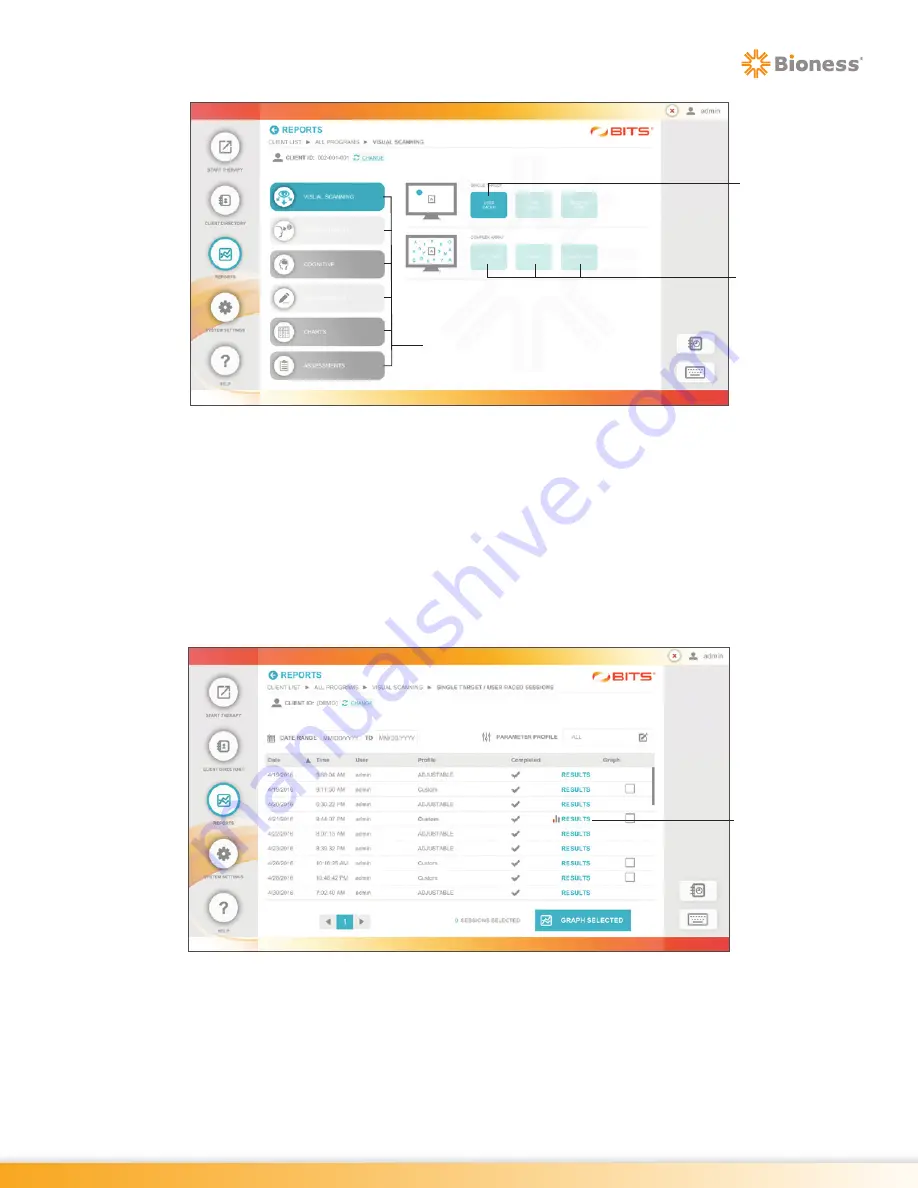
Figure 19-5: Reports Category Screen, Example 

3.  Press a Therapy Category Button to display the therapy groups and therapy programs found in the 

selected category. See Figure 19-5. The buttons for each Therapy Program containing Session 
Results will also be darker in color than Therapy Programs without Session Results

4.  Press the desired Therapy Program Button to view the Session Results.

5.  The Sessions Results List Screen will open displaying the Therapy Sessions performed, see Figure 

19-6. Select a Therapy Session by pressing the row containing the date and time for the desired 
Therapy Session.

Figure 19-6: Example of the Sessions Results List Screen 

6.  The Session Results Screen will open. See Figure 19-7.

Report 

Categories

Session  

Results Exist  

(dark button 

example)

Session Results 

Do Not Exist  

(light button 

example)

Results

Summary of Contents for BITS

Page 1: ...nyon Loop Valencia CA 91355 USA Telephone 800 211 9136 Email info bioness com Website www bioness com Bioness Europe B V Stationsweg 41 3331 LR Zwijndrecht The Netherlands Telephone 31 78 625 6088 Ema...

Page 2: ...CLINICIAN S GUIDE...

Page 3: ......

Page 4: ...or repair of Bioness Inc products Bioness Inc does not accept any responsibility for any damage caused to its products either directly or indirectly as a result of use and or repair by unauthorized p...

Page 5: ...r to Instruction Manual Booklet FCC ID RYYEYSHSN Re Order Number Lot Number Serial Number Warning Electricity MD Medical Device MR Unsafe Quantity 48 Single Use Only European Authorized Representative...

Page 6: ...Charging the Sensors 9 Turning the System On 9 Launching the Software 10 Log Out 11 Exit Program 12 Windows Operating System 12 Chapter 4 Introduction to BITS Software Navigation 15 Start Therapy 15...

Page 7: ...32 Archiving a Client 33 Activating an Archived Client 34 Chapter 6 Start Therapy 35 Preparing the Client 36 Preparing the Client for Balance Therapy 36 Wearing the Motion Sensor 36 Setting up the Wea...

Page 8: ...Vestibular 65 Assessments 65 Chapter 9 Single Target Balance Reaction Program 67 Reaction Time Program 67 User Paced Program 67 Time Paced Program 67 Static Postural Sway Program 67 Dynamic Postural S...

Page 9: ...am 79 Motion Program 79 Multiple Program 79 Puzzle Program 79 Peripheral Letter Charts Program Group 80 Sequence Program 80 Match Program 80 Chapter 16 Vestibular Programs 81 Ocular Motor Program 81 V...

Page 10: ...1 Rotator Program Group 102 Pursuit Program Group 103 Cognitive Program Group 103 Drawing Program Group 104 Letter Charts Program Group 104 Peripheral Letter Charts Program Group 104 Assessments 104 T...

Page 11: ...g 121 Maintenance 121 Cleaning 121 Touchscreen Display Monitor 121 BITS Bedside Mobile 122 Cleaning the BITS Bedside Mobile Hardware 122 Sensor 122 Straps 122 Chapter 23 Technical Specifications 123 5...

Page 12: ...enge and assess vision motor cognitive and balance abilities of individuals including those with deficits resulting from traumatic injuries and movement disorders as well as competitive athletes The B...

Page 13: ...BITS Balance Accessories Be sure to review this guide including all safety information before using the Bioness Integrated Therapy System If you have questions or need technical support contact the B...

Page 14: ...thorized modifications to the Bioness Integrated Therapy System such as installing or uninstalling software will void the warranty Accessing the internet or local intranet with the Bioness Integrated...

Page 15: ...so could cause the equipment to fall causing damage and or injury Ensure Sensors are charged prior to performing Balance Therapy Do not charge the Sensors while it is in use by client or user Sensors...

Page 16: ...ess lesions or blisters are signs of irritation Use of the Adhesive Patch should be temporarily halted until the irritation is resolved Patients should consult their physician if irritation persists D...

Page 17: ...6 Clinician s Guide...

Page 18: ...location designated for therapy sessions If needed the BITS portable stand can be moved Warning Make sure the computer is shut down and turned off before moving the stand To move the portable stand 1...

Page 19: ...the Balance Platform Warning Make sure the Balance Platform is placed in a secured location when not in use to avoid tripping hazards To move the Platform 1 Ensure Platform feet are retracted all the...

Page 20: ...Button on the computer The computer is mounted on the back of the touchscreen display See Figure 3 5 Figure 3 5 Location of On Off Buttons Example Shown for Reference Only 3 After Windows has loaded...

Page 21: ...2 The BITS Login Screen will open To open the on screen keyboard press the Keyboard Icon located at the bottom right of the screen See Figure 3 8 3 Type your username and password into the text fields...

Page 22: ...e Login Screen Figure 3 9 Location of X Button Home Screen It is recommended to press the X Button to logout of the BITS software after a clinician has completed a therapy session with a client When t...

Page 23: ...t button The display screen will return to the Windows desktop Figure 3 10 Location of X Button Login Screen Windows Operating System To shut down from the Windows Operating System 1 Press the Start I...

Page 24: ...13 Chapter 3 The System Figure 3 12 Windows Shut Down Power Icon Shut Down...

Page 25: ...14 Clinician s Guide...

Page 26: ...isting client and archive a client See Figure 4 1 For more information see the Client Directory section of this guide Reports The Reports Module allows the user to view a client s therapy session resu...

Page 27: ...lected from the Client List Refer to the Client Directory and Start Therapy sections of this guide for more information Figure 4 2 Discipline Menu Screen Physical Therapy The Physical Therapy Discipli...

Page 28: ...isual Scanning Visual Motor Visual Pursuit Charts Cognitive Assessments Balance Therapy The Balance Therapy Module features the therapy categories listed below To access the Balance Therapy Module pre...

Page 29: ...X Weight Shift X X Array Complex Array Sequence Array X X X X X Verbal Array X X X X X Competition X Pursuit Smooth Pursuit Smooth Pursuit X Pattern X X Adjustable Pattern X X Rotator Single Color Rot...

Page 30: ...herapy Category Menu will open displaying the available therapy categories found in the selected discipline See Figure 4 3 3 Press a Therapy Category Button to display the program groups and therapy p...

Page 31: ...menu 4 Press and hold the and buttons on Sensor simultaneously A blue flashing light will appear on the Sensor 5 Enter a Name for the Sensor and select whether this Sensor will be used with the weara...

Page 32: ...Sensor name for the Sensor user wants to activate See Figure 4 6 Figure 4 6 Switching between Sensors Disconnecting the Sensor 1 Select the Bluetooth Icon on screen 2 In the Device Settings menu selec...

Page 33: ...ce Therapy Difficulty Level for a client refer to the Client Directory section of this guide Sensor Battery Level The battery level for the active in use Sensor is indicated on the Bluetooth Icon Batt...

Page 34: ...ss the Recent Sessions icon See Figure 4 8 Figure 4 8 Recent Sessions Icon The Recent Sessions list allows the user to review therapy results obtained during the client s previous therapy sessions The...

Page 35: ...24 Clinician s Guide...

Page 36: ...ng client and archive a client The client detail screen also allows the user to access a client s therapy session history Creating a New Client Record 1 From the Home Screen press the Client Directory...

Page 37: ...outside of parallel bars 1 Dependent Level II Subject requires manual contacts of no more than one person during ambulation on level surfaces to prevent falling Manual contacts are continuous and nece...

Page 38: ...Medium Medium Feet Exension High No Feet Extension Easy X X X Medium X X Hard X Wearable Difficulty Difficulty Level Static Balance Dynamic Balance Easy Requires a significant amount of movement by c...

Page 39: ...ress the Visibility Icon see Figure 5 4 to make the Client List visible on the display screen Figure 5 4 Visibility Feature Turned Off Select the desired client from the Client List by pressing the ro...

Page 40: ...etail Screen will open see Figure 5 6 Make desired changes to the data fields Custom images and words can also be added to a client record Note Balance Therapy Difficulty Levels can only be updated in...

Page 41: ...l appear when selected Press the Add Selected Button See Figure 5 7 5 The Custom Image Library Window will open displaying the custom images Press the Done Button to close the Custom Image Library Pop...

Page 42: ...rom the Client Detail Screen press the Custom Word Icon Box next to the Custom Word Icon to add words See Figure 5 6 2 The Custom Word List Window will open Use the on screen keyboard to type the cust...

Page 43: ...o remove from the word list See Figure 5 10 3 A dialog window will open to confirm that the user wants to delete the image from the Custom Image Library Press the Yes Button see Figure 5 10 4 The Cust...

Page 44: ...ect the desired client by pressing the row with the client s name See Figure 5 11 Figure 5 11 Client List Screen 2 The Client Detail Screen will open Press the Archive client Button See Figure 5 12 Fi...

Page 45: ...archived Client List will appear Select the desired client by pressing the row with the client s name 3 The Client Detail Screen will open Press the Activate Client Button see Figure 5 14 Figure 5 14...

Page 46: ...rip hazards injury it is recommended that the client stands or sits at least two feet away from the portable stand for dynamic balance activities Before starting a therapy program 1 From the Home Scre...

Page 47: ...information Preparing the Client for Balance Therapy Wearing the Motion Sensor Wrap the chest Strap with the Sensor attached around the client s chest ensuring a snug but comfortable fit Sensor can be...

Page 48: ...lect the Wearable Balance Therapy Difficulty level for the client depending on the client s functional level To change the difficulty level go to the client s profile in Client Directory Refer to Chap...

Page 49: ...lient This is optional user can select Yes which will then open the Assessment Therapy Category If user does not want to perform an assessment then click Cancel Figure 6 5 Sensor Calibration for Weara...

Page 50: ...ed and on level ground 3 From the Home Screen press the Start Therapy Button See Figure 6 1 4 Press the Visibility Icon see Figure 5 5 to make the client list visible on the display screen 5 Select th...

Page 51: ...tform will allow the least amount of tilt See Figure 6 9 Figure 6 9 Adjust Platform Tilt To retract the feet place fingers around the adjustment knob pull up and rotate the knob to the left until the...

Page 52: ...adjusted and customized to suit the unique needs of each client however using a predefined Parameter Profile is a quick way to start using the program Parameter Profiles include parameter sets with i...

Page 53: ...ine features To create a Custom Parameter Profile 1 Press the Profile Icon Box 2 The Parameter Profile Pop up Window will appear Press the Custom Tab See Figure 6 12 Figure 6 12 Custom Parameter Profi...

Page 54: ...in the In Therapy Side Menu and are referred to as In Therapy Parameters Refer to Chapter 7 for detailed information on all Parameters Accessing the In Therapy Side Menu To access the In Therapy Side...

Page 55: ...am screen press the small starburst icon located at the bottom left corner of the screen See Figure 6 13 2 The In Therapy Side Menu will open see Figure 6 14 Press the Screen Scale Icon located at the...

Page 56: ...his information is stored to the client s file in the Reports Module and can be accessed at a later time For most therapy programs the Results Screen has five tabs see Figure 6 16 Refer to Chapter 18...

Page 57: ...n the software and the path to get to the current screen To get back to a previous screen quickly touch the desired selection within the Breadcrumb See Figure 6 17 Keyboard Icon The Keyboard Icon loca...

Page 58: ...display screen Central Fixation must be enabled to make this parameter visible and selectable in the therapy programs The Reaction Time Program is an exception to this rule Board Setup The Board Setup...

Page 59: ...ion exercise in which a Central Fixation Point is presented in the center of the screen The letter in the center of the Central Fixation Point will change randomly during the therapy session When the...

Page 60: ...Difficulty The Difficulty Parameter controls the allowed response time to the stimulus There are three levels of difficulty in Rhythm program 1 2 and 3 Press the gray arrows or drag the blue indicato...

Page 61: ...ash Time The Flash Time Parameter controls the length of time the target stimuli will appear on the display screen before disappearing Press the gray arrows or drag the blue indicator to change the va...

Page 62: ...t they are following to provide visual and auditory feedback To turn the user Interactive Parameter off press the blue check mark box The box will turn white and the check mark will disappear Guided G...

Page 63: ...r the row and column coordinates displayed visually during the Puzzle Program will persist until the letter is touched or whether the coordinates will be flashed for a limited amount of time This para...

Page 64: ...meter is not selected the Quantity Size and Speed Parameters are displayed in the Stimuli Tab In the Trail Making Assessment the Random Parameter controls the orientation of the stimuli It randomizes...

Page 65: ...r options are Counterclockwise CCW Clockwise CW and alternating from Counterclockwise to Clockwise CCW CW To change the setting press the Rotation Parameter Icon The Rotation pop up window will open d...

Page 66: ...and the sequence is reset Increasing Random When this option is selected the sequence length will change as it does when the Increasing Option is selected however each new trial will be presented with...

Page 67: ...ters Numbers Letters Uppercase Letter Lowercase Letters Upper Lowercase Letters Images Words Shapes Cardinal Oblique Cardinal Oblique bdpq and Numbers Letters Arrows To change the type of target stimu...

Page 68: ...n specific locations within the visual field The Distribution Parameter options are Full Central Peripheral The default setting is Full When the Central option is selected target stimuli only appear i...

Page 69: ...bias the appearance of the target stimuli within an Area or Axis and is related to specific movement in the anterior posterior and lateral directions Adjusting the Area or Axis Parameter changes the w...

Page 70: ...the target is presented during the therapy session The Presentation Parameter options are Visual Verbal and Visual Verbal To change this setting press the Presentation Parameter Icon The Presentation...

Page 71: ...bled to make this parameter visible and selectable in the therapy programs When enabled user can touch and slide the Rings on screen and move the image anywhere on the screen before starting the thera...

Page 72: ...the client to return to the Balance Point between each target hit If the system detects that the client has not returned to the Balance Point a new target will not appear and the clinician should inst...

Page 73: ...62 Clinician s Guide...

Page 74: ...ator Program Group is divided into four therapy programs Warning The programs found in the Visual Pursuit Therapy Category utilize moving and rotating graphics that may cause dizziness vertigo or naus...

Page 75: ...motion Challenge dual tasking capability by combining vision motor and cognitive activities with balance training The Dynamic Balance Therapy Category is divided into four Therapy Program Groups Balan...

Page 76: ...ics that may cause dizziness vertigo or nausea in sensitive patients Individuals experiencing dizziness vertigo or nausea while using BITS should discontinue use immediately Assessments The programs i...

Page 77: ...66 Clinician s Guide...

Page 78: ...to press and hold the Center Stimulus This program measures hand speed and latency User Paced Program Stimuli targets appear on the screen one at a time client is instructed to visually scan the scree...

Page 79: ...68 Clinician s Guide...

Page 80: ...ut is required Client is instructed to move body or platform to align the reticle on screen with the stimuli in order to eliminate it Sequence Program All target stimuli will appear on the display scr...

Page 81: ...70 Clinician s Guide...

Page 82: ...timuli appear on the rotator clients are instructed to visually track the stimuli and accurately eliminate them in the correct color sequence The target stimuli will need to be eliminated either by cl...

Page 83: ...72 Clinician s Guide...

Page 84: ...y Categories Smooth Pursuit Guides clients to follow moving stimuli with their eyes toward the neglected hemispace Smooth pursuit eye movement training SPT uses optokinetic stimulation and may reduce...

Page 85: ...74 Clinician s Guide...

Page 86: ...ce and Optokinetic Static Therapy Categories client is instructed to keep Reticle within the Balance Point and touch the display screen to eliminate the stimuli For Programs in the Dynamic Balance and...

Page 87: ...76 Clinician s Guide...

Page 88: ...stimulus pattern on it The client is instructed to recreate this pattern by drawing on the blank board Symmetry Program The client is instructed to simultaneously draw on both sides of the screen The...

Page 89: ...78 Clinician s Guide...

Page 90: ...am A chart displaying the selected stimuli type will appear and continuously move on the display screen The clinician will instruct the client to read and verbally say the selected stimuli from the ch...

Page 91: ...rogram A chart displaying different size letters will appear on the display screen In the center of the chart a letter will appear as the central focus point and will change periodically The client wi...

Page 92: ...i with the eyes while keeping the head stationary An optotype E will flash for the duration specified in the moving stimuli Client is required to identify the way the E is facing and choose the correc...

Page 93: ...82 Clinician s Guide...

Page 94: ...rs and letters in ascending order 1 A 2 B 3 C etc The client is instructed to connect the circles as quickly as possible without lifting their finger or stylus from the display screen The client is ti...

Page 95: ...h level is progressively more difficult than the previous levels The client must pass Level 1 to proceed to Level 2 and so on The client is expected to complete all four levels in a single therapy ses...

Page 96: ...tegration Test Assess Sensory contributions to postural control and involves measuring client s attempt to maintain balance under various Sensory conditions for 30 seconds per condition Multi trial al...

Page 97: ...86 Clinician s Guide...

Page 98: ...mpts Coverage Percent of coverage on target Trace Program Distractors Hit Number of stimuli selected that are not bells Early Hits Number of early hits Errors Number of times a stimulus is hit out of...

Page 99: ...program without errors Time to Complete Time period used to complete the program beginning when the client touches the Starburst icon Trials Accuracy Successful trials Total number of trials Trials S...

Page 100: ...ation of client s sway movements Threshold Totals Accuracy Attempts Above and Below for overall program Time in Balance Point only appears if Balance Point is adjusted time client spent within the Bal...

Page 101: ...90 Clinician s Guide...

Page 102: ...time Selecting a Client 1 From the Home Screen or Navigation Bar press the Reports button See Figure 19 1 Figure 19 1 Reports Button Home Screen Left Navigation Bar Right 2 The Client List Screen wil...

Page 103: ...in the Therapy Module Session Results in the Reports Module are organized by Therapy Categories similar to Discipline Menu 1 From the Navigation bar press the Reports Button See Figure 19 4 Figure 19...

Page 104: ...ssion Results 4 Press the desired Therapy Program Button to view the Session Results 5 The Sessions Results List Screen will open displaying the Therapy Sessions performed see Figure 19 6 Select a The...

Page 105: ...er 18 of this guide Figure 19 7 Example of a Results Screen in the Reports Module Printing a Report Therapy results displayed on the Results Screens in the Reports Module and at the end of each therap...

Page 106: ...arameter Profiles This restriction ensures that the therapy results displayed and compared on the same graph are relevant to each other The Graph Icon displayed next to each of the Predefined Paramete...

Page 107: ...ltered by Default or Custom Parameter Profiles by pressing the Parameter Profile Icon See Figure 19 11 Figure 19 11 Parameter Profile Pop Up Window Figure 19 12 Reports Filtered Session Results List S...

Page 108: ...d Session Labels 1 To display Session Labels above the graph select the Session Labels Box See Figure 19 13 2 To see the details for each data point identified by Session Label press the Details tab t...

Page 109: ...date in the appropriate format The graphs will change dynamically Note When multiple Sessions are performed on the same day the data points representing the Variable for the Sessions will be displaye...

Page 110: ...utomatically saved to the folder C users BITS Documents BITS PDF Reports Graphs The file name will include the name of the Therapy Program the Client Name and the date and time at which the Therapy Se...

Page 111: ...enter Time in each Ring Time Paced Program Accuracy Reaction Time Accuracy by Area Reaction Time by Area Accuracy by Rings Reaction Time by Rings Hits by Area Time in Balance Point Hits by Rings Time...

Page 112: ...Time in Balance Point Hits by Rings Time in each Area Percent in Balance Point Time in each Ring Percent in Center Time to Complete only if Balance Point was adjusted Verbal Program Accuracy Reaction...

Page 113: ...alance Point Time in each Area Percent in Center Time in each Ring Time in Balance Point only if Balance Point was adjusted Sequence Program Accuracy Time in Center Percent in Balance Point Time in ea...

Page 114: ...Area Reaction Time by Rings Hits by Ring Time to Complete Reaction Time Smooth Pursuit Program Accuracy Cognitive Program Group Memory Program Accuracy Time in Balance Point Accuracy by Area Time in...

Page 115: ...Time to Complete Coverage Letter Charts Program Group Puzzle Program Accuracy Average Response Time Peripheral Letter Charts Program Group Match Program Sequence Program Number of Hits Number of Hits...

Page 116: ...Reaction Time Reaction Time per Area Static Postural Sway Program Percent in Center Time in Center Functional Reach Program Average Distance Romberg Program Romberg Score Sensory Integration Test Prog...

Page 117: ...e compared with the Baseline Therapy Session must be performed using that Baseline Parameter Profile Figure 19 18 Baseline Icon in Results Sessions List Baseline Comparison Results are displayed in th...

Page 118: ...f a Therapy Session Only Completed Therapy Sessions may be saved as a Baseline Upon arriving at the Results Screen the Save As Baseline Icon will be displayed see Figure 19 20 To Create a Baseline Pro...

Page 119: ...apy Session as the Baseline Profile for that Parameter and overwrite the current one This situation may occur when the clinician determines that the Session Results are not a true representation of th...

Page 120: ...ialog Window 4 The dialog window will display the following statement Are you sure Overwriting the Baseline results will establish these session results as your new Baseline Profile Previously saved B...

Page 121: ...110 Clinician s Guide...

Page 122: ...ivileges Manages system general settings see the general setting section below Manages User Accounts creates closes and reactivates accounts for clinicians therapists Resets Passwords maintains system...

Page 123: ...ing for the User Role setting is Therapist If a new Admin Account is being created press the User Role Icon See Figure 20 3 The Change User Role pop up window will open select Admin and press the Done...

Page 124: ...ed user account from the User List by pressing the row with their name 2 The User Detail Screen will open See Figure 20 5 3 Enter the desired revisions into the text fields 4 To change a preassigned p...

Page 125: ...User Detail Screen will open Press the Reset Password Button and the text Password Changed will appear See Figure 20 7 The password now is the same as the Admin password 3 The Administrator now can e...

Page 126: ...able the user s account See Figure 20 8 The user account is now archived in the BITS software application Figure 20 8 Disable User Account Pop Up Window Reactivate a User Account 1 From the System Set...

Page 127: ...r this If adjustment is needed follow this procedure 1 From the System Settings Screen press the Screen Size Icon 2 The Screen Size pop up window will open Select the desired screen size and then pres...

Page 128: ...dow will open Press the Next Button see Figure 20 12 4 The Select Images to Add Window will open Select the drive icon and corresponding folder that contains the logo image Select the desired file A c...

Page 129: ...118 Clinician s Guide...

Page 130: ...tware application To access the Help Module 1 From the Home Screen or Navigation Bar press the Help Button See Figure 21 1 Figure 21 1 Location of Help Button Home Screen left Navigation Bar Right 2 T...

Page 131: ...120 Clinician s Guide...

Page 132: ...difference in the tension 5 Put the cover back on the portable stand tower Cleaning Touchscreen Display Monitor It is important to keep the touchscreen display monitor clean for proper operation and...

Page 133: ...al cleaning solutions 5 Unless a pre moistened wipe is used apply cleaning solution onto a clean microfiber cloth 6 Wipe the surface of the touchscreen display monitor Use circular motions to clean to...

Page 134: ...20 50 8cm h x 14 35 6 cm d Shipping Weight 122 lbs 55kg Assembly Pre Assembled Computer Specifications Operating System Windows 10 Type Intel NUC USB Ports Four 4 with expansion hub Keyboard Wireless...

Page 135: ...t to the following two conditions 1 This device may not cause harmful interference and 2 This device must accept any interference received including interference that may cause undesired operation Rad...

Page 136: ...tegrated Therapy System should be configured and used in accordance with the instructions provided in this guide Chest Strap Technical Specifications Chest Strap Specifications Sizes XSmall Small 20 t...

Page 137: ...Conditions Transport and Storage Temperature 20 C 4 F to 60 C 140 F Operational Temperature 5 C 41 F to 60 C 140 F Relative humidity 25 to 85 Atmospheric Pressure 50 kPa to 106 kPa Cleaning Wipe down...

Page 138: ...ption Visual Auditory Processing Working Memory Physical Cognitive Endurance Balance Control Postural Stability Encrypted The database file uses AES 256 Encryption Privileges Admin and user log in pri...

Page 139: ...128 Clinician s Guide...

Page 140: ...alter the BITS software and install unauthorized software on it including Virus scan software Procedural Security e g create awareness of the dangers of social engineering create separate login crede...

Reviews: