background image

  Shows the remaining battery capacity. Each segment represents approximately 20% of 

the battery’s capacity.


5: Backlight/Headlight Indicator 

  Signals if the headlight and display backlight is powered on. 

6: Walking Mode Indicator 

  Icon lights up if walking mode is turned on.


7: Speed Display Unit 

  Unit being used for measurement of speed and distance will be lit up; either KM/H or 

MPH. 

8: Speed Display 

  Displays current bike speed. 

9: Riding Information Display 

  Toggles between different pieces of riding information: 

  ODO: Total mileage the bike has been rode 

  Trip 1: Trip Meter #1 

  Trip 2: Trip Meter #2 (resets after powering off display) 

  Time: Time spent powered on (resets after powering off display) 

10: Set 

  Lights up when in the SETUP interface 

11+ 12: PAS 

  Displays the current PAS mode selected 


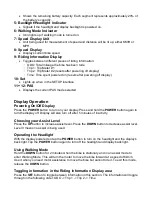
Display Operation 

Powering On/Off Display 

Press the 

POWER

 button to turn on your display. Press and hold the 

POWER

 button again to 

turn the display off. Display will also turn off after 5 minutes of inactivity. 
 

Choosing your Assist Level 

Press the 

UP

 button to increase assist level. Press the 

DOWN

 button to decrease assist level. 

Level 0 means no assist is being used. 
 

Operating the Headlight 

With the display powered on tap the 

POWER


button to turn on the headlight and the display’s 

back light. Tap the 

POWER

 button again to turn off the headlight and display back light. 

 
Using Walking Mode 

Hold the 

DOWN

 button for 2 minutes when the bike is stationary and in an assist mode to 

enter Walking Mode. This will turn the motor to move the bike forward at a speed of 6km/h. 
Use it when you need motor assistance to move the bike but cannot ride it. To exit this mode, 
release the 

DOWN

 button.


Toggling information in the Riding Information Display area 

Press the 

SET

 button to toggle between information in this section. The information will toggle 

through in the following order: ODO -> Trip 1 -> Trip 2 -> Time 

Summary of Contents for Bigstone C600E V5S

Page 1: ...r codes which may be triggering from the bike 2 Current Power Output Shows the current discharging from the battery which corresponds to the amount of power the bike is using 3 Riding Mode Shows current riding mode This will change as you use different PAS Levels Levels 1 and 2 are ECO Mode Level 3 and 4 are Normal Mode and level 5 is Sport Mode 4 Battery Level ...

Page 2: ...R button to turn on your display Press and hold the POWER button again to turn the display off Display will also turn off after 5 minutes of inactivity Choosing your Assist Level Press the UP button to increase assist level Press the DOWN button to decrease assist level Level 0 means no assist is being used Operating the Headlight With the display powered on tap the POWER button to turn on the hea...

Page 3: ...ange Max Speed Limit Set 2 will be displayed Use the UP and DOWN buttons to adjust the Max Speed limit that the motor will accelerate up to The motor will no longer function above this speed however you can still go faster with the pedals Press the SET button when done to save changes and advance to the next setting Change Wheel Diameter Set 3 will be displayed This does not need to be changed unl...

Page 4: ...do not need to change this it will be set correctly from the manufacturer Entering the Advanced Settings Interface While in the Settings Interface press and hold the SET and DOWN buttons for 10 seconds You can save any changes and exit this mode by holding the SET key SOME OF THE SETTINGS IN THE MENU ARE NOT TO BE CHANGED Biktrix is not liable for any changes being made resulting in corruption of ...

Page 5: ...ting does not need to be changed Starting Magnetic Steel Number This setting does not need to be changed Throttle Binning This setting does not need to be changed Throttle Speed Limit Changes the speed at which the throttle will function ...

Page 6: ...ith 1 through 3 enabling the setting At 1 the bike s acceleration will be reduced from default settings with 3 having the bike s acceleration much more reduced Current Limiting Setting Lowers current sent from the battery to the motor to limit motor power and increase battery range Can set to a MINIMUM OF 16 for less motor power and better battery life of a MAXIMUM of 22 for more motor power and l...

Page 7: ...shooting and repair assistance Error Code Definition 1 Current Error or MOSFET damaged 2 Throttle Error 3 Phase position error 4 Hall Sensor Error 5 Brake cutoff error 6 Under voltage 7 Motor Stalling 8 Controller communication receiving error 9 Display communication receiving error 21 Current Error 22 Throttle error start detection 23 Motor no phase position 24 Hall error 25 Brake Error Start det...

Reviews: