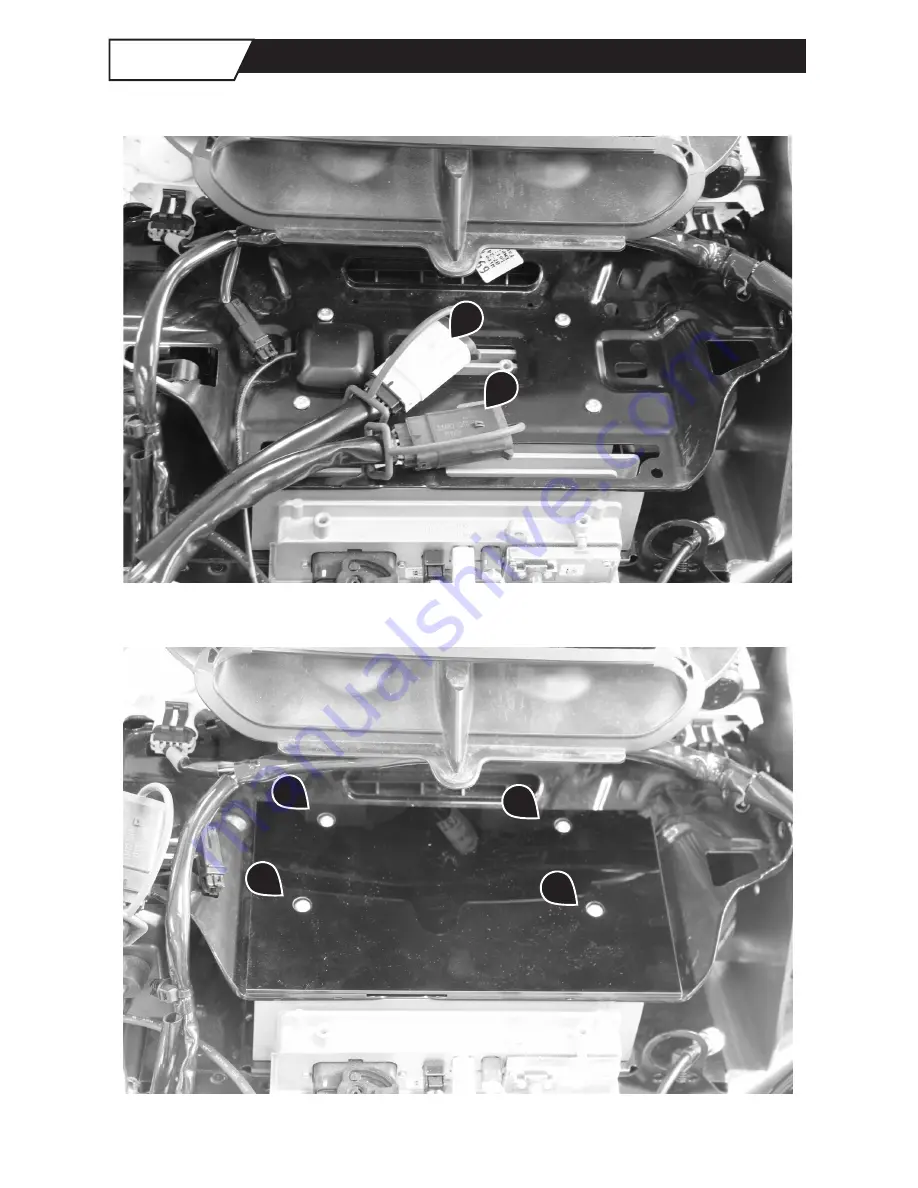
7
Mount Amp Plate
Step 1
• Remove connectors and satellite antenna from radio plate.
• Mount amp plate using stock screws.
!
Page 1: ...AMPLIFIER INSTALLATION MANUAL biketronics com 800 735 2419 BT4180 14 FITMENT 2014 FLH SPECIFIACTIONS 4 Channel 2 ohm stable 720W RMS total output at 4 ohm 1 440W total peak output ...
Page 2: ......
Page 3: ...mation and Notes 6 Preparation 6 STEP 1 Mount Amp Plate 7 STEP 2 Amplifier Placement 8 STEP 3 Ground Wire 9 STEP 4 Amp Enable 10 STEP 5 RCA Connectors 11 STEP 6 Speaker Output 12 STEP 7 Power Connection 13 STEP 8 Test Amplifier 13 Troubleshooting 13 Warranty Policy 14 Contents ...
Page 4: ...rewdriver 1 4 drive socket set Harley Davidson shop manaul optional A shop towel to lay your fairing on recommended A Amplifier B Speaker wires C REM wire D Continuous power cable E Grounding cable Package Contents F Amp Plate G Zip ties 2 H RCA Cable I Amp Enable Wire J Power cable with fuse K Transformers 2 x2 ...
Page 5: ...e first Do this now Failure to do so is an improper installation and will cause a short to ground and is NOT covered under warranty Our amplifiers pack a lot of power so please operate with good judgement to protect hearing and respect the noise oridinance of where you ride Go easy Don t force parts Prior to disassembly ensure that you have all necessary tools and parts for the job Protect bike fi...
Page 6: ...mation and Notes Speaker use Use a 2 or 4 ohm speaker For a parallel set up use 4 ohm Care The amp enclosure is water resistant using a special baffle system to prevent water from entering the custom enclosure However please exercise good judgement when locating the amp to minimize exposure to any potential source of water Do not modify Modifications made to the amplifier with void the warranty Pl...
Page 7: ...7 Mount Amp Plate Step 1 Remove connectors and satellite antenna from radio plate Mount amp plate using stock screws ...
Page 8: ...8 Peel adhesive strips from amp bottom and place as shown Amplifier Placement Step 2 ...
Page 9: ...9 Install ground wire from amplifier using radio mount bolt Replace satellite antenna and secure connectors with zip tie Ground Wire Connection Step 3 ...
Page 10: ...10 Amp Enable Step 4 Connect amp enable adapter into accessory plug harness and connect to blue amp enable wire ...
Page 11: ... secure and insulate connections Connect amp s front RCA plugs to RCA jacks found on transformer Since some stock radios do not have balance control RCA polarity may not matter Rear Amp Input Depending on bike configuration the rear speaker signal will be connected to the rear transformer one of three ways Ultra Classic custom harness bringing signal from rear pod area Road Glide and Street Glide ...
Page 12: ...p to speakers See illustrations for acceptable configurations Only use speakers capable of handling at least 100 watts RMS Contact your speaker manufacturer if you are unsure if your speakers meet these requirements CAUTION CONFIGURATION 2 CONFIGURATION 1 ...
Page 13: ...t Amplifier Step 8 It is unsafe to look down at radio while riding Familiarize yourself with radio controls in garage Allow yourself time to normalize working the unit with hand controls and hearing the result Please exercise proper riding safety It s also worth noting that our gear is designed to be loud Please use caution when turning the volume up so you don t damage your hearing SAFETY NOTICE ...
Page 14: ... modification improper installation vehicle crash or any type of impact will void the warranty We will not be responsible for damages to motorcycles resulting from the use or misuse of the product In no event shall Biketronics Inc be liable for any damages whatsoever including consequential damages incidental damages or damages for loss of use loss of time inconvenience or other losses arising out...
Page 15: ...15 ...
Page 16: ...Version 04172015 LIFETIME WARRANTY Made in the U S A 1 800 735 2419 www biketronics com ...