background image


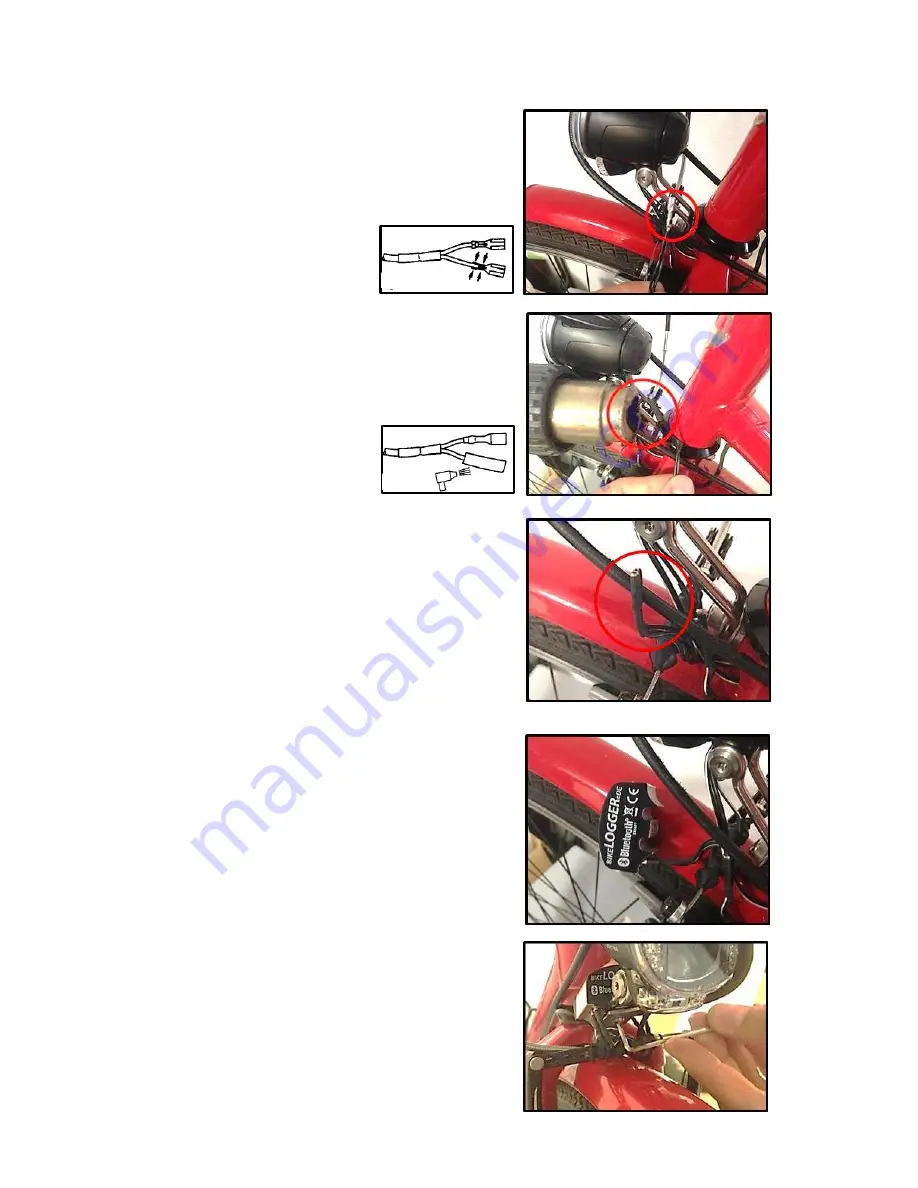
4. Using the crimp plier (or other), pull the flat-plug 
shoes over the twisted cable ends. Ensure both sets of 
wire-ends are securely inside these accessories.  


Make sure these are very tightly connected 

with the cables. 


5. Pull the shrink tubing over the flat-plug shoes and, 
using a heat source (hot air gun or lighter), heat the 
tubing material so it contracts. 
 

Attention: please be aware of dangers of 

radiated heat. 

!

 Risk of injury. 


6. The finished cable ends should now look like this. 


7. The two flat-shoe plugs should now be securely 
connected and attached to the BikeLogger L. 


!  

Polarity is not important. Please note however, 

for lamps with a battery or capacitator, a fault 
with the BikeLogger app may occur. If so, simply 
reverse the polarity with the BikeLogger device. 


8. Attach the BikeLogger L onto the headlight bracket and 
tighten securely with the Allen key. 


!  

Briefly adjust or position your bicycle’s brake or 

gear cables for easier handling. 


Summary of Contents for L

Page 1: ...aler Scope of Delivery 1 Supplemental sheet with basic information 2 Heat shrink tubing 3 Micro flat plug shoes 4 BikeLogger L Installation Summary The BikeLogger L is designed for installation on your bicycle s lamp bracket but can also be mounted onto another location This is done by attaching the BikeLogger along the cable found between the hub dynamo and lamp To do this please take the followi...

Page 2: ...ending from the hub dynamo to the headlight If possible level this with the headlight frame cutting the cable as close to its bracket as possible Please pay attention to the length of cable which requires cutting cable may have to be extended to accommodate for installation If lighting is originally connected via a coaxial cable instead of a two wire cable please see our additional notes on http b...

Page 3: ...ease be aware of dangers of radiated heat Risk of injury 6 The finished cable ends should now look like this 7 The two flat shoe plugs should now be securely connected and attached to the BikeLogger L Polarity is not important Please note however for lamps with a battery or capacitator a fault with the BikeLogger app may occur If so simply reverse the polarity with the BikeLogger device 8 Attach t...

Page 4: ...our front wheel Please note the following indicators for displaying information during your active journey o Red needle active speed o Orange needle average speed of active journey o Analogue clock active time o Digital display inside the analogue clock length of active journey o Cadence o Length of active journey o total kilometre o Bluetooth Status Blue connected White no connection o active out...

Page 5: ... two 4 5 5mm thick bars that run parallel at a distance of 10 mm Guarantee Warranty and Contact We are liable to all contractual partners for any defects according to our legal regulations For guarantee please contact your BikeLogger dealer or send your item directly to our address see right please include your receipt and all billing attachments Please ensure adequate postage The manufacturer res...

Page 6: ...e im Steuerrohr conforms with the essential requirements of the directives mentioned above The conformity assessment procedures according to appendix IV of 1999 5 EC where carried out with support of SGS Fimko Oy Säriniementie 3 Helsinki Finnland Applied standards Radio spectrum matters ERM EN 300 328 V1 7 1 Data transmission equipment operating in the 2 4 GHz ISM band Electromagnetic compatibilit...

Reviews: