background image

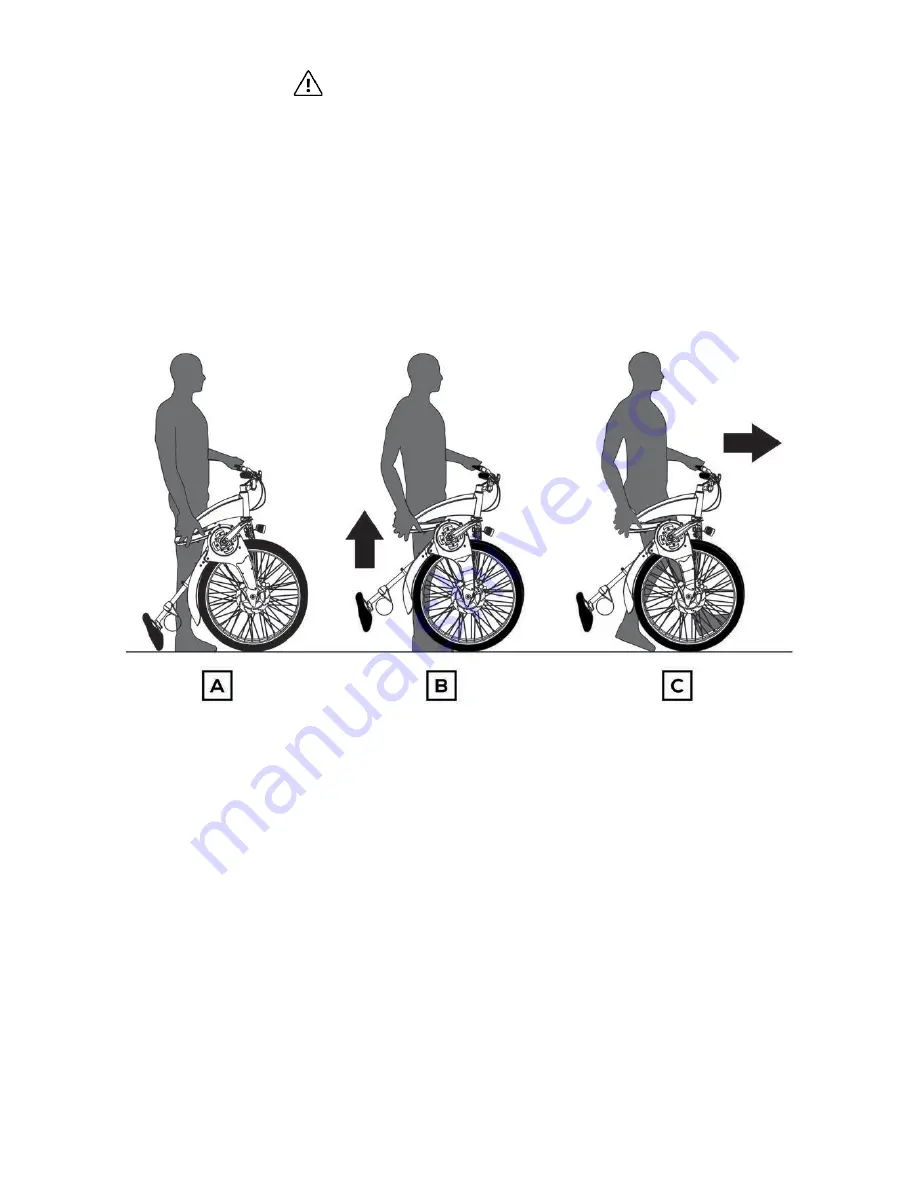
Never roll your Gi Fly while the saddle is making contact with the 

ground. This will damage the saddle. Instead, lift the saddle off of 

the ground before moving the bike.  

Caution

Img. 18

Stand on the left side of the folded bike with your left hand on the left handlebar and 

your right hand gripping the folding joint (Img.18.A).

Lift the back side of the bike with your right hand so the saddle comes off the ground 

and the bike’s weight rests on the two wheels (Img.18.B).

Walk forwards while rolling the bike (Img.18.C). 

1.

2.

3.

vi. Adjusting your folding mechanism and eliminating  

     “play” between the front and rear parts of the bike.

If, when riding your Gi Fly (and particularly when using the front brake), you notice that the bike 

bends slightly at the folding mechanism, then you must adjust the folding mechanism. We call 

this bending movement “play”.

To adjust your folding mechanism you must first unfold your Gi Fly (Img.19.A).

Next, close the folding lever by pushing it into the frame (Img.19.B).

If there is a gap of empty space (marked as “x” in 19.C), then you must loosen the 


locking nut (marked as “i” in Img.19.C) and tighten the screw (marked as “ii” in Img.19.C) 

until the space is eliminated. 

1.

2.

3.

38

Summary of Contents for Gi Fly

Page 1: ...Owner s Manual 1st Edition 2017 Bignay Inc...

Page 2: ......

Page 3: ...omponents such as the belt drive or pedals on your bicycle or for accessories such as helmets or lights that you purchase If you have any questions or do not understand something take responsibility f...

Page 4: ......

Page 5: ...ce It is our hope that your Gi Fly provides you with the freedom to move interact connect and enjoy your commute As a member of our community we invite you to engage in meaningful conversations with u...

Page 6: ...ing D Night riding 9 Getting to know your Gi Fly A General overview B Gi Fly System Serial Number C Activating your Gi Fly D Using your USB key for the first time E Folding mechanism i Folding your Gi...

Page 7: ...e holder I Pedals 11 Cleaning and preventing corrosion A Removing and installing wheels or brake pads discs 12 Service A Service intervals B If your bicycle sustains an impact 13 Warranty 14 Troublesh...

Page 8: ...udguard and rear light from the box These parts will arrive unattached to the bike We will assemble them shortly see image A Remove the bike and handlebars from the box The handlebars will be attached...

Page 9: ...on 6 A i of the Gi Fly manual for further instruction Don t worry about the height of the seatpost we are not fitting you to your Gi Fly at this point We are putting the seatpost onto the bike so that...

Page 10: ...G To unfold your bike stand on the LEFT side of the bike with your left hand on the left handle grip Slide the stainless steel button on the folding lever upwards so that the lever pops out of the fra...

Page 11: ...e rest of the tools to attach the rear light component to the frame Fasten this component securely see image M L M Attaching the pedals Attach the pedals to the bike Take a look at the screws of both...

Page 12: ...reflectors are required by different countries Choose from the selection of reflectors in the box appropriately Head to Section 11 C in the manual for detailed instructions Activate your Gi Fly via t...

Page 13: ...amage to the bicycle or the voiding of your warranty Many of the Warnings and Cautions say you may lose control and fall As any fall may result in serious injury or even death we do not always repeat...

Page 14: ...of its employees or directors free from all liabilities that you agree you are using and operating the product at your own risk and that no warranties or guarantees are made by Bignay Inc expressed o...

Page 15: ...r use and application of your reflectors The maximum power is 250 W with a maximum speed of 25km h with the electric assistance A helmet license and insurance may be required when riding in your locat...

Page 16: ...es of safe and responsible bicycling As a parent you should read this Manual as well as review its warnings and the bicycle s functions and operating procedures with your child before letting your chi...

Page 17: ...tc make sure that it is compatible with your bicycle by checking with your dealer or with Bignay Inc Be sure to read understand and follow the instructions that accompany the products you purchase for...

Page 18: ...o achieve this torque If necessary see your local bike mechanic Warning Correct saddle adjustment is an important factor in getting the most performance and comfort from your Gi Fly If the saddle po s...

Page 19: ...in the palm of your hand and squeeze the lever with significant force Img 2 C until it reaches the closed position Img 2 D 4 Keep in mind that you can adjust the height of your Plume Mudguard which in...

Page 20: ...tment If you make your own front and back adjustment make sure that the clamp mechanism is clamping on the straight part of the saddle rails and is not touching the curved part of the rails and that y...

Page 21: ...g B Handlebar height and angle Your bike is equipped with a threadless stem which clamps onto the outside of the steerer tube With the threadless stem your dealer or local bike shop may be able to cha...

Page 22: ...ciently tightened stem clamp bolt handlebar clamp bolt or bar end extension clamping bolt may compromise steering ac tion which could cause you to lose control and fall Place the front wheel of the bi...

Page 23: ...check Tires in good shape Spin each wheel slowly and look for cuts in the tread and sidewall Replace damaged tires before riding the bike Wheels true Spin each wheel and check for brake clearance and...

Page 24: ...u ride Loose or damaged handlebar grips can cause you to lose control and fall Unplugged handlebars can cut you and cause serious injury in an otherwise minor accident When you buckle on your helmet a...

Page 25: ...u engage in this sort of extreme aggres sive riding you will get hurt and you voluntarily assume a greatly increased risk of injury or death It is extremely dangerous to use the Gi Fly mobile applicat...

Page 26: ...of your bicycle brakes Section 6 C handlebar height Section 6 B Always wear Shoes that will stay on your feet and will grip the pedals Make sure that shoe laces cannot get into moving parts and never...

Page 27: ...h headphones They mask traffic sounds and emergency vehicle sirens distract you from concentrating on what s going on around you and their wires can tangle in the moving parts of the bicycle causing y...

Page 28: ...one will remain connected to the bike even if it is not located in the phone holder Warning Warning Warning D Night riding Riding a bicycle at night is much more dangerous than riding during the day A...

Page 29: ...to ride under conditions of poor visibility check and be sure you comply with all local laws about night riding and take the following strongly recommended additional precautions Make sure your cloth...

Page 30: ...is something that we are constantly improving and changing You can find the most current version of the guide here http giflybike com downloads GiFly App Tutorial pdf B Gi Fly System Serial Number Yo...

Page 31: ...ay Img 7 A or from App Store Img 7 B 1 2 Sync with your Facebook or Google account or create a new account see Img 8 Img 7 A B Img 8 Make sure your bike has battery before attempting to activate your...

Page 32: ...e and password you create Img 9 B Assuming that you have not already activated a Gi Fly immediately after creating an account a screen will appear to activate your Gi Fly with your unique QR code prin...

Page 33: ...case you are not able to scan the QR code you can activate the bike manually by clicking Type QR code at the top of the screen Img 11 Enter in your bike s QR code num ber see Section 9 B for the locat...

Page 34: ...rogram a new USB key is the same as the process for using your USB key for the first time Using Your USB key for the first time Your USB key will arrive unprogrammed That is you will need to introduce...

Page 35: ...ch the following video http giflybike com downloads How to fold your GiFly mp4 You can damage Gi Fly s saddle if you do not fold the bike carefully Once your bike is folded rest the saddle onto the gr...

Page 36: ...in line with one another Img 14 E release the front brake engage the rear break with your right hand and bring the front of the bike backwards Gently rest the bike on its two wheels and saddle Img 14...

Page 37: ...s Img 15 D With your left hand on the handlebars maintaining a 45 degree angle to the right and your right hand gripping the folding lever pull up with significant force on the folding lever so that t...

Page 38: ...you unfold it the left pedal is positioned correctly when the right pedal is positioned as shown in Img 16 C Tilt the handlebar 45 degrees to the right Img 16 D Push the bike forward with both wheels...

Page 39: ...the right pedal is positioned as shown in Img 17 C Tilt the handlebar 45 degrees to the right Img 17 D Push the front wheel forward with your left hand on the left grip while simultaneously keeping t...

Page 40: ...ling the bike Img 18 C 1 2 3 vi Adjusting your folding mechanism and eliminating play between the front and rear parts of the bike If when riding your Gi Fly and particularly when using the front brak...

Page 41: ...he folding lever gets trapped within the frame or if the lever becomes difficult to move then you must slightly loosen the folding mechanism s adjustment screw 4 5 6 Img 19 In the case that you have f...

Page 42: ...ghts on then your lights will turn on when you use the USB key Caution G Gi Fly s smart locking system Gi Fly has an integrated mechanical lock within its frame The locking system refers to the abilit...

Page 43: ...pp If you find yourself without a smartphone or if the Gi Fly mobile app is non functional please use your USB key to manage Gi Fly s locking mechanism See Section 9 G ii Caution ii Locking Unlocking...

Page 44: ...een Turn on the option Auto Lock by sliding the little toggle With the Auto Locking system activated your Gi Fly will lock automatically once a certain amount of distance is between your phone and you...

Page 45: ...B cable to the bike s USB port Place your mobile device in Gi Fly s phone holder for more information on using Gi Fly s phone holder please see Section 10 H You can charge your mobile device via the b...

Page 46: ...ct giflybike com Do not take the battery apart or out of the frame of the bike Only specialized personnel should handle the battery If the frame is ope ned by unauthorized personnel the product will l...

Page 47: ...ette Do not disassemble or change internal parts Use a suitable charger and the appropriate voltage Charger and battery should be maintained within the appropriate temperature range and moisture condi...

Page 48: ...increase which in time reduces the ability of the battery to deliver its charge For this reason a new battery will always perform better than an older battery Under proper usage your LifePo4 battery...

Page 49: ...y unused for more than half a year then your battery may lose its ability to charge Do not drop the battery or subject it to strong impacts Impacts can damage the inter nal battery safety devices and...

Page 50: ...port cover removed from the charging port Img 27 Insert the charging lead as seen in Img 27 Img 28 When the power light turns Red and the charging light turns Orange the battery is charging Img 28 Cha...

Page 51: ...t Img 30 Img 31 Ensure that the rubber charging port cover is in place before riding Img 31 NOTE Check whether the battery is fully charged via the Gi Fly mobile app If not return to charge Please dow...

Page 52: ...death Applying brakes too hard or too sud denly can lock up a wheel which could cause you to lose control and fall Sudden or excessive application of the front brake may throw the rider over the hand...

Page 53: ...ls the front brake It is important to check and familiarize yourself with the sensitivity of Gi Fly s brakes Make sure that your hands can reach and squeeze the brake levers comfortably If your hands...

Page 54: ...no traffic or other hazards and distractions Everything changes when you ride on loose surfaces or in wet weather It will take longer to stop on loose surfaces or in wet weather Tire adhesion is reduc...

Page 55: ...er weight including clothing and luggage tire type terrain surface texture weather conditions as well as the amount that the rider is pedaling Continual use of the motor assistance while riding will l...

Page 56: ...aintenance durability and added safety The primary components of the CDRIVE System are a specially engineered industrial grade belt together with high precision molded front and rear sprockets Please...

Page 57: ...ious injury Warning Img 35 i How to regulate the belt tension To regulate the belt tension you must adjust the belt drive adjustment screw displayed as i in Img 36 Img 36 A CDRIVE System consists of a...

Page 58: ...kage Do not bend backwards Do not use as a chain whip Do not bundle Do not crimp Do not twist Do not invert F Solid tires We designed Gi Fly to be used with the tires we provide We do not recommend yo...

Page 59: ...nent of Gi Fly s saddle was custom engineered to have a kevlar layer This is to reduce damage to the rear of the saddle when folding the bike and when moving the folded bike Img 38 H Cell phone holder...

Page 60: ...ould not have your phone in the bike s phone holder as your pho ne will get wet and break When riding in the rain put your phone in your pocket backpack etc The rider is responsible for any damage the...

Page 61: ...en making sharp turns Warning The pedals on Gi Fly were specifically designed for the bike We recommend that you do not change the pedals as this could inter fere with the bike s folding mechanism Cau...

Page 62: ...stem Do not use polishes waxes or solvents to clean your Gi Fly Caution Wheels brake pads and discs are particularly subject to wear Please allow a specialty retailer to check these key parts on a reg...

Page 63: ...nd that you ask your dealer to check the quality of your work the first time you work on something and before you ride the bike just to make sure that you did everything correctly Since that will requ...

Page 64: ...same If any feel loose have your dealer check the wheel for tension and trueness Check the tires for excess wear cuts or bruises Have your dealer replace them if necessary Check to make sure that all...

Page 65: ...ems cranksets brakes etc which have sustained an impact must not be ridden until they have been disassembled and thoroughly inspected by a qualified mechanic See Appendix B A crash or other impact can...

Page 66: ...wish to make a warranty claim you must provide your original proof of purchase sales receipt or order confirmation Keep this information in a safe place Before we can process a warranty claim you mus...

Page 67: ...the front wheel by the handlebars upwards while simultaneously moving the left pedal backwards until the pedal is freed from the spokes ii My bike is not folding or is not folding properly This proble...

Page 68: ...folded bicycle does not stand by itself This problem may appear for the following reasons 1 The saddle is adjusted to extreme positions too high or too low Solution Respect the minimum and maximum li...

Page 69: ...pdf 11 Another authorized user is connected to the same bike That is someone who has received and accepted an invitation from the owner of the Gi Fly is still connected to the bike Solution The guest...

Page 70: ...e is not connected to the bike Solution Please open the app and connect to the bicycle 2 You have not updated the Gi Fly mobile app Solution Update the latest version of the Gi Fly mobile app via the...

Page 71: ...me of your friend 3 Your smartphone is not connected to the internet Solution Your smartphone must be connected to the internet in order to operate the app 4 You have not updated the Gi Fly mobile app...

Page 72: ...e any battery Solution Charge your bike s battery Please go to Section 10 A iv for further instruction 2 Your bike s battery is off Solution Please turn on the battery by pressing the button on the un...

Page 73: ...ar wheel off the ground and spin the wheel Is there interference with the belt Does the belt challenge the movement of the rear wheel If so visit the mechanic in your local bike shop E I am unable to...

Page 74: ...ing the phone holder properly Solution Please check the phone holder manual which you can find in the bike s box I The bike folds a little at the hinge when I use the brake This problem may appear for...

Page 75: ...ns General Purpose Riding Bikes designed for riding in Urban Conditions plus smooth gravel roads and improved trails with moderate grades where the tires do not lose contact with the ground INTENDED f...

Page 76: ...ked periodically by your dealer for indi cators of stress and or potential failure including cracks deformation corrosion paint peeling dents and any other indicators of potential problems inappropria...

Page 77: ...e This requires a lot of ma terial and a lot of weight Any structure that must be light and strong will have a finite fatigue life Aircraft race cars and motorcycles all have parts with finite fatigue...

Page 78: ...5 Investigate and find the source of any noise It may not a be a crack but whatever is causing the noise should be fixed promptly Fatigue Is Not A Perfectly Predictable Science Fatigue is not a perfec...

Page 79: ...ned above The more you fit the shorten product life profile the more you must question the use of super light components The more you fit the lengthen product life profile the more likely it is that l...

Page 80: ...the nut and turn it clockwise with a coin or similar tool Slide it toward the rim until it s tightened Remember to keep good balance on both ends of the reflector to the rim Each pedal has reflectors...

Page 81: ...79 Img 40...

Page 82: ...80 Img 41...

Reviews: