background image

Appliance description

3

1.5

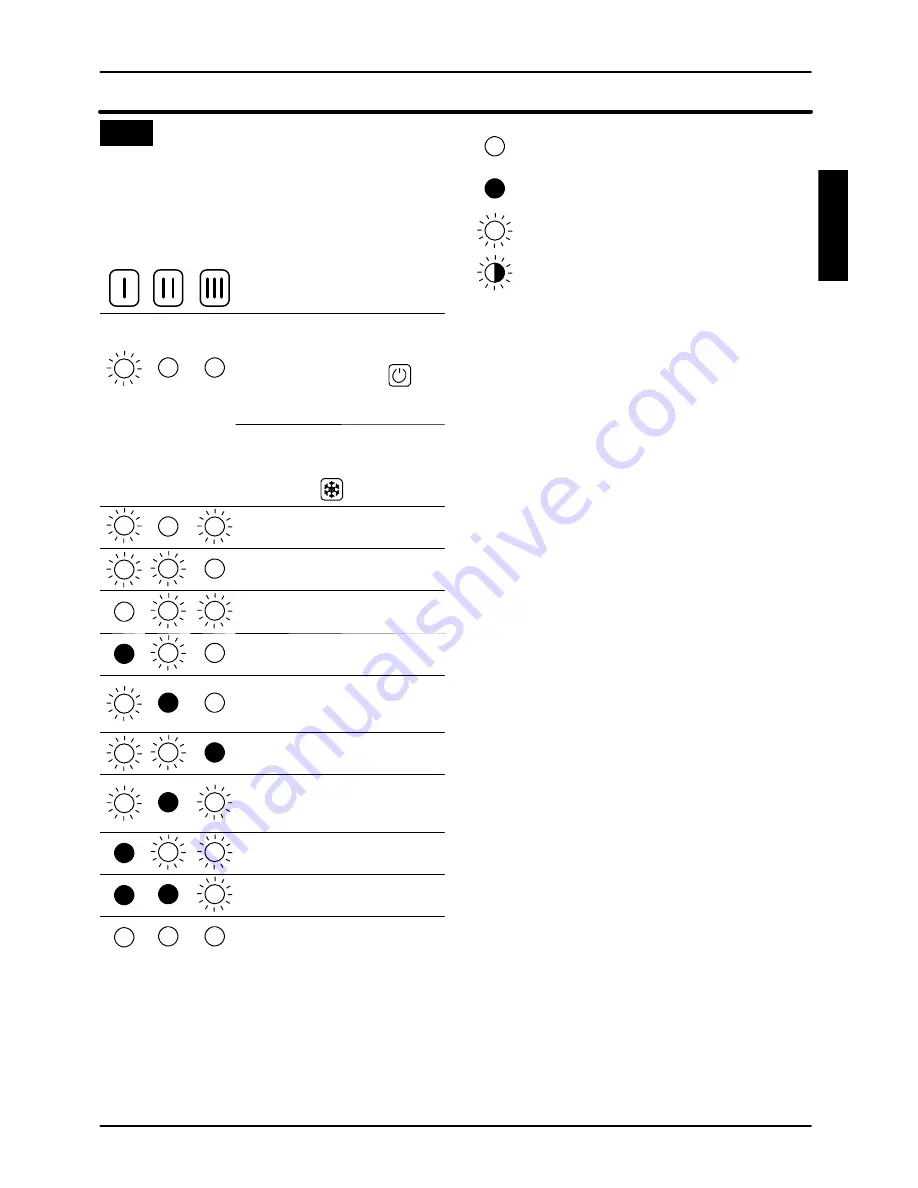
Operation lights

Three lights (9 in Fig. 1.3) give detailed indication

regarding the operation of the boiler.
The following table gives the relationship between

each of the possible light combinations and their

meaning.

A short pulse every 4

seconds:

stand---by condition

Function selector in

position.

Anti---freeze system active
1 second pulse every 2

seconds: normally

operating boiler. Function

selector in

position

C.h. operation

Frost protect operation

Faulty c.h. temperature

probe NTC
Faulty flue temperature

probe NTC
Faulty primary circuit

(no water or absence of

flow)

Faulty air pressure switch

Lack of burner ignition (no

ignition signal from the full

seqence ignition device)

Safety thermostat lock out

Flue temperature probe

NTC lock out
Lack of power supply or

fauly electr. control p.c.b.

Lamp OFF

Lamp ON

Flashing lamp, alone or simultaneously

with an other lamp.
Flashing lamp, alternate with another

lamp.

USE

Summary of Contents for Parva HE M96.28SR/P

Page 1: ...Wall hung fan flue room sealed high efficiency gas boiler User manual and Installation instructions GARDA HE SYSTEM Models M96 28SR P M96 32SR P...

Page 2: ...t is of the correct gauge for the flow to the boiler is fitted with all the safety and control de vices required by the current Regulations n Ensure that the installer has connected the pressure relie...

Page 3: ...gh risk follow good hygiene prac tices wash handsbefore touching eyes consum ing food drinking or using the toilet First aid Medical attention must be sought fol lowing eye contact or prolonged redden...

Page 4: ...It is also sensible to initially fire and com mission the boiler before connecting any ex ternal controls such as a room thermostat By this method if you have a subsequent prob lem following the addi...

Page 5: ...20 6 3 Installing the bracket 20 6 4 Overall dimensions 21 6 5 Joints 21 6 6 Mounting the boiler 21 6 7 Fitting the flue system 22 6 8 Choice of flue 22 6 9 Electrical connections 24 6 10 External fro...

Page 6: ...l knob 8 Service knob 9 Appliance operation lights The service knob 8 is useless for the normal oper ation of the boiler It must be used only by a qualified person during commissioning and servicing 1...

Page 7: ...ry 2 seconds normally operating boiler Function selector in position C h operation Frost protect operation Faulty c h temperature probe NTC Faulty flue temperature probe NTC Faulty primary circuit no...

Page 8: ...ro cedure you are advised to contact your In staller or an Approved Engineer This appliance is provided with a built in anti freeze system that operates the boiler when the temperature is below 5 C Th...

Page 9: ...pre set in the factory can however be reduced in level according to actual system requirements Such adjustments must be carried out by a quali fied person therefore we advise you to contact your insta...

Page 10: ...the electricity supply to the boiler by means of the fused spur isolation switch 2 Shut off the gas supply cock 12 and the valves for the water circuit fitted under the boiler Fig 2 8 3 Empty the wate...

Page 11: ...will be inspected and cleaned This service can be part of a maintenance con tract In particular you are advised to have the following checks carried out primary heat exchanger burner exhaust fume duc...

Page 12: ...case tempera ture rise in the circuit can cause the pressure relief valve to open So that this does not happen and to decrease the pressure to a normal value it is advisable to vent some of the water...

Page 13: ...ow switch 21 C h temperature probe NTC 22 Flame detecting electrode 23 Ignition electrodes 24 Burner 25 Combustion chamber 26 Primary heat exchanger 27 Fan 28 Air switch pressure test points 29 Flue t...

Page 14: ...Technical information 10 4 2 Main diagram 39 30 41 40 20 26 23 35 17 33 19 36 16 38 11 13 12 37 27 22 21 34 32 24 15 31 14 10 29 Fig 4 2 INSTALLATION...

Page 15: ...ermostatic valves or sys tem component cocks the by pass valve ensur es a minimum flow of water through the primary heat exchanger 4 4 Expansion vessel Note this boiler is designed for operation only...

Page 16: ...easonal efficiency G20 B band B 87 7 Seasonal efficiency G30 G31 B band B 87 1 Gas supply pressures Gas Natural G20 Butane G30 Propane G31 Norm Pa mbar 2 000 20 2 900 29 3 700 37 Max Pa mbar 2 500 25...

Page 17: ...2 3 15 AF Flue design Flue pipe diameter Coaxial mm 60 100 Twin split pipes mm 80 Roof mm 80 125 Nominal heat flow rate A C kW 29 0 Exhaust temperature C C 90 Mass flow rate C g s 21 1 Flue gas figure...

Page 18: ...Seasonal efficiency G20 B band B 86 8 Seasonal efficiency G30 G31 B band B 88 8 Gas supply pressures Gas Natural G20 Butane G30 Propane G31 Norm Pa mbar 2 000 20 2 900 29 3 700 37 Max Pa mbar 2 500 25...

Page 19: ...2 3 15 AF Flue design Flue pipe diameter Coaxial mm 60 100 Twin split pipes mm 80 Roof mm 80 125 Nominal heat flow rate A C kW 33 3 Exhaust temperature C C 90 Mass flow rate C g s 21 5 Flue gas figure...

Page 20: ...is drawn tothe requirementsof the current I E E Wir ing Regulations and in Scotland the electrical provisions of the Building Regulations applicable in Scotland with respect to the installation of the...

Page 21: ...both to the boiler and the other appliance when they are in use at the same time Pipework must be of adequate size Pipes of a smaller size than the boiler inlet connection should not be used Installat...

Page 22: ...ed to assure a minimum flow of 500 600 lts hr through the main heat ex changer If you are installing a system that includes thermo static radiator valves TRV and or small bore 8 10 mm it may be necess...

Page 23: ...competent person and be in accordance with the current I E E Regulations and any local regulations which apply Reference should be made tu the current ETCI rules for electrical installations For Irel...

Page 24: ...with during installation To allow maintenance procedures it is necess ary to leave the minimum gaps indicated in Fig 6 1 25 50 200 200 Fig 6 1 all dimensions in mm When installing the boiler in a cup...

Page 25: ...lief valve 15 Condensate drain 25 plastic Tab 6 1 sizes in mm o d 6 6 Mounting the boiler 1 Take the protective caps off the boiler pipe work 2 Thoroughly clean the connections 3 Mount the boiler on i...

Page 26: ...its are available for connecting to the boiler Standard horizontal flue kit Fig 6 6A Co axial 60 100mm nominal length 1m Thiskitisnormally supplied with the boiler and can be fitted to allow discharge...

Page 27: ...he pipe that discharges the exhaust gasses Consequently it is possible to extend the flue system to a greater distance than that pro vided by the standard horizontal co axial flue If either an additio...

Page 28: ...ute Each additional elbow reduces the overall accept able length of the flue system as follows 45 reduce length by 0 5 m 90 reduce length by 1 m 90 1 m 45 0 5 m max 8 5 m Only for M96 32SR max 6 m max...

Page 29: ...ing from the fused spur isolation switch to the power supply terminal block of the boiler Fig 6 13 keeping the same connections for the live brown wire and the neutral blue wire External 3 A fuse or f...

Page 30: ...olation switch Fig 6 15 6 10 External frost protection 10 Connect the frost thermostat between ter minals 1 and 2 as shown in Fig 6 16 Do not connect live wires to terminals to which the room thermost...

Page 31: ...ration is controlled by the external control terminal block In Fig 6 18 the boiler is not permanently con nected to the supply line The boiler operation is controlled by switching the mains supply In...

Page 32: ...erminal block Room thermostat A B 5 4 Cylinder thermostat C 1 2 8 7 6 GY WH OR GRYE BL 2 3 8 5 7 MAINS 230V a c Switched 3 Amp fused spur L N 2 3 1 Programmer HTG HW OFF HW ON L N 2 1 4 6 7 Power supp...

Page 33: ...ink Room thermostat A B 4 5 Cylinder thermostat C 1 2 8 7 6 GY WH OR GRYE BL 2 3 8 5 7 MAINS 230V a c Switched 3 Amp fused spur L N 2 3 1 Programmer HTG HW OFF HW ON L N 2 1 4 6 7 Power supply L N 2 3...

Page 34: ...nd check the gas connector on the appliance for leaks Open position 12 Fig 7 1 7 3 Initial filling of the system 1 Open the c h flow and return valves 2 Remove the front panel of the case see the sect...

Page 35: ...ly normally If externalcontrols are fitted e g Timeclock room thermostat ensure they call for heat 1 Turn on the electricity supply to the boiler switching on the fused spur isolation switch The appli...

Page 36: ...gas pressure adjustment procedure is given in the Gas Valve section of the service manual If maximum and or minimum gas pressures are adjusted then the ignition gas pressure must be checked and adjust...

Page 37: ...ated in Fig 7 6 and ensure that the timer selector switch and room thermostat if fitted are set to heat demand 7 9 8 5 6 Fig 7 6 5 Keep pressed the reset button 6 for about 10 seconds until the lock o...

Page 38: ...bout 5 seconds until the lamps 9 all brief ly simultaneously blink 14 To reset the boiler to the normal operation turn it OFF and ON by the function selector 7 In any case the boiler automatically res...

Page 39: ...con densate traps 7 12 Instructing the user Hand over this combined User Installation man ual and the Service manual tothe end user and ex plain how to use the unit Take the User step by step through...

Page 40: ...lfor detailed in structions 5 Carry out the conversion for the type of gas re placing the burner injectors correctly 6 Re assemble the burner the front panel of the combustion chamber and the lid of t...

Page 41: ...it ON by the function selector 7 on the desired operation and checking the ignition pressure and that the burner lights up uniformly In any case the boiler automatically resets to its nor mal operati...

Page 42: ...off the gas cock before carrying out any pro cedures whatsoever for cleaning mainten ance opening or dismantling boiler panels 9 2 Dismantling the external panels Front panel 1 Loosen the three screw...

Page 43: ...e burner 1 Take off the front of the case 2 Take off the removable front of the air tight chamber and the front panelof the combustion chamber 3 Brush out the burner with a bristle paintbrush 9 7 Chec...

Page 44: ......

Page 45: ......

Page 46: ......

Page 47: ......

Page 48: ...17962 1404 0 1607 48A5 UK Biasi UK Ltd Newman Park Western Way Wednesbury WS10 7BJ Sales Tel No 0121 506 1340 Sales Fax No 0121 506 1360 Service Tel No 0121 506 1350 Service Fax No 0121 506 1370 www...

Reviews: