background image

9

8

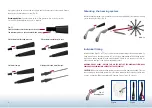
Apply glue to the wire core and the cut surface and fit the adapter onto the temple. Ensure 
the adapter sits straight and secure (Fig. 11).

Recommendation: 

Cyanoacrylate quick-action glue with low viscosity (such as 

Loctite 406) Hardening time: approx. 2 minutes. 

Fig. 11
Push the adapter onto the temple all the way 
The indent must be on the underside when fitting

Mounting the hearing system

Mount the hearing system onto the adapter and secure it using a BHM pin setter and locating 
pin (on the adapter ring) - Fig. 12.

Individual fitting

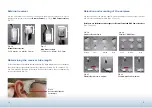
Individual fitting (Figs. 13 to 15) is possible after adequate warming of the hearing system by 
using hot air only on the area specified in Fig. 13 using a frame warmer. The hearing system 
may only be heated uniformly in the area stipulated. Please do not use any tools such as 
pliers because damage to the plastic material may result.

WARNING: RISK OF BURNS – ENSURE THAT ALL THE PARTS OF THE HEARING SYSTEM HAVE 
COOLED BEFORE COMING INTO CONTACT WITH BODY PARTS!!!

CAUTION: 

When bending the hearing system, never use a naked flame for heating. This can 

cause damage to the hearing system. Only the frame warmer with slit nozzle provided may 
be used for heating. Max. temperature: 60 degrees Celsius / max. 45 seconds

Plastic temple with round wire core

Plastic temple with flat wire core

Flat metal temple

Slimline and round metal temple

Abb. 12 

Fig. 15

Fig. 14

Fig. 13

Bending zone

Summary of Contents for Pan Series

Page 1: ...Fitting Manual for pan...

Page 2: ...t hearing aid acousticians doctors and show proper fitting and adjustment of the pan hearing system Purpose Hearing systems are developed to improve hearing The key functions of a hearing sys tem are...

Page 3: ...adapter at marking B Fig 7 Determining the temple length To determine the correct temple length use the fitting template supplied Fig 1 Ensure the wearing position of the spectacles is correct Use a p...

Page 4: ...is an adapter ring with different adapters suitable for different wire cores Fig 10 Select from them the adapter suitable for your temple Fig 9 Clean the wire core and remove any grease Fig 10 C Adap...

Page 5: ...ng of the hearing system by using hot air only on the area specified in Fig 13 using a frame warmer The hearing system may only be heated uniformly in the area stipulated Please do not use any tools s...

Page 6: ...al is read to determine the receiver tube length Fig 18 Selection and mounting of the earpiece Use the condition of the auditory canal to select the earpiece suitable for your customer and fit it onto...

Page 7: ...e by pressing together the mounting tool Insert the High Power receiver into the open earpiece Carefully remove the mounting tool Ensure that the earpiece is fully on the mounting tool Removing the HF...

Page 8: ...ng the frame warmer Fig 28 Allow the receiver to cool for at least one minute and remove the spiral spring and protective sleeve Fig 29 Mounting and dismounting the receiver See Figs 23 to 25 for fitt...

Page 9: ...r on the programming cable connector is on the same side as the marking on the housing no connection is established otherwise Fitting software To guarantee problem free function only use BHM Tech soft...

Page 10: ...18 Notes...

Page 11: ...the content BHM Tech Design RABOLD UND CO Photos BHM Erwin Muik BHM Tech Produktionsgesellschaft mbH Grafenschachen 242 7423 Grafenschachen Austria www bhm tech at According to EU guidelines 93 42 EE...

Reviews: