background image

Register your product warranty online at: www.BHFitnessUSA.com

Questions regarding warranty and parts call:  636.634.2217

 2 

TM

TABLE OF CONTENTS 

Title  . . . . . . . . . . . . . . . . . . . . . . . . . Page

Congratulations  . . . . . . . . . . . . . . . . 02

Warnings and Labels  . . . . . . . . . . . . 03

Safety Information  . . . . . . . . . . . . . . 04

Exercise Instruction  . . . . . . . . . . . . . 05

Training Guidelines   . . . . . . . . . . . . . 06

Suggested Stretches  . . . . . . . . . . . . 10

Assembly Instructions  . . . . . . . . . . . 12

Notice and Inspection  . . . . . . . . . . . 15

Exploded View Drawing  . . . . . . . . . . 16

Parts List . . . . . . . . . . . . . . . . . . . . . . 17

Console Operations  . . . . . . . . . . . . . 18

Maintenance And Cleaning  . . . . . . . 20

French / Français . . . . . . . . . . . . . . . 21

CONGRATULATIONS

Congratulations on your purchase of  

BH Fitness equipment. We hope you appreciate 

the style, quality, and value that exercisers 

around the world have come to expect from  

BH Fitness.
If you have any questions, concerns or product 

issues please call our Customer Service  

Team at 1-866-325-2339 or email us at 

[email protected]
Carefully read through the instructions 

contained in this manual. They provide you with 

important information about assembly, safety, 

fitness and use of the machine. Please 


read ALL the safety information contained on 

the following page.

TM

Summary of Contents for BLADEZ ECHELON GS

Page 1: ...les MO 63301 p 636 487 0050 www BHFitnessUSA com www BHFitnessCanada ca Important Read all instructions carefully before using this product Register your product warranty online at www BHFitnessUSA co...

Page 2: ...eaning 20 French Fran ais 21 CONGRATULATIONS Congratulations on your purchase of BH Fitness equipment We hope you appreciate the style quality and value that exercisers around the world have come to e...

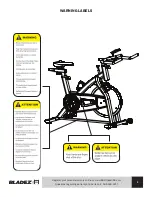
Page 3: ...3 Register your product warranty online at www BHFitnessUSA com Questions regarding warranty and parts call 636 634 2217 TM WARNING LABELS...

Page 4: ...son or doctor 9 Do warm up stretching exercises before using the equipment 10 Do not use the machine if it is not working correctly 11 Before using the machine thoroughly inspect the equipment for pro...

Page 5: ...the recommended exercise level Do not over exert yourself 3 If you feel any pain or discomfort stop exercising immediately and consult your doctor 4 Wear appropriate clothing and footwear for the exer...

Page 6: ...t is the muscular endurance of your legs to carry you 10 km without stopping FLEXIBILITY The range of motion of your joints Improving flexibility involves the stretching of muscles and tendons to main...

Page 7: ...As you become more fit a higher intensity of exercise is required to create an overload and therefore provide continued improvement SPECIFICS Different forms of exercise produce different results The...

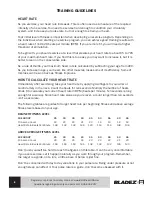
Page 8: ...ack as fitness improves HOW TO CALCULATE YOUR HEART RATE Immediately after exercising take your heart rate by applying two fingers to your wrist or carotid artery in the neck Count the beats for ten s...

Page 9: ...exercising and consult your doctor WHAT TO WEAR Wear clothing that will not restrict your movement in any way while exercising Clothes should be light enough to allow the body to cool Excessive cloth...

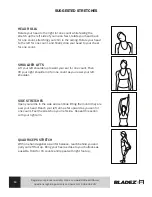
Page 10: ...chest for one count SHOULDER LIFTS Lift your left shoulder up toward your ear for one count Then lift your right shoulder up for one count as you lower your left shoulder SIDE STRETCHES Open your arm...

Page 11: ...d shoulders relax as you stretch toward your toes Reach down as far as you can and hold for 15 counts HAMSTRING STRETCHES Sit with your right leg extended Rest the soles of your left foot against your...

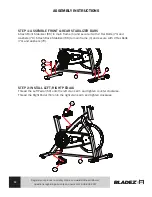
Page 12: ...ZER BARS Attach Front Stabilizer 65 to main frame 1 and secure it with 2 Hex Bolts 71 and washers 70 Attach Back Stabilizer 66 to main frame 1 and secure with 2 Hex Bolts 71 and washers 70 STEP 2 INST...

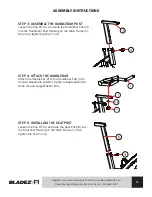
Page 13: ...he Handlebar Post 3 into the Handlebar Post Housing on the Main Frame 1 Secure by tightening Pop Pin 4 STEP 4 ATTACH THE HANDLEBAR Attach the Handlebar 2 to the Handlebar Post 3 to desired adjustable...

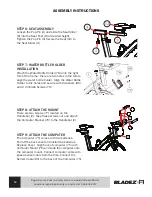
Page 14: ...ter bottle holder Align the Water Bottle Holder to the holes and secure with 2 washers 80 and 2 Umbrella Screws 79 STEP 8 ATTACH THE MOUNT There are two screws 77 located on the Handlebar 2 Take these...

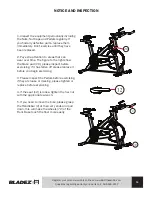
Page 15: ...that can wear over time The figure to the right show the brake pad 20 please inspect before exercising if it has fallen off please replace it before you begin exercising 3 Please inspect the Pedals be...

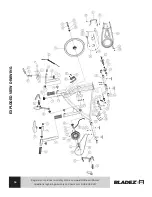
Page 16: ...Register your product warranty online at www BHFitnessUSA com Questions regarding warranty and parts call 636 634 2217 16 TM EXPLODED VIEW DRAWING...

Page 17: ...Cap nut 1 EchelonGS 61 Inner hexagon flat round head screw 1 EchelonGS 20 Braking pad 1 EchelonGS 62 Nylon nut 1 EchelonGS 21 Braking pad holder 1 EchelonGS 63 C shaped axle buckle 1 EchelonGS 22 Bra...

Page 18: ...STANCE FUNCTION FROM MILES TO KILOMETERS After installing the batteries in the console the default distance speed measurement is in Miles and is noted by an M on the display in the speed SPD and dista...

Page 19: ...pressing MODE until DST appears on the console ODOMETER Press the MODE button until the pointer advance to ODO the total accumulated distance will be shown PULSE The current heart rate is displayed i...

Page 20: ...computer surface may collect dust or finger prints The use of harsh chemicals will destroy the protective coating and cause a static build up that will damage the components This surface may be cleane...

Page 21: ...tnessUSA com www BHFitnessCanada ca Important lisez attentivement toutes les instructions avant d utiliser ce produit Enregistrez la garantie de votre produit en ligne sur www BHFitnessUSA com Conserv...

Page 22: ...riel CustomerSupport BHNorthAmerica com Lisez attentivement les instructions fournies dans ce guide Elles contiennent des renseignements importants propos du montage de la s curit de la condition phys...

Page 23: ...23 Enregistrez la garantie de votre produit en ligne sur www BHFitnessUSA com Questions sur la garantie et les pi ces appelez le 636 634 2217 INSTRUCTIONS DE MONTAGE ET TIQUETTES DE MISE EN GARDE...

Page 24: ...Faites des exercices d tirement avant d utiliser l appareil 10 N utilisez pas l appareil s il ne fonctionne pas correctement 11 Avant d utiliser l appareil v rifiez soigneusement qu il est correcteme...

Page 25: ...as 3 Si vous ressentez quelque douleur ou malaise que ce soit interrompez imm diatement votre s ance d exercice et consultez votre m decin 4 Portez des v tements et des chaussures adapt s l exercice N...

Page 26: ...10 km sans s arr ter FLEXIBILIT L amplitude de mouvement de vos articulations Pour am liorer sa flexibilit il faut tirer ses muscles et ses tendons afin de maintenir ou d augmenter sa souplesse laque...

Page 27: ...n forme plus l exercice devra tre intense pour cr er une surcharge et que vous continuiez ainsi de vous am liorer SP CIFICIT Diff rentes formes d exercice produisent diff rents r sultats Le type d exe...

Page 28: ...ailleurs l entra nement peut tre un moyen d viter une partie de ces pertes musculaires COMMENT CALCULER VOTRE FR QUENCE CARDIAQUE Imm diatement apr s votre entra nement mesurer votre fr quence cardiaq...

Page 29: ...t consultez votre m decin V TEMENTS RECOMMAND S Portez des v tements qui ne g neront aucunement vos mouvements durant l entra nement Ils devraient tre assez l gers pour laisser le corps se refroidir T...

Page 30: ...sur la poitrine sur un temps SOUL VEMENTS DES PAULES Soulevez l paule gauche vers l oreille sur un temps Soulevez ensuite l paule droite sur un temps en abaissant l paule gauche TIREMENTS LAT RAUX Ou...

Page 31: ...n vous tirant vers les orteils Descendez le plus bas possible et comptez 15 temps TIREMENTS DES ISCHIO JAMBIERS En position assise tendez la jambe droite Appuyez la plante du pied gauche contre l int...

Page 32: ...ant 65 sur le ch ssis principal 1 et fixez le avec 2 boulons hexagonaux 71 et des rondelles 70 Installez le stabilisateur arri re 66 sur le ch ssis principal 1 et fixez le avec 2 boulons hexagonaux 71...

Page 33: ...ez la tige avant 3 dans son bo tier sur le ch ssis principal 1 et fixez en resserrant la tige de r glage 4 TAPE 4 FIXEZ LE GUIDON Fixez le guidon 2 sur la tige avant 3 et r glez le la position d sir e...

Page 34: ...porte bidon d eau sur les orifices et fixez le avec 2 rondelles 80 et 2 vis t te parapluie 79 TAPE 8 FIXEZ LE SUPPORT D ORDINATEUR Fixez le support d ordinateur 76 sur le guidon 2 l aide de 2 vis 77 R...

Page 35: ...ement les endroits susceptibles de s user au fil du temps La figure ci contre montre la plaquette de frein 20 v rifiez la avant d utiliser l appareil et remplacez la d abord si elle est tomb e 3 Avant...

Page 36: ...Enregistrez la garantie de votre produit en ligne sur www BHFitnessUSA com Questions sur la garantie et les pi ces appelez le 636 634 2217 36 VUE CLAT E...

Page 37: ...Rondelle en caoutchouc 2 EchelonGS 40 Rondelle en plastique du garde cha ne 2 EchelonGS 41 Rondelle plate 2 EchelonGS 42 Vis t te parapluie cruciforme 2 N Description QT EchelonGS 43 Boulon cruciforme...

Page 38: ...DE DISTANCE Apr s l installation des piles dans la console la distance et la vitesse sont mesur es pard faut en kilom tres ce que l cran indique par un K dans les fonctions de vitesse SPD et de distan...

Page 39: ...uyez sur MODE jusqu ce que DST apparaisse sur la console ODOM TRE Appuyez sur le bouton MODE jusqu ce que le pointeur avance jusqu ODO pour afficher la distance totale parcourue POULS Appuyez sur le b...

Page 40: ...ons fortement de vous procurer un tel produit de nettoyage 7 Le degr de s curit de l appareil ne peut tre maintenu que par des examens r guliers visant d tecter des dommages ou de l usure ventuels 8 P...

Reviews: