background image

Advanced Setup 

88 


3)


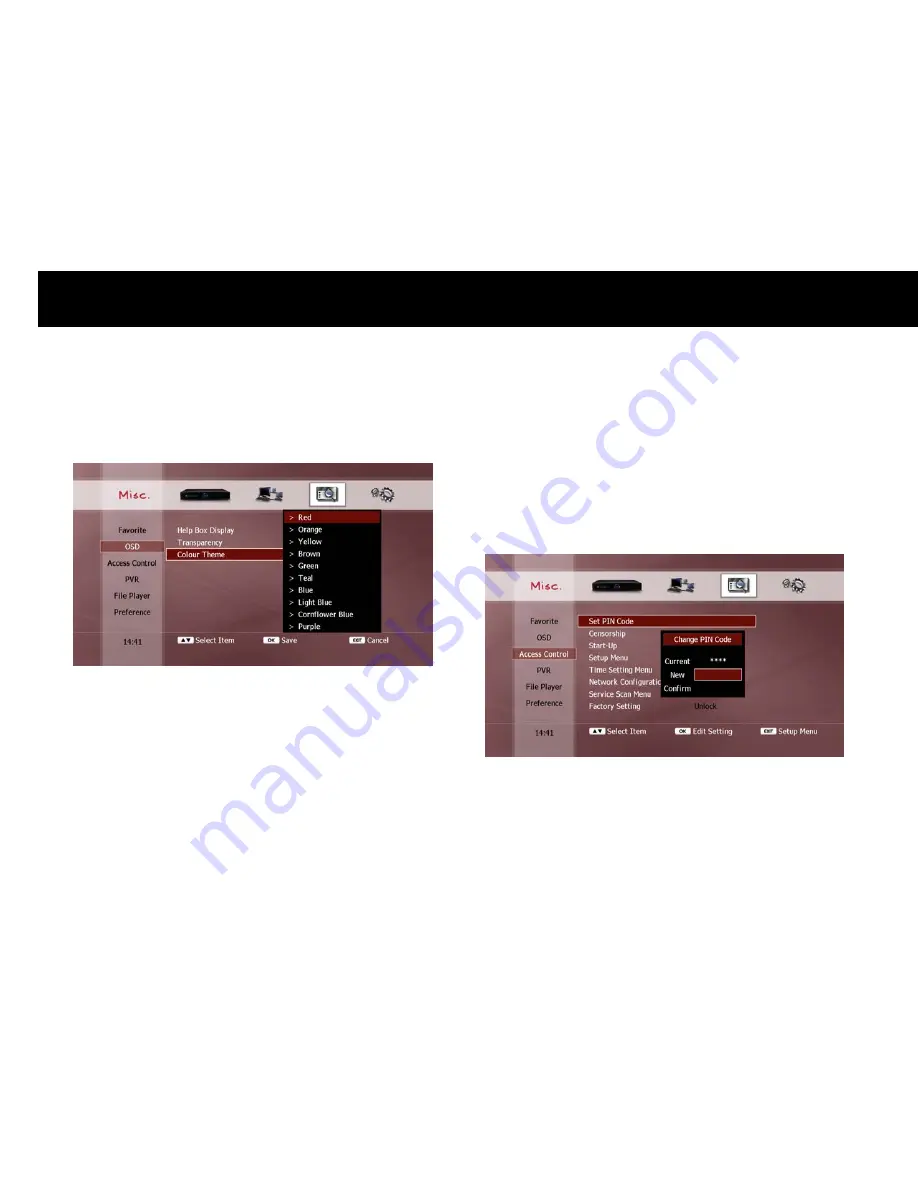
Colour Theme 

You can choose between 10 colour themes for on-screen menus and 

information boxes. 


1-3.


Access Control 

You can set a 4-digit PIN number to control access to certain set-up 

menus.  After setting a PIN number, users must enter the PIN number 

to access the menu.     


1)


Set PIN Number 

Press the OK button to open the “Change PIN Code” pop-up window, as 

shown below; 


Use the NUMERIC buttons to enter the current PIN number, then your 

desired new PIN number, and then repeat your desired new PIN number 

to confirm it was entered correctly 

 
NOTE 


The default PIN number is 0000. 


Summary of Contents for DP-Lite

Page 1: ...USER GUIDE DP Lite Version 1 52_Eng...

Page 2: ...an play almost any multimedia content from any connected storage device With a DP Lite you don t have to bring your PC to your living room to enjoy your PC or Internet based content on the big screen...

Page 3: ...ult in fire or electric shock Do not place metal objects on top of the product If metal objects fall into the product it could result in a fire or electric shock Do not repair disassemble or modify th...

Page 4: ...roduct is mishandled it might cause minor damage If the product becomes marked clean it gently with a soft cloth or towel Never use chemical solvents such as benzene thinner acetone or other solvents...

Page 5: ...les Do not use the product in excessively hot or humid places or in places that may be subject to sudden changes in temperature Sudden changes in temperature can cause condensation to from inside the...

Page 6: ...ptions which this manual contains are based on the time of this manual s production The manufacturer constantly updates it with new functions and technology All the specifications are subject to chang...

Page 7: ...C 15 3 3 Direct Connection to Internet 16 4 Quick Setup 18 1 Start Quick Setup 18 1 1 Quick Setup of Video Output Format 18 1 2 Basic Operation 19 2 Configuration 22 2 1 Time Setting 22 2 2 A V Output...

Page 8: ...ntents Playback 67 2 1 Movie Playback 67 2 2 Music Playback 72 2 3 Photo Playback 72 2 4 Playlist 73 7 File Management 76 1 Add Folder 76 2 Delete 77 3 Auto Delete 78 4 Rename 78 5 Copy Move 79 6 Edit...

Page 9: ...This page intentionally left as blank...

Page 10: ...ms are included in the box Please check all package contents before using your product DP Lite Remote Control Batteries AAA size x2 USB cable male female type User Manual RCA Audio Video Cable Compone...

Page 11: ...4 This page intentionally left as blank...

Page 12: ...s and networking the most frequently used ways of sharing contents the DP Lite gives unlimited flexibility to access and play multimedia content Dual Tuner DVB T Compliant with Internal Loop through V...

Page 13: ...parts of the circular button work as the channel up and channel down buttons VOLUME Buttons the left and right parts of the circular button work as the volume down and volume up buttons Standby Butto...

Page 14: ...ervice information 15 FAV Show Favorite Service List 16 GUIDE Show EPG Electronic Program Guide 17 POP UP Show advanced menus of the current mode 18 LIST Show Service List 19 EXIT Return to the previo...

Page 15: ...TV does not turns off repeat clicking the UP button until your TV turns off Once your TV turns off when you click the UP button press the OK button The TV button blinks three times to indicate that th...

Page 16: ...208 209 215 216 218 224 229 253 260 270 277 286 287 296 325 337 374 410 412 SHARP 207 209 230 245 384 SONY 206 207 208 225 230 264 272 285 286 329 424 426 430 THOMSON 208 258 286 345 405 NOTE If your...

Page 17: ...4 INFO 0xBE000DF2 15 FAV 0xBE0009F6 16 GUIDE 0xBE0043BC 17 POP UP 0xBE001AE5 18 LIST 0xBE004CB3 19 EXIT 0xBE001CE3 20 UP DOWN LEFT RIGHT 0xBE004EB1 0xBE004FB0 0xBE0053AC 0xBE0054AB 21 OK 0xBE001FE0 22...

Page 18: ...Introduction 11 This page intentionally left as blank...

Page 19: ...f your TV set does not support HDMI but has a DVI input a HDMI to DVI converter can be purchased separately in this case audio signal output through the HDMI interface is disabled If you do not have a...

Page 20: ...ital audio output COAXIAL or OPTICAL 2 CH stereo analogue audio output 2 Antenna Connection Connect your TV Antenna to the DP Lite as follows Antenna In connecting to the roof Antenna RF LOOP OUT only...

Page 21: ...hown in the picture connect the DP Lite to the router with Ethernet cable included in the box If you purchase a router with a DP Lite and have no experience of connecting a router with a PC please ref...

Page 22: ...thernet crossover cable If your PC has the DHCP server feature and it is enabled all the configurations for networking will be set automatically and the DP Lite is ready to communicate with your PC If...

Page 23: ...P Lite to your ADSL Modem or Cable Modem with an Ethernet crossover cable not included in the box Most ISPs Internet Service Provider support DHCP Therefore you can connect your DP Lite directly to yo...

Page 24: ...17 This page intentionally left as blank...

Page 25: ...e format and resolution of the video output to suit your TV Since you are currently unable to access this setting through the set up menu a TV OUT button is provided on the remote control unit RCU The...

Page 26: ...ry with the UP DOWN buttons the items belonging to the sub category will be listed in the item list Press the OK button to enter the item list and use the UP DOWN buttons to select an item in the item...

Page 27: ...apply this setting If you decide not to change settings press the EXIT button to close the pop up menu Setup using the NUMERIC buttons The NUMERIC buttons are used to set configuration with numbers su...

Page 28: ...n return to lower case characters by pressing the RED button again If you need to input special characters press the GREEN button The screen keyboard now displays special characters You can return to...

Page 29: ...the NTP Network Time Protocol server Please note if choosing AUTO mode that broadcasters can occasionally transmit the wrong time and date information and this can cause problems with recording schedu...

Page 30: ...deo output set the resolution to suit the resolution of your TV screen TV Aspect Ratio select either 4 3 or 16 9 to suit the aspect ratio of your TV screen NOTE Component video output supports SD 576i...

Page 31: ...for when audio is connected directly to the TV using RF cables NOTE If you set the audio format to 2ch the DP Lite mixes down 5 1ch audio source to 2ch audio If the content of a channel broadcasted h...

Page 32: ...e the sensitivity before you supply DC power to the antenna Scanning Range Select either of the following options FULL scans all VHF and UHF channels PARTIAL scans only a specific channel or channel r...

Page 33: ...ss Once scanning is complete you are ready to watch live television by pressing the LIVE button NOTE You cannot select an end channel smaller than the start channel If you perform a FULL service scan...

Page 34: ...ay Select either of the following options Full Displays incoming video signal as 16 9 aspect ratio Centre Displays incoming video signal as 4 3 aspect ratio Input 1 Select either Composite or S VIDEO...

Page 35: ...section will guide you on how to configure the network interfaces 3 1 Enable Ethernet The first step is to enable the Ethernet interface In the Network Device menu select the LAN option NOTE If you se...

Page 36: ...ct the Enable option In this case all subsequent settings options are disabled Then press the RED button to update the LAN settings A LAN Status pop up window will now appear to show you the updated L...

Page 37: ...e the LAN settings A LAN Status pop up window will now appear to show you the updated LAN settings Press EXIT to close the LAN Status pop up window NOTE If an address you need to input does not have 1...

Page 38: ...rvice Owner ID Enter your user ID for your IceTV account Password Enter your password for your IceTV account Check User Info Press the OK button to check if your IceTV account information is valid Sel...

Page 39: ...d stream contents files from the WizPNP server the operation of WizPNP may be slow 1 Set as WizPNP Client Setting the DP Lite as a WizPNP client allows access to another beyonwiz product which has bee...

Page 40: ...server The default name is beyonwiz To change the server name press the OK button and use the Keyboard Input pop up window to enter your desired name Port This is 5 digit number which has maximum valu...

Page 41: ...hese cases you must configure the following settings Default UserName Use the Keyboard Input pop up window to enter the username of your PC user account Default Password Use the Keyboard Input pop up...

Page 42: ...are using the DP Lite in another operating mode you can return to the STB PVR mode by pressing the LIVE button on the remote control 1 Basic STB Function 1 1 Service Change 1 Change between TV and Rad...

Page 43: ...n scroll through the list quickly by using the LEFT RIGHT buttons to skip up and down one page respectively To hide the service list window press the EXIT button NOTE You can extend the service list w...

Page 44: ...y using the EPG see EPG Electronic Program Guide section later in this chapter NOTE If you press the CH or CH button continuously to change service only the information box will be updated to show you...

Page 45: ...e both information boxes as will the EXIT button at either stage The following screen shots show the layout of the information boxes and the meaning of each symbol which may appear Additional Service...

Page 46: ...ot control the volume level of the digital audio outputs set to AC3 or Dolby Digital 5 1 audio In these cases you must use the remote control of your audio decoder e g amplifier to adjust the volume l...

Page 47: ...OK NOTE You cannot use the subtitle function if the service provider does not provide a subtitle service 2 Teletext Service Teletext is a free service broadcast by TV stations which gives the latest...

Page 48: ...delay is displayed If one or more recordings are still active when the sleep timer delay is reached the DP Lite will remain on until the completion of the recording s To cancel the sleep timer press t...

Page 49: ...e that this service is locked Users must enter the 4 digit PIN code in order to watch a locked service To unlock a service repeat the procedure by pressing the GREEN button and entering the 4 digit PI...

Page 50: ...rvices which belong to that group Select a favorite group in the left column with the UP DOWN buttons and press OK The cursor then moves to the right column Select a service with the UP DOWN buttons a...

Page 51: ...as usual to change among these services on the list CH CH buttons Pressing the CH or CH buttons will change to the next or previous service as listed in the current favorite group To exit from a favor...

Page 52: ...use skip and jump Bookmark allows returning to a chosen position easily A B Repeat allows playing a chosen section repeatedly For detailed information about these functions see the Movie Playback sect...

Page 53: ...rogram even if there is a previous program stored in the time shift buffer All Record all programs in the time shift buffer File Lock You can lock the recording file to prevent unauthorised access and...

Page 54: ...ive therefore the Current Program and All options will not appear The asterisk mark on the file name indicates that the DP Lite has assigned the program name automatically If you change the program na...

Page 55: ...etails to be individually set via EPG Electronic Program Guide sets the recording details automatically This section explains the Timer List method The EPG method will be explained in the EPG Electron...

Page 56: ...to change to the radio service list Date Set the start date of the recording Move the cursor with the LEFT RIGHT buttons and change the date with the CH CH buttons or by using the NUMERIC buttons Star...

Page 57: ...fer to automatically change service in order to view the program or transfer it to an external recorder use the LEFT RIGHT buttons to select View File Lock You can lock the recording file to prevent u...

Page 58: ...use the UP DOWN buttons to select Accept and press OK To cancel the changes to the timer settings select Cancel and press OK or press EXIT 4 Delete Timer To delete an existing timer press POP UP then...

Page 59: ...s completed If remote control activity is detected during this period the DP Lite will remain on so you can continue to use it without interruption otherwise it will return to standby mode NOTE If AC...

Page 60: ...or change to a service which is already being recorded you can perform the same trick mode operations as for time shifting and file playback see Movie Playback section in Chapter 6 This applies even...

Page 61: ...ill be displayed as shown below You can perform the following functions Pause recording Press the PAUSE button to pause recording When you are ready to resume recording press the PAUSE button again St...

Page 62: ...e the duration press the LEFT or RIGHT button File Name To change the file name press the RED button File Lock To change the lock status of the recording file press the GREEN button See Instant Record...

Page 63: ...ot check if the new timer conflicts with recordings started by the instant recording method and will only do this check when the timer is ready to begin 1 New Timer Overlaps Two Existing Timers You ca...

Page 64: ...ble to respond to the timer conflict dialog within 1 minute the current recording which is scheduled to finish sooner will be stopped to allow the new timer to begin 3 Timer Overlaps Current Recording...

Page 65: ...unction the EPG will only show the services contained in the current favorite group and in the order you selected when you set it up see Favorite Group section earlier in this chapter When using the E...

Page 66: ...ly one service at a time in a list format The right column contains the program name and the left column displays the corresponding scheduled broadcast start and finish times The program currently bei...

Page 67: ...OK button The service showing in the small window will be changed accordingly NOTE If two programs are being recorded simultaneously the number of services you can view will be limited Services which...

Page 68: ...ll delete the timer and return the program to the normal grey shading NOTE When EPG Action Set Timer the REC PLAY and STOP buttons can still be used to set and delete timers Timers set via the EPG are...

Page 69: ...layback mode press the FILE PLAY button To return to the previous operation mode e g STB PVR or Setup press the EXIT button 1 Exploring Contents The File Playback menu is structured in three parts as...

Page 70: ...anise your media files see Add Folders section in Chapter 7 Network This will show the following networked devices PCs connected to your home network Networked storage devices e g NAS WizPNP servers N...

Page 71: ...e above HDD represents a playlist function This will be explained in the Playlist section later in this chapter NOTE If there is no network device listed on the screen after scanning check the network...

Page 72: ...SB device properly 2 Step 2 Select Content Type Use the LEFT RIGHT buttons to select the type of content you wish to play as follows All media icon This will show all media files contained in the sele...

Page 73: ...ontents Playback for more information To choose a particular selection of files select a desired file and press the BLUE button A tick will appear in the box alongside the selected file Repeat this pr...

Page 74: ...he previous file in the File list NEXT button Jumps to the next file in the File list STOP button Stops playback and returns to the File list When playback reaches the end of the video file the next f...

Page 75: ...6 and x1 32 speed PLAY button Reverts back to normal playback speed after using any of the above trick modes The current trick mode operation will be displayed on the screen You can also skip or jump...

Page 76: ...d position press the GREEN button You can also set multiple bookmarks Each press of the RED button will create a bookmark at the current position To see the location of all bookmarks open the progress...

Page 77: ...ove the red position marker to your desired starting position by using the trick mode functions see Trick Mode section earlier in this chapter Now press the YELLOW button The progress bar will appear...

Page 78: ...ubtitle Control menu You can change the subtitle settings as follows Subtitle State Press the OK button to switch between hiding and showing the subtitles Subtitle Position Use the UP DOWN buttons to...

Page 79: ...will not play if the content is in a format not supported by the DP Lite If you wish to play a selection of audio files located in different folders or devices use the Playlist function see Playlist...

Page 80: ...ide show and returns to the File list button Swaps between hiding and showing the help bar NOTE The rotation function is not available for some picture file formats 2 4 Playlist The playlist is a pers...

Page 81: ...ist To play the playlist select your desired file s see previous section Exploring Contents and press the OK button Playback occurs in the same manner as detailed in the corresponding Playback section...

Page 82: ...File Playback 75 This page intentionally left as blank...

Page 83: ...disk drive HDD a networked PC or storage device a USB storage device 1 Add Folder In File Play mode display the File list where the new folder is to be created see Exploring Contents section in Chapt...

Page 84: ...ss OK to cancel the delete function or press EXIT NOTE You can press the GREEN button a second time to confirm the delete function instead of selecting Yes You can only delete folders which are empty...

Page 85: ...unction applies only for the recording files 4 Rename To rename a file or folder select a file or folder in the File list see Exploring Contents section in Chapter 6 Press the POPUP button to display...

Page 86: ...u window Press the OK button to select Copy to or Move to and press the OK button The following options will be displayed alongside the window as follows HDD Select the internal HDD Network Select a n...

Page 87: ...nation folder GREEN button Create a new folder alongside the currently shown folders Use the Keyboard Input pop up window to enter your desired name see On screen Keyboard section in Chapter 4 Once yo...

Page 88: ...r in the browser window When copying or moving any other media file to the internal HDD only the contents folder will appear in the browser window To copy or move a file to a networked PC ensure that...

Page 89: ...Move the red position marker to the end of the section you wish to edit and press the POP UP button The Edit menu pop up window will be displayed as follows Select one of the following functions Delet...

Page 90: ...83 8 Internet Service The DP Lite is designed to support various Internet services Press wizTV button to access the services You can get the latest information by visiting our website wiztv com au www...

Page 91: ...84 This page intentionally left as blank...

Page 92: ...e type of the group is determined by the first service placed in it and is indicated by the TV and RADIO icons alongside the group name Place the cursor on the Group column and then you can perform th...

Page 93: ...es list Page down up Use the GREEN and YELLOW buttons to show the next or previous page of services 3 Favorite Service The second column displays the services belonging to the favorite group selected...

Page 94: ...time see Change Service with Service List section in Chapter 5 If you set this option to Hide the help box does not appear when you press the LIST button 2 Transparency You can set the transparency o...

Page 95: ...in set up menus After setting a PIN number users must enter the PIN number to access the menu 1 Set PIN Number Press the OK button to open the Change PIN Code pop up window as shown below Use the NUME...

Page 96: ...a selected classification rating or higher Start up Every time the DP Lite is turned on Setup Menu To access to Setup menu Time Setting Menu To change the time and date settings Network Configuration...

Page 97: ...e watching a live TV program You can then use all the time shift functions as described in the Time shifting section in Chapter 5 including all the trick mode operations 2 Time Shift Warning You can h...

Page 98: ...d program Set Timer Pressing the OK button will cycle between setting a recording timer setting a view timer and deleting the timer for the selected program 4 EPG Scroll You can change the scroll opti...

Page 99: ...end times of a timer override the pre padding and post padding of a previous or following timer Pre padding The scheduled end time of a timer will be overridden by the pre padding of a following timer...

Page 100: ...t will automatically restore them But manually renamed channels will be kept Normally you can not detect any clue that indicates the DCM is there 7 Skip for recordings You can configure the skip funct...

Page 101: ...your previous position in the file NOTE Resume playback is only available for the last 32 files played 2 Automatic Play Next You can set automatic play function to automatically play next files in th...

Page 102: ...racters with each press of the NUMERIC button 2 Watch TV in Background of WizTV When using the WizTV internet service you can set to watch TV in the background 3 Auto Delete You can set to enable or d...

Page 103: ...umber 2 Firmware Upgrade You can upgrade your DP Lite with the latest firmware Please visit the beyonwiz website www beyonwiz com au for firmware information To upgrade the firmware download the lates...

Page 104: ...ware file from the file list and press the OK button to start the upgrade process It takes several minutes to complete the upgrade Ensure that your DP Lite is NOT turned off until the upgrading proces...

Page 105: ...DD If you select this menu item with the OK button a confirmation pop up dialog will be displayed as shown below Select Yes and press the OK button to proceed To cancel the HDD format function select...

Page 106: ...hown below Select Yes and press the OK button to proceed To cancel the HDD check function select No and press the OK button or press the EXIT button NOTE When you turn the DP Lite on after it is turne...

Page 107: ...you wish to format and press the OK button WARNING If you format the USB storage device all the data stored in the USB storage device will be erased NOTE It takes several minutes to format a USB HDD...

Page 108: ...ion select No and press the OK button or press the EXIT button 2 Factory Setting You can restore the DP Lite to its factory configuration This will erase all setup information If you select this menu...

Page 109: ...shown below Select Yes and press the OK button to proceed To cancel the clear IceGuide disk cache function select No and press the OK button or press the EXIT button 4 Clear WizTV Disk Cache You can...

Page 110: ...he AV Cables are securely connected to the TV Make sure that the antenna cable is correctly connected to the product Check the brightness level of TV Check that the channel is currently on air Check w...

Page 111: ...the TV If the Remote control range seems to be limited check to ensure that the protective plastic film for shipping protection on the front panel of the DP Lite has been removed Remote control does n...

Page 112: ...m your provider The picture looks squashed or too wide Check whether the product has been configured to display the correct TV Aspect Ratio Setup Configuration A V Output Check whether the TV has been...

Page 113: ...106 This page intentionally left as blank...

Page 114: ...al Audio Output Coaxial Optical S PDIF Pass through Extended Interface Slots Ethernet 10 100 Ethernet Port USB Host 1 USB Host Ports USB 2 0 Compliant Video Audio Decoding MPEG 2 Video MPEG 2 up to 10...

Page 115: ...ginal carton and protective packaging or alternatively in a packing suitable to prevent damage beyonwiz will not accept any responsibility for goods damaged whilst transit 8 Repair or replacement unde...

Page 116: ...rolled waste disposal please separate this from other types of waste and recycle it responsibly to promote the sustainable reuse of resources Household users should contact either the retailer where t...

Page 117: ...tact beyonwiz beyonwiz Australia support beyonwiz com au www beyonwiz com au Some features and information in this manual may differ slightly from the product itself due to firmware version and change...

Page 118: ...Version 1 52_Eng...

Reviews: