background image

Bewan Wi-Fi USB 54 


26 

Configuration of the computers 

To connect the adapter to a Wireless network, you must first check that the Bewan Wi-Fi USB 54 
parameters are compatible with the parameters of the wireless network. The TCP/IP configuration 
varies according to whether or not a DHCP server is used on the wireless network. In this section, 
we describe the configuration for computers using the following operating systems: Windows 2000 
and Windows XP. 

PC running Windows 2000 

Dynamic IP address 

You have chosen to configure the Bewan Wi-Fi USB 54 in order to connect to an Access Point or a 
Wireless router using a DHCP server. The latter dynamically assigns IP addresses to computers on 
the wireless network. Proceed as follows: 

1.


Click on 

Start

, then point to 

Settings

, and then click on 

Control Panel

. Then double-click on 

the 

Network and Dial-up Connections

 icon. 

2.


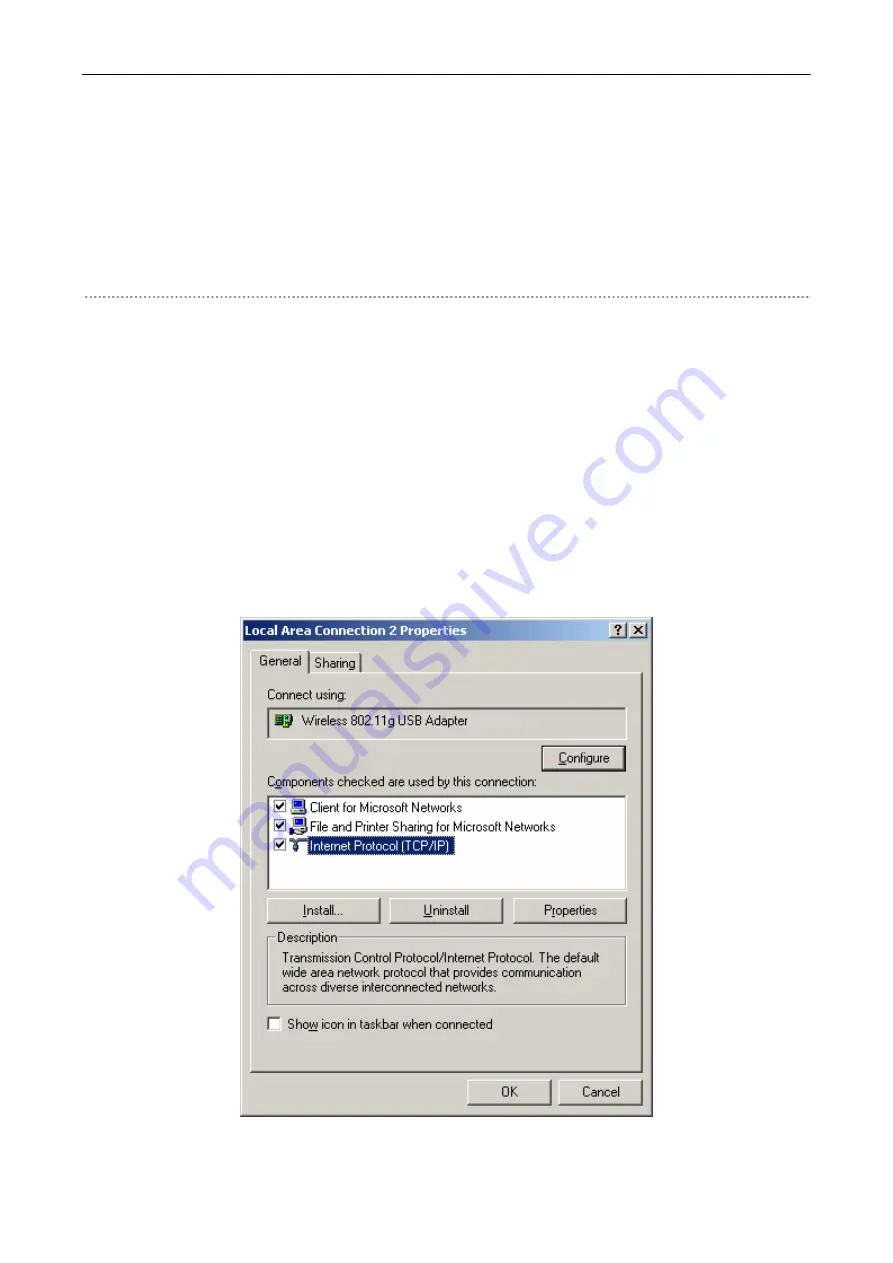
With the right mouse button, click on 

Local Area Connection 2

 and select 

Properties

 in the 

menu. 

3.


Select the element 

Internet Protocol (TCP/IP)

, then click on 

Properties


Summary of Contents for Wi-Fi USB 54

Page 1: ......

Page 2: ...erved December 2006 edition Registered trademarks and copyright Bewan and the Bewan logo are the registered trademarks of Bewan systems Microsoft and Windows are registered trademarks of Microsoft Cor...

Page 3: ...tructure mode 15 Ad Hoc mode 18 Configuring encryption 21 WEP encryption 21 WPA encryption 24 Configuration of the computers 26 PC running Windows 2000 26 Dynamic IP address 26 Fixed IP address 27 Gat...

Page 4: ...are designed to be as simple as possible so that they can be used not only by professionals but also by individual home users Before proceeding with the installation of your product we recommend that...

Page 5: ...h as anti virus products Close all open applications Installation under Windows is relatively simple With Windows 2000 1 Turn on your computer 2 Place the Bewan Wi Fi CD ROM in the drive If the PC con...

Page 6: ...Bewan Wi Fi USB 54 6 6 Read the licence agreement carefully then click on Yes 7 Click on Next to install the adapter s software programs in the default folder...

Page 7: ...8 The files are then copied 9 The following window appears Click on Yes 10 A window will inform you that the driver and the configuration utility have been installed correctly Close the Assistant win...

Page 8: ...ready for use An icon appears in the task bar You can now configure your adapter Refer to the chapter Configuring the Bewan Wi Fi USB 54 on page 14 First to connect your Bewan Wi Fi USB 54 adapter to...

Page 9: ...ion program will be launched automatically If this program does not launch automatically run the program autorun exe located in the CD ROM root 3 Select your product 4 Select your language then click...

Page 10: ...Bewan Wi Fi USB 54 10 7 Click on Next to install the adapter s software programs in the default folder 8 The files are then copied 9 The following window appears Click on Continue Anyway...

Page 11: ...ly Close the Assistant window Click on Finish 11 Once the files have been copied connect the USB adapter to one of your PC s USB ports directly or using the USB extension 12 Windows indicates that it...

Page 12: ...Bewan Wi Fi USB 54 12 13 The installation proceeds 14 The following screen appears Click on Continue Anyway...

Page 13: ...n appears in the task bar You can now configure your adapter Refer to the chapter Configuring the Bewan Wi Fi USB 54 on page 14 First to connect your Bewan Wi Fi USB 54 adapter to a wireless network c...

Page 14: ...nection to the Wireless network established Configuration procedure The configuration procedure for the client workstation is relatively simple 1 Initial search for an Access Point Infrastructure mode...

Page 15: ...erves as the bridge between the wired network and the wireless client workstations Thanks to a much broader operating perimeter the Access Point will allow you to extend the range of communications an...

Page 16: ...ected and made available Note click on the Refresh button to update the information displayed 2 According to the Network Name click on the identification value for the Access Point to which you wish t...

Page 17: ...ess Point in question click on the Link Information tab The following screen appears 5 Click on the More button The window will display the current connection parameters network name operating mode ch...

Page 18: ...r This operating mode is more suited to short distances and for when the users are not moving around during the transmission Required configuration When two machines are in the same perimeter they mus...

Page 19: ...dentification value for the network to which you wish to connect Note you must respect case capitals lower case 4 In the Network Type section select the Peer to Peer operating mode synonym of Ad Hoc 5...

Page 20: ...elect Disable in order to allocate a fixed IP address to your Wireless station 10 In the IP Address and Subnet Mask sections enter the IP address you wish to attribute to your adapter and the correspo...

Page 21: ...WEP you should proceed as follows 1 In the Authentication Mode section select the configuration options in order to verify the identity and access privileges of mobile network cards This consists of v...

Page 22: ...method Alphanumeric Hexadecimal or Passphrase format If you select Alphanumeric mode you should use characters between a z A Z and 0 9 If you select Hexadecimal mode you should use characters between...

Page 23: ...ter to be able to dialogue with a client station Ad Hoc mode or an Access Point Infrastructure mode the adapter and the remote equipment must use the same encryption key It is important to note the re...

Page 24: ...replace the current WEP Wired Equivalent Privacy for Wi Fi links using static keys which must be changed manually WPA uses different data encryption protocols or algorithms TKIP Temporal Key Integrit...

Page 25: ...on Next When your profile has been fully created the encryption is acknowledged The padlock symbol appears next to your profile name Note you must use the same algorithm TKIP or AES as that used for t...

Page 26: ...systems Windows 2000 and Windows XP PC running Windows 2000 Dynamic IP address You have chosen to configure the Bewan Wi Fi USB 54 in order to connect to an Access Point or a Wireless router using a D...

Page 27: ...nnection 2 and select Properties in the menu 3 Select the element Internet Protocol TCP IP then click on Properties 4 Select Use the following IP address 5 In the IP address field enter the IP address...

Page 28: ...Wi Fi USB 54 28 In case of uncertainty regarding these points check with a network specialist 6 In the Subnet mask field enter the corresponding subnet mask value 7 Click on OK to validate the modific...

Page 29: ...llows 1 Click on the button Advanced 2 In the area Default gateways click on Add 3 In the Gateway field indicate the router s IP address then click on Add 4 Then click on OK in each of the windows and...

Page 30: ...essories then click on Command prompt 2 In the Command prompt window enter ping followed by the IP address of the remote Wireless device Access Point wireless router or other computer fitted with a Wi...

Page 31: ...IP addresses to computers on the wireless network Proceed as follows 1 Click on start then on Control Panel 2 Click on Network and Internet Connections then on Network Connections 3 With the right mo...

Page 32: ...TCP IP then click on Properties 5 Select Use the following IP address 6 In the IP address field enter the IP address that you have decided to assign to the PC Important The PC s IP address must impera...

Page 33: ...Bewan Wi Fi USB 54 33 7 In the Subnet mask field enter the corresponding subnet mask value 8 Click on OK to validate the modifications...

Page 34: ...mode fixed or dynamic You can also enter the address of the DNS server If you have a dynamic IP address proceed as follows 1 Click on the button Advanced 2 In the area Default gateways click on Add 3...

Page 35: ...ue with remote Wireless devices using the TCP IP protocol Proceed as follows 1 Click on start All Programs point to Accessories then click on Command prompt 2 In the Command prompt window enter ping f...

Page 36: ...USB 54 With Windows 2000 To uninstall the adapter s driver and utility proceed as follows 1 With the right mouse button click on the hardware removal icon then click on Unplug or eject hardware 2 The...

Page 37: ...n the Add Remove Programs icon 7 In the menu on the left select Change or Remove Programs 8 Select Wireless 802 11g USB Adapter then click on Change Remove 9 The following window opens Click on Next 1...

Page 38: ...dows XP To uninstall the adapter s driver and utility proceed as follows 1 With the right mouse button click on the hardware removal icon and click on Safely Remove Hardware 2 The following window ope...

Page 39: ...rams 7 In the menu on the left select Change or Remove Programs 8 Select Wireless 802 11g USB Adapter then click on Change Remove 9 The following window opens Click on Next 10 The removal procedure ta...

Page 40: ...on low voltages the protection of the health and safety of the user The product guarantees the efficient usage of the spectrum assigned to radio equipment in order to avoid damaging interference The...

Reviews: