background image

18 


CLEANING AND MAINTENANCE  

Daily 

Remove water drops with a soft lint free 

cloth to avoid limescale build-up. 

Weekly 

Clean all surfaces and corners. Clean 

the spray nozzle is necessary (see 

Nozzle cleaning) 

Monthly 

Clean the ceramic with low acidic 

cleaning agents. 

Every 6 months 

Replace the filter if required. (see 

replacing the filter) 

NOTE: 

Do not use strong abrasive cleaning agents or materials, as this can damage 

the product and will invalidate your guarantee.


TANK SELF-CLEAN 

If the product is not used for more than 72 hours, the next time it is used, and the 
wash function is activated, the unit will carry out a self-clean for approximately 3 
minutes. All functions will be de-activated during this time. 

CLEANING THE NOZZLE 


It is recommended that regular cleaning of the nozzle takes place to prevent 
blockages.  

To manually clean the nozzle, follow the below:  

Keep pressing the "stop "and "front wash" buttons on the device for a few seconds, 
then the nozzle will come out with cleaning water. It will return back after 5 minutes 
or when the stop button is pressed.


Summary of Contents for BeBa 27403

Page 1: ...INTELLIGENT TOILET SEAT BeBa_27403 REMOTE CONTROL IPX4 INGRESS PROTECTION REAR AND FRONT WASH...

Page 2: ...PRODUCT OVERVIEW 8 BEFORE INSTALLATION 8 INSTALLATION 9 REMOTE CONTROL 12 OPERATION 14 CLEANING AND MAINTENANCE 18 RESETTING THE THERMOSTAT 19 DESCALING 20 REPLACING THE FILTER 21 DRAINING THE WATER T...

Page 3: ...location where it may be subject to high temperatures The toilet must be stored in an upright position before installation Do not over bend or kink the water supply hose as this could cause leaks Only...

Page 4: ...nected before seeking assistance This product is IPX4 rated and so no part of the installation is allowed to be within bathroom Zones 0 or 1 Installation is permitted within Zone 2 and outside of the...

Page 5: ...5 INSTALLATION DIAGRAMS SEAT...

Page 6: ...6 INSTALLATION DIAGRAMS TOILET...

Page 7: ...oupler PARTS LIST TOOLS REQUIRED Seat Fixing Plate Water Hose T Valve Connector Expansion Screws Remote Batteries Not Included Remote Control Holder Adjustment Sheet Installation template Phillips scr...

Page 8: ...8 BEFORE INSTALLATION IMPORTANT Before commencing installation the water and electrical supplies should be turned OFF PRODUCT OVERVIEW Front Wash Front Wash...

Page 9: ...tion template onto the toilet bowl Insert the fixing plate onto the back of the toilet using the installation template as a guide Screw in the provided screws to fix the fixing plate onto the toilet b...

Page 10: ...the screws are tightened and the wire ends are fully secured Carry out the same process for the cable attached to the toilet then connect the coupler sections together Place your new intelligent seat...

Page 11: ...shown Insert the water outlet onto the T connector and now secure all fittings ensuring that the water pipe filter and water inlet are securely fastened Before replacing the seat turn on the water sup...

Page 12: ...ing the installation From the rear of the holder peel off the adhesive strip cover Place the holder with the adhesive side to the wall ensuring this is level press to the wall firmly and hold for a co...

Page 13: ...disposed of safely If the appliance is not to be used for a long period batteries should be removed When the light flashes continuously the batteries need to be replaced Rear Wash Stop Decrease Flow R...

Page 14: ...and operational your toilet is ready for use Lift up the toilet seat lid locate yourself so that the sensor detects a user Press the wash button when you do this the toilet will carry out initially an...

Page 15: ...te The massage mode can only be adjusted using the remote control WATER FLOW Change between LOW MEDIUM or HIGH To adjust the water flow press the or water flow buttons on the remote The indicator will...

Page 16: ...for more than 6 seconds it will go into power standby mode Press again the button for more than 6 seconds to restart it NIGHT LIGHT The night light defaults to always on Keep pressing the or temperatu...

Page 17: ...ash Release the STOP button but continue to press the temperature button Press the or flow rate button then releases the temperature button the fifth indicator will flash Press or flow rate buttons to...

Page 18: ...will invalidate your guarantee TANK SELF CLEAN If the product is not used for more than 72 hours the next time it is used and the wash function is activated the unit will carry out a self clean for a...

Page 19: ...TTING THE THERMOSTAT If the device is stored in a high temperature environment such as room temperature exceeds 45 degrees Celsius it is necessary to do as follows Otherwise the washing water may not...

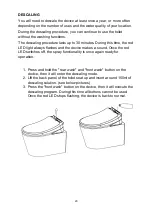
Page 20: ...ways flashes and the device makes a sound Once the red LED switches off the spray functionality is once again ready for operation 1 Press and hold the rear wash and front wash button on the device the...

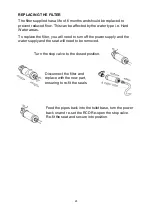
Page 21: ...the filter you will need to turn off the power supply and the water supply and the seat will need to be removed Turn the stop valve to the closed position Disconnect the filter and replace with the n...

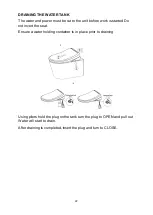
Page 22: ...before work is started Do not invert the seat Ensure a water holding container is in place prior to draining Using pliers hold the plug on the tank turn the plug to OPEN and pull out Water will start...

Page 23: ...23 REMOVING AND RE INSTALLING THE SEAT AND COVER NOTE The removal and reinstallation of the seat is the same as the cover REMOVE RE INSTALL...

Page 24: ...It has a service life of approx half a year The nozzle may be blocked Please replace the nozzle Low water temperature The water temperature may be set at low grades Please set the water temperature at...

Page 25: ...ol dial 3 The night light may be set to Always On mode Please adjust the night light mode as per Light Setting of operating instructions If you should encounter an issue with operation function of you...

Page 26: ...Toilet Seat The object of the declaration described above is in conformity with the relevant statutory requirements applicable to the specific product The Restriction of the Use of Certain Hazardous S...

Page 27: ...s Object of Declaration BeBa_27403 Intelligent Toilet Seat The object of the declaration described above is in conformity with the relevant Union harmonisation legislation RoHS Directive 2011 65 EU Ra...

Page 28: ...nector G 1 2 G 3 8 Rated Voltage AC220 240V 50 60HZ Power 1100W Length of Power Cord 1 8m Water Supply Pressure 0 07 0 75MPa 0 7 7 5Bar Water Supply Temperature 4 35 C Ambient Temperature 4 40 C Prote...

Reviews: